目录
- POM
- Maven
- 命令行运行
- 前端乱码问题
- 函数式接口
- 方法引用
- 四种引用
- Matcher
- 日期和时间
- 泛型
- 集合
- Optional
- 并发编程
- 流式数据
- Netty
- Http
- 类加载器
- 日志框架
- Session
- Zookeeper
- IO 对象
- 排序
- JSON
- HTTP-流式响应
- ByteBuddy
- Jackson
- 国产Web中间件
POM
- socpe 范围
- compile(默认值): 这个范围表示依赖项会在编译、测试、运行等所有阶段有效。依赖会被包含在最终的可交付成果(如 JAR 文件)中。
- provided: 这个范围表示依赖项在编译阶段有效,但在打包阶段不会被打包进最终的可交付成果。通常用于那些在开发环境中存在(例如JDK或者Servlet API),但是在运行时由应用服务器提供的类库。
- 像 lombok 依赖,只在编译期间生成对应的
getter/setter而在运行期间是不需要的,或者像在中间件中运行的项目,某些 servlet 相关的依赖,中间件也会提供,但是编译期间是需要的,也是 provided
- 像 lombok 依赖,只在编译期间生成对应的
- runtime: 这个范围表示依赖项在测试和运行阶段有效,但在编译阶段无效。通常用于那些在运行时才需要的库,比如 JDBC 驱动。
- 像 jdbc 驱动程序,例如 mysql 驱动类,在实际项目中并不需要直接
import相关的类,因此编译阶段也就不需要这个 jar 包,但是在运行阶段,jdbc 的具体实现一般是通过配置文件提供的,运行时通过反射(Class.forName("com.mysql"))获得具体的实现相关的类,因此运行时必须存在这个 jar 包。
- 像 jdbc 驱动程序,例如 mysql 驱动类,在实际项目中并不需要直接
- test: 这个范围表示依赖项仅在测试阶段有效。用于那些仅在单元测试中使用的库,它们不会被打包到最终的产品中。
- system: 这个的作用是使用本地文件系统中的一个 jar 包作为依赖,比如与第三方厂商对接,对方只提供 jar 包,并没有发布到 maven 中央仓库,可以使用这种方式。但这种方式并不推荐,因为它使得构建过程变得依赖于特定机器上的文件,如果其他机器中的指定路径没有这个依赖 jar 包,就会导入失败。推荐将依赖 jar 包安装到本地仓库,当成普通依赖导入:
# widndows 系统安装 jar 包,使用双引号包裹 -Dxxx,否则解析失败
mvn install:install-file "-Dfile=D:/lib/demo-1.0.jar" "-DgroupId=com.demo" "-DartifactId=demo-sdk" "-Dversion=1.0" "-Dpackaging=jar"

# linux 系统安装 jar 包
mvn install:install-file \
-Dfile=/opt/lib/demo-1.0.jar \
-DgroupId=com.demo \
-DartifactId=demo-sdk \
-Dversion=1.0 \
-Dpackaging=jar

# 安装源码
mvn install:install-file -Dfile=xxx.jar -Dsources=xxx-sources.jar -DgroupId=xxx -DartifactId=xxx -Dversion=1.0 -Dpackaging=jar
- import: 从 Maven 2.0.7 开始引入,只能用在
<dependencyManagement>的上下文中。它用来导入另一个 POM 中的<dependencyManagement>部分,以简化管理多个模块间的依赖关系。 <optional>true</optional>:标记一个依赖为“可选”,即:当前项目依赖它,当前项目编译和运行仍然会包含该依赖。但使用当前项目的其他项目不需要强制继承这个依赖。除非在自己的 pom.xml 中显式声明相同的依赖。
important
-
基本原则:
- 显式 import 的类,必须用 compile,默认是 compile
- 仅运行时通过反射/配置加载的类,用 runtime,像 jdbc 驱动,日志实现依赖
- 编译期需要但运行时环境提供的,用 provided,像 lombok
-
特殊情况:
- 注解处理器、字节码增强工具等,即使没有 import 也可能需要编译期依赖。
-
验证方法:
- 结合编译器报错、
mvn dependency:analyze和 IDE 工具综合判断。
- 结合编译器报错、
-
如果你的目标是构建一个通用的 Starter 组件,推荐做法是:
- 将非核心依赖(如 spring-boot-autoconfigure)设为 optional
- 将运行环境提供的依赖(如数据库驱动、Servlet API)设为 provided
- 保留核心依赖(如 jsqlparser、mybatis、caffeine)为默认 scope(compile)
- 这样既能保证你的组件正常运行,也能避免与用户的项目产生冲突。
- project 标签指定项目的声明。modelVersion 标签指定POM模型的版本。目前使用的是4.0.0版本。这是Maven项目的根元素,定义了项目模型的版本。
- parent 标签指定父项目信息,这里继承了spring-boot-starter-parent的pom。
- build 标签指定项目的构建配置。它包含了多个子元素,如
<plugins>、<resources> 和<finalName>等等。
resources
<resources>用来配置“哪些非 Java 文件应该被包含在最终的构建产物中”(如 JAR、WAR)- 对于SPringMVC的项目可实现灵活切换配置环境
<profiles>
    <!-- 公共变量 -->
    <profile>
        <id>dev</id>
        <properties>
            <env>dev</env>
            <db.host>localhost</db.host>
            <redis.port>6379</redis.port>
        </properties>
        <activation><activeByDefault>true</activeByDefault></activation>
    </profile>
    <profile>
        <id>prod</id>
        <properties>
            <env>prod</env>
            <db.host>prod-db.company.com</db.host>
            <redis.port>6380</redis.port>
        </properties>
    </profile>
</profiles>

<build>
    <resources>
        <!-- 优先加载环境专用资源 -->
        <resource>
            <directory>src/main/resources-${env}</directory>
            <!-- 只对需要变量替换的配置进行过滤,其余不要过滤。会导致文件无法打开 -->
            <filtering>true</filtering>
        </resource>
        <!-- 再加载通用资源 -->
        <resource>
            <directory>src/main/resources</directory>
            <filtering>false</filtering>
        </resource>
    </resources>
</build>
- 项目结构
src/main/
 ├── resources-dev/
 │   ├── application.properties     # dev 专用配置
 │   └── logback-spring.xml         # dev 日志
 ├── resources-prod/
 │   ├── application.properties     # prod 专用配置(可不提交 Git)
 │   └── logback-spring.xml         # prod 日志
 └── resources/
     ├── jdbc-template.properties   # 使用 ${db.host} 的模板
     └── common-config.xml          # 通用配置
- jdbc-template.properties 示例:
jdbc.url=jdbc:mysql://${db.host}:3306/mydb
jdbc.username=root
jdbc.password=123456
plugins
-
<plugins>元素用于配置构建过程中使用的各种插件,它可以包含一个或多个<plugin>标签。<plugin>元素是在构建生命周期的不同阶段执行的工具,它们可以执行各种任务,例如编译代码、运行测试、打包项目、生成报告等。 -
<plugin>插件子元素:- groupId: 指定插件的 groupId,标识插件的组织或提供者。
- artifactId: 指定插件的 artifactId,标识插件的具体名称。
- version: 指定插件的版本号。
- extensions: 可选子元素。指示插件是否为 Maven 的核心扩展插件。默认值为 false。这意味着 Maven 将插件作为标准插件处理,它们遵循标准的插件生命周期和行为。如果将 extensions 属性显式设置为 true,则表示插件是 Maven 的核心扩展插件。这意味着插件可以在 Maven 构建中扩展或修改 Maven 的核心行为,通常用于提供额外的功能或集成。
-
executions: 描述插件执行的阶段和配置。<executions>: 这个标签用于定义一个或多个插件的执行配置。<execution>: 每个<execution>标签定义一个执行单元。可以在不同的构建阶段执行多个目标。<phase>package</phase>:指定了 Maven 生命周期的 package 阶段。在 Maven 的标准构建生命周期中,package 阶段用于将编译后的代码打包成可分发格式(如JAR文件)。<goal>jar</goal>:指示 Maven 在 package 阶段创建一个 JAR 文件。这个目标是由 Maven 的 maven-jar-plugin 插件提供的。<goal>jfxnative</goal>: 指示 Maven 在 package 阶段创建一个本地可执行文件(如EXE文件)。这个目标是由 javafx-maven-plugin 插件提供的。jfxnative 目标会使用javapackager 或 jpackage 来生成本地可执行文件。
-
configuration: 用于配置插件在执行过程中的具体行为和参数,以定制插件的功能和行为。 configuration 的两大作用:- 传递参数: 插件可能需要某些参数来正确执行其功能。这些参数可以通过 configuration 元素传递给插件。
<source>和<target>: 传递给编译插件的 Java 版本信息。
- 定制插件行为: 不同的插件支持不同的配置参数。通过 configuration 属性,你可以定制插件的行为以适应项目的特定需求。
outputDirectory标签指定插件输出的目录。verbose标签控制是否输出详细信息。includeSystemScope标签用于指定是否包括系统范围的依赖项(system scope dependencies)。系统范围的依赖项是那些指定了本地文件路径的依赖项,这些依赖项通常是一些特殊的、不可通过Maven仓库获取的库。
- 复杂类型参数: 如对象或嵌套配置,用于传递更复杂的配置信息。
compilerArguments标签指定传递给编译器插件的编译参数。<compilerArguments><arg>-Xlint:unchecked</arg></compilerArguments>encoding标签指定源文件编码格式。<encoding>UTF-8</encoding>
- 集合类型参数: 用于传递列表或数组等复杂的数据结构。
includes标签指定哪些测试类被包括在测试中。excludes标签指定哪些测试类被排除在测试外。skipTests标签用于跳过测试执行。
- 传递参数: 插件可能需要某些参数来正确执行其功能。这些参数可以通过 configuration 元素传递给插件。
-
<configuration>可以放在两个位置:- 插件级别(plugin-level):全局默认配置。对所有 execution 生效。执行阶段和直接执行插件目标都会使用配置的参数,只对“参数名匹配”的目标生效
- execution 级别(execution-level):仅对该 execution 生效,执行具体阶段时,会调用配置的插件目标,并使用配置的参数,命令直接执行目标时,不会使用配置的参数
<plugin>
    <groupId>org.apache.maven.plugins</groupId>
    <artifactId>maven-dependency-plugin</artifactId>
    <version>3.6.1</version>
    <!-- 插件级别 -->
    <configuration>
        <useRepositoryLayout>true</useRepositoryLayout>        <!-- 只有 copy-dependencies 等少数目标支持 -->
        <outputDirectory>${project.build.directory}/lib</outputDirectory> <!-- 同上 -->
        <outputFile>${project.build.directory}/tree.txt</outputFile>      <!-- tree 目标支持 -->
    </configuration>
    <executions>
        <execution>
            <id>id</id>
            <phase>package</phase>
            <goals>
                <goal>tree</goal>
            </goals>
            <!-- execution 级别: 执行 mvn package 时,会执行 tree,目标,并使用这里配置的参数 -->
            <configuration>
                <outputFile>${project.build.directory}/tree-g.txt</outputFile> <!-- 覆盖全局 -->
            </configuration>
        </execution>
    </executions>
</plugin>
note
- 有些插件没有
<executions>,它是怎么执行的? - Maven 有“默认绑定”(Default Binding)机制,即使没有在 pom.xml 中写
<executions>,Maven 也会根据 项目打包类型(packaging) 自动绑定插件目标到生命周期阶段。 <configuration>中配置的就是插件阶段中的参数
回到目录
Maven
生命周期
- 清理:删除以前的编译结果,为重新编译做好准备。
- 编译:将 Java 源程序编译为字节码文件。
- 测试:针对项目中的关键点进行测试,确保项目在迭代开发过程中关键点的正确性,在每次测试后以标准格式记录和展示测试结果。
- 打包:将一个包含诸多文件的工程封装为一个压缩文件用于安装或部署。Java 工程对应 jar 包,Web 工程对应 war 包。
- 安装:在 Maven 环境下特指将打包的结果(jar 包或 war 包)安装到本地仓库中。
- 发布:将打包的结果部署到远程仓库或将 war 包部署到服务器上运行。
阶段和插件的关系
-
阶段(Phase)是 Maven 生命周期中的一个步骤,比如 compile、test、package、install 等。Maven 定义了三套标准生命周期:
- default(主构建生命周期):处理项目构建、打包、部署等(最常用)
- clean:清理项目(如删除 target/ 目录)
- site:生成项目文档站点
-
不能直接“运行”一个插件目标而不经过阶段(除非显式调用),但可以运行一个阶段,Maven 会自动执行该阶段及之前所有阶段绑定的插件目标。
-
📌 例如:
mvn package会依次执行 validate → compile → test → package 等阶段。 -
插件(Plugin)是 实际执行具体任务的 Java 程序,比如编译代码、运行测试、打包 JAR。插件通过绑定到生命周期阶段 来参与构建。每个插件包含若干目标(Goal),例如:
- maven-compiler-plugin 有 compile 目标
- maven-surefire-plugin 有 test 目标
- maven-jar-plugin 有 jar 目标
-
Maven 的核心机制是:将插件的 Goal 绑定到生命周期的 Phase 上。
-
在 Maven 插件开发中,每个 Mojo(Maven plain Old Java Object,即插件目标的实现类)会用 @Parameter 注解声明参数
(name = "run") // 插件目标名
public class AntrunMojo extends AbstractMojo {
private Target target; // ← 这个参数名就是 <target>
public void execute() { ... }
}
Maven 插件
- Maven 的核心仅仅定义了抽象的生命周期,具体的任务都是交由插件完成的。每个插件都能实现多个功能,每个功能就是一个插件目标。Maven 的生命周期与插件目标相互绑定,以完成某个具体的构建任务。
- maven-compiler-plugin 插件描述:设置 maven 编译的 jdk 版本,maven3 默认用 jdk1.5,maven2 默认用 jdk1.3,除了配置 maven 安装目录/config/settings.xml 文件,也可以使用 maven-compiler-plugin 进行指定
<build>
  <plugins>
    <!-- 依赖插件 -->
    <plugin>
      <groupId>org.apache.maven.plugins</groupId>
      <artifactId>maven-compiler-plugin</artifactId>
      <version>3.2</version>
      <configuration>
        <source>1.8</source>
        <target>1.8</target>
        <encoding>UTF-8</encoding>
      </configuration>
    </plugin>
  </plugins>
</build>
Mavn 依赖
- maven 根据 GAV 构建字符串去找依赖:
仓库地址/{groupId}/{artifactId}/{version}/{artifactId}-{version}.jar,注意:groupId 需要把所包含的所有点替换成斜杠。
 <!-- 用来排除不想要的依赖包 -->
<exclusions>
  <exclusion>
    <groupId>commons-logging</groupId>
    <artifactId>commons-logging</artifactId>
  </exclusion>
</exclusions>
- 依赖的原则
- 原则一:路径最短者优先
- 原则二:验证路径相同时,先声明者优先
- 依赖的继承:为了在父项目中统一管理依赖的版本
- 将 Parent 项目中的 dependencies 标签,用 dependencyManagement 标签括起来。
<dependencyManagement>
  <dependencies>
    <dependency>
      <groupId>junit</groupId>
      <artifactId>junit</artifactId>
      <version>4.9</version>
      <scope>test</scope>
    </dependency>
  </dependencies>
</dependencyManagement>
- 在子项目中重新指定需要的依赖,删除范围和版本号。
<dependencies>
  <dependency>
    <groupId>junit</groupId>
    <artifactId>junit</artifactId>
  </dependency>
</dependencies>
mvn命令
- Maven 命令有两种主要形式:
- 调用生命周期阶段(最常见)
mvn [phase]示例:mvn compile, mvn test, mvn package, mvn installMaven 会自动执行该阶段及之前的所有阶段 每个阶段会触发绑定的插件目标 - 调用插件目标
- 完整形式:
mvn [groupId]:[artifactId]:[version]:[goal] - 简写形式(常用):
mvn [plugin-prefix]:[goal]
- 调用生命周期阶段(最常见)
mvn compiler:compile → 等价于 mvn compile
mvn surefire:test → 等价于 mvn test
mvn spring-boot:repackage
mvn versions:use-latest-versions
- 💡 插件前缀(plugin prefix)是 Maven 通过
META-INF/maven/plugin.xml自动生成的,比如:
maven-compiler-plugin → compiler
maven-surefire-plugin → surefire
spring-boot-maven-plugin → spring-boot
- mvn 命令一般格式
mvn [选项] [生命周期阶段] [插件目标] [-D参数] [-P配置文件]
| 部分 | 说明 | 示例 |
|---|---|---|
| mvn | Maven 的命令入口 | |
| [选项] | 控制 Maven 运行方式的全局选项 | -X, -e, -q |
| [生命周期阶段] | Maven 内置的构建阶段(如 clean, compile, package) | mvn clean package |
| [插件目标] | 指定插件的具体目标(格式:插件前缀:目标 或 groupId:artifactId:version:目标) | mvn exec:java |
| -D参数 | 动态传递系统属性或覆盖 POM 属性(键值对) | -DskipTests=true |
| -P配置文件 | 激活指定的 Profile(逗号分隔) | -Pprod,dev |
- 常用选项(
[选项]) -e --errors显示详细错误信息-X --debug启用调试模式(输出完整日志)-q --quiet静默模式(仅显示错误)- 插件目标格式
- 简写(需提前在 settings.xml 中配置前缀):
mvn 插件前缀:目标,完整格式mvn org.codehaus.mojo:exec-maven-plugin:3.1.0:exec
- 简写(需提前在 settings.xml 中配置前缀):
- 只有当插件目标(Goal)有默认绑定阶段时,才能省略
<phase>。
important
- 帮助命令
mvn help:help - 查看插件 compiler 基础信息
mvn compiler:help,查看所有的目标 - 查看插件 exec 的 java 目标的参数信息:
mvn exec:help -Ddetail=true -Dgoal=java - 查看插件的详细信息:
mvn help:describe "-Dplugin=org.springframework.boot:spring-boot-maven-plugin" -Ddetail - 查看插件指定目标的详细信息:
mvn help:describe "-Dplugin=org.springframework.boot:spring-boot-maven-plugin" -Dgoal=repackage -Ddetail
mvn -v查看版本mvn clean清理项目mvn compile编译主程序mvn test-compile编译测试程序- 执行主程序
首先需要编译 Java工程:
mvn compile
不存在参数的情况下运行:mvn exec:java -Dexec.mainClass="主程序入口类,不需要拓展名"
在存在参数的情况下运行:mvn exec:java -Dexec.mainClass="主程序入口类,不需要拓展名" -Dexec.args="arg0 arg1 arg2" mvn test执行测试mvn package打包mvn package '-Dmaven.test.skip=true'跳过测试打包mvn install安装项目(安装就是将打包的上传至仓库)mvn install '-Dmaven.test.skip=true'跳过测试安装mvn deploy部署mvn deploy '-Dmaven.test.skip=true'跳过测试部署mvn site生成站点mvn dependency:tree打印出所有的依赖列表mvn dependency:sources下载源码mvn dependency:tree -o-o 表示离线模式-U强制更新标志:忽略本地缓存,强制检查远程仓库-Dmaven.test.skip=true该参数用于跳过单元测试:mvn -Dmaven.test.skip=true clean package-Dmaven.compile.fork=true这个参数强制 Maven 为每个模块的编译过程创建一个新的 JVM 进程,有助于避免内存限制问题,尤其是在多模块并行编译时:mvn -Dmaven.compile.fork=true clean packagemvn dependency:purge-local-repository清理当前项目的所有依赖并重新下载mvn dependency:resolve打印出已解决依赖的列表,解析和显示项目的依赖关系,常用参数:-DincludeScope包含的作用域-DincludeScope=compile-DexcludeScope排除的作用域-DexcludeScope=test-DincludeTypes包含的类型-DincludeTypes=jar-DoutputFile输出到文件-DoutputFile=dependencies.txt
mvn dependency:get下载指定依赖, 常用参数:-Dartifact=groupId:artifactId:version[:packaging[:classifier]]完整坐标,maven坐标的完整形式:groupId:artifactId:version[:packaging[:classifier]]- packaging:
- jar: Java库文件, .jar
- pom: Maven项目文件, .pom
- war: Web应用包, .war
- ear: 企业应用包, .ear
- maven-plugin: Maven插件, .jar
- classifier
- sources: 源代码
- javadoc: API文档
- tests: 测试代码
- 平台相关: 如Linux/Windows特定版本,
native-library-1.0-linux-x64.so
- packaging:
-DremoteRepositories=https://maven.aliyun.com/repository/public指定仓库-DoutputDirectory=./lib指定输出路径
内网环境
- 设置离线模式:找到配置文件(全局模式) settings.xml:
<settings><offline>true</offline></settings>,在 idea 中设置maven离线模式(当前项目) - 使用
mvn dependency:go-offline命令在联网环境预下载所有依赖
根据 pom.xml 下载项目的所有依赖到指定目录
- 方式一:使用
copy-dependencies,只会下载运行时依赖,parent 类型的纯 pom 不会下载
# 复制jar和pom
mvn -f "/path/to/pom.xml" "dependency:copy-dependencies" "-DoutputDirectory=/path/to/repo" "-Dmdep.useRepositoryLayout=true" "-Dmdep.copyPom=true"

# 复制源码
mvn -f "/path/to/pom.xml" "dependency:copy-dependencies" "-DoutputDirectory=/path/to/repo" "-Dmdep.useRepositoryLayout=true" "-Dmdep.copyPom=true" "-Dclassifier=sources"

# powershell 删除 _remote.repositories 文件
Get-ChildItem -Path "/path/to/repo" -Filter "_remote.repositories" -Recurse | Remove-Item -Force
# linux
find /path/to/repo -name "_remote.repositories" -delete

# powershell 生成sha1
Get-ChildItem -Path ./repository -Recurse -Include *.jar,*.pom | ForEach-Object { (Get-FileHash -Path $_.FullName -Algorithm SHA1).Hash.ToLower() | Out-File -FilePath "$($_.FullName).sha1" -Encoding ASCII }

# linux
find /path/to/repo -name "*.jar" -o -name "*.pom" | while read -r file; do sha1sum "$file" | cut -d' ' -f1 > "${file}.sha1"; done
note
Windows环境使用 -Dxxx 时一定加上双引号,防止错误解析
- 方式二:构建离线仓库
- Maven 运行任何命令时,都可以通过
-Dmaven.repo.local指定本地仓库的位置 mvn dependency:go-offline -f "$PomFullPath" -Dmaven.repo.local="$RepoFullPath"指定一个空目录作为mvaen的本地仓库目录,maven就会自己根据pom.xml下载相关的依赖,包括 jar, parent pom, 插件等。- 直接打包
mvn -f pom.xml clean package "-Dmaven.test.skip=true" "-Dmaven.repo.local=lib"
Maven 变量信息
-
内置变量主要有两个常用内置属性:
${basedir}项目的根目录 (包含 pom.xml 文件的目录),${version}项目版本
-
用户可以使用该属性引用POM文件中对应元素的值,常用的POM属性包括:
${project.build.sourceEncoding}:源码编码方式${project.build.sourceDirectory}:项目的主源码目录,默认为src/main/java${project.build.testSourceDirectory}:项目的测试源码目录,默认为src/test/java${project.build.directory}:项目构件输出目录,默认为target/${project.outputDirectory}:项目主代码编译输出目录,默认为target/classes/${project.testOutputDirectory}:项目测试代码编译输出目录,默认为target/test-classes/${project.groupId}:项目的groupId${project.artifactId}:项目的artifactId${project.version}:项目的version,与${version}等价${project.build.fianlName}:项目打包输出文件的名称。默认为${project.artifactId}-${project.version}
-
获取环境变量属性,所有环境变量都可以使用以
env.开头的 Maven 属性引用${env.xxx}:获取系统环境变量;
-
获取Settings属性,用户使用
settings.开头的属性引用 settings.xml 文件中 XML 元素的值${settings.xxx}:获取 settings.xml 中对应元素的值;
-
使用 maven 将项目打为 jar 包,该 jar 包不包含依赖,其中有一个
MANIFEST.MF,其中记录着 jar 包运行的入口,依赖文件地址,使用的插件是org.apache.maven.plugins/maven-jar-plugin,典型配置如下:
<build>
  <plugins>
    <plugin>
      <groupId>org.apache.maven.plugins</groupId>
      <artifactId>maven-jar-plugin</artifactId>
      <configuration>
        <archive>
          <manifest>
            <!-- 在 MANIFEST.MF 中输出类路径 -->
            <addClasspath>true</addClasspath>
            <!-- 指明依赖的路径。注意,配置依赖的存放路径时,要以生成的 Jar 文件的最终存放目录(app 目录)为参照点,以相对路径的方式指定依赖的存放目录-->
            <classpathPrefix>lib/</classpathPrefix>
            <!-- 在 MANIFEST.MF 中指定主类,作为系统入口 -->
            <mainClass>com.example.MyApplication</mainClass>
          </manifest>
        </archive>
        <finalName>SpringBootDemo</finalName>
      </configuration>
    </plugin>
    <plugin>
      <!-- 复制依赖的插件,否则要手动将依赖放置合适位置 -->
      <groupId>org.apache.maven.plugins</groupId>
      <artifactId>maven-dependency-plugin</artifactId>
      <executions>
        <execution>
          <!-- 绑定生命周期 -->
          <phase>package</phase>
          <goals>
            <goal>copy-dependencies</goal>
          </goals>
          <!-- 设置依赖的存放路径 -->
          <configuration>
            <outputDirectory>${project.build.directory}/lib</outputDirectory>
          </configuration>
        </execution>
      </executions>
    </plugin>
  </plugins>
</build>
- 使用 Springboot 的打包插件
org.springframework.boot/spring-boot-maven-plugin,打成的 jar 包是在 maven 打的 jar 包基础上再进行打包,将相关依赖直接放入 jar 包中,所以 jar 包比较大。打包后附带生成的myproject-0.0.1-SNAPSHOT.jar.original就是原生 maven 打的 jar 包。典型配置如下:
<build>
    <plugins>
        <plugin>
            <groupId>org.springframework.boot</groupId>
            <artifactId>spring-boot-maven-plugin</artifactId>
            <configuration>
                <mainClass>${start.class}</mainClass>
                <layout>ZIP</layout>
                <finalName>SpringBootDemo</finalName>
            </configuration>
            <executions>
                <execution>
                    <goals>
                        <goal>repackage</goal>
                    </goals>
                </execution>
            </executions>
        </plugin>
    </plugins>
</build>
- 配置文件共享:在配置文件中使用
@environment@作为环境的占位符。使用mvn clean package -Pdev激活开发环境,-Pprod激活生产环境,activeByDefault指定默认的环境。在其他配置文件中通过spring.profiles.include=common,mysql-@environment@,redis-@environment@来引入公共的配置信息,也可以覆盖。
<profiles>
    <profile>
        <id>dev</id>
        <activation>
            <activeByDefault>true</activeByDefault>
        </activation>
        <properties>
            <environment>dev</environment>
        </properties>
    </profile>
    <profile>
        <id>prod</id>
        <properties>
            <environment>prod</environment>
        </properties>
    </profile>
</profiles>
回到目录
命令行运行
类的路径
- 代码里写的
./xxx、../xxx,相对的是 JVM 进程启动时的工作目录(user.dir),不是源码目录、不是target、不是类路径。 - 不同启动方式 user.dir 不一样
- IDEA 直接运行 main:默认是项目根目录(包含
pom.xml的那一层),项目结构:D:/demo-project/,./classes等价于D:/demo-project/classes/ java -jar /java xxx.class命令行启动:在哪个文件夹敲命令,user.dir就是哪个文件夹。例:cd D:/demo-project/bin,执行java App→./classes = D:/demo-project/bin/classes- Tomcat 容器运行:
user.dir是tomcat/bin目录,不是你的项目 target
- IDEA 直接运行 main:默认是项目根目录(包含
- 如果要加载
org.example.User,则实际的User.class必须在 org/example/User.class` 下 - 加载类的路径和
classpath无关,加载类就是把字节码文件读入为字节数组。普通的文件读取 - 输出依赖路径:
mvn "dependency:build-classpath" "-Dmdep.outputFile=cp.txt"
$cp = Get-Content cp.txt
java -Dfile.encoding=UTF-8 -cp "target\classes;$cp" com.example.MyMain
手动创建项目
- 构建如下目录:
ProtoCode/
├── src/
│   └── com/
│       └── zmy/
│           └── App.java
├── bin/ (编译后的class文件存放位置)
└── lib/ (依赖位置)
javac编译
- 一个完整的javac命令行应该是这样的,假设
abc.java在路径c:\src里面,在任何的目录的都可以执行以下命令来编译。javac -d "c:\out" -classpath "c:\classes;c:\jar\abc.jar;c:\zip\abc.zip" -sourcepath "c:\source\project1\src;c:\source\project2 \lib\src.jar;c:\source\project3\lib\src.zip" "c:\src\abc.java" - 表示编译需要
c:\classes下面的class文件,c:\jar\abc.jar里面的class文件,c:\zip\abc.zip里面的class文件 还需要c:\source\project1\src下面的源文件,c:\source\project2\lib\src.jar里面的源文件,c:\source\project3\lib\src.zip里面的源文件,将编译的文件输出到c:out目录
note
- -classpath,设定要搜索类的路径,可以是目录,jar文件,zip文件(里面都是class文件),会覆盖掉所有在CLASSPATH里面的设定。
- -sourcepath, 设定要搜索编译所需java文件的路径,可以是目录,jar文件,zip文件(里面都是java文件)。
java运行
- 假设
abc.class在路径c:\src里面,可以在任何路径下执行以下命令java -classpath "c:\classes;c:\jar\abc.jar;c:\zip\abc.zip;c:\src" abc
note
- -classpath,设定要搜索的类的路径,可以是目录,jar文件,zip文件(里面都是class文件),会覆盖掉所有的CLASSPATH的设定。
- 由于所要执行的类也是要搜索的类的一部分,所以一定要把这个类的路径也放到-classpath的设置里面。
- 在要执行的类的路径里面执行java时,一定要添加上点号(.)表示本目录也要搜索。
- 执行编译
javac -encoding UTF-8 -d bin src/com/zmy/*.java,-cp就是指定-classpath,-d指定编译后文件存放位置 - 运行
java -cp bin com.zmy.App 2 5,传递参数2 5对应的args[0], args[1] - 如果有依赖项,将所有的依赖放入
lib目录,lib中的依赖要包括所有用到的依赖,包括传递依赖,在 IDEA 中的 Maven 中的 Dependencies,可通过mvn dependency:copy-dependencies "-DoutputDirectory=/path/lib" "-DincludeScope=runtime" "-DstripVersion=true"将所有的依赖复制到指定目录,使用<includeScope>runtime</includeScope>会包含编译和运行所需的依赖,但排除provided和test范围的依赖,或者使用依赖管理插件,在运行mvn package阶段执行目标copy-dependencies
<plugin>
  <groupId>org.apache.maven.plugins</groupId>
  <artifactId>maven-dependency-plugin</artifactId>
  <version>3.6.0</version>
  <executions>
    <execution>
      <id>copy-dependencies</id>
      <phase>package</phase>
      <goals>
        <goal>copy-dependencies</goal>
      </goals>
      <configuration>
        <outputDirectory>${project.build.directory}/lib</outputDirectory>
        <includeScope>runtime</includeScope>  <!-- 可选:compile|runtime|test -->
        <excludeTransitive>false</excludeTransitive>
        <stripVersion>true</stripVersion>    <!-- 移除版本号 -->
      </configuration>
    </execution>
  </executions>
</plugin>
- 执行编译
javac -cp lib/* -d bin src/com/zmy/*.java - 运行
java -cp "bin;lib\*" com.zmy.App不仅指定编译后的源码,还有依赖的位置 - 如果当前路径为 src,类 App.class 的包为
com.zmy.pkg,那么运行时java -cp . com.zmy.pkg.App表示在当前路径下的com/zmy/pgk/目录找到 App.class,java 中写了包路径,运行时必须使用全限定名的形式
important
- java 运行 class 文件是从 classpath 路径去寻找 class 文件,如果 class 文件中有包名,则会按照 package 指定的包路径转化为文件路径去搜索 class 文件,(java规定运行 class 必须指定完整限定名)如果是当前文件则使用
-cp ".;"指定 classpath - 如果在项目根目录下让 java 命令去执行
com.zmy.util.App,其实它会以为类的路径是:E:\Java\Train\Train\com\zmy\util\App,实际路径是在target\classes下,所以需要在E:\Java\Train\Train\target\classes执行java -cp . com.zmy.util.App
反编译class
- E:\Java\Tools
# 使用IDEA的反编译工具,通常在IDEA安装目录的plugins/java-decompiler/lib/

# 反编译单个文件
java -cp java-decompiler.jar org.jetbrains.java.decompiler.main.decompiler.ConsoleDecompiler input.class output_dir/
# 反编译整个jar包
java -cp java-decompiler.jar org.jetbrains.java.decompiler.main.decompiler.ConsoleDecompiler input.jar /path/to/output
# 反编译整个文件夹
java -cp java-decompiler.jar org.jetbrains.java.decompiler.main.decompiler.ConsoleDecompiler /path/to/classes\ /path/to/output

# 使用 cfr 反编译
# 反编译整个jar
java -jar cfr_0.152.jar your_jar.jar --hideutf false --outputdir /path/to/output
# 反编译单独class
java -jar cfr-0.152.jar --hideutf false /path/to/Main.class > Main.java
# 查看帮助
java -jar cfr-0.152.jar ruoyi-admin.jar --help
java -jar cfr-0.152.jar ruoyi-admin.jar --help outputdir
使用 maven 构建
- 创建项目
mvn archetype:generate "-DgroupId=com.zmy" "-DartifactId=ProtoCodeWithMaven" "-DarchetypeArtifactId=maven-archetype-quickstart" "-DinteractiveMode=false" - linux 环境下可以省略参数中的双引号,Windows 则必须加双引号
- 写好
pox.xml,包括依赖项,编码方式(可临时指定),运行插件,主类
<properties>
    <!-- 1. 设置项目源码编码 使用命令行参数就是 -Dproject.build.sourceEncoding=UTF-8 -->
    <project.build.sourceEncoding>UTF-8</project.build.sourceEncoding>
</properties>
<build>
    <plugins>
        <plugin>
            <groupId>org.codehaus.mojo</groupId>
            <artifactId>exec-maven-plugin</artifactId>
            <version>3.0.0</version>
            <configuration>
                <mainClass>com.zmy.App</mainClass>
                <arguments>
                    <argument>1</argument>
                    <argument>2</argument>
                </arguments>
            </configuration>
        </plugin>
    </plugins>
</build>
- 然后编译
mvn clean compile,也可临时指定编码方式mvn clean compile "-Dproject.build.sourceEncoding=UTF-8" - 运行
mvn exec:java "-Dexec.mainClass=com.zmy.App" "-Dexec.args=1 2",对于 Linuxmvn exec:java -Dexec.mainClass="com.zmy.App" -Dexec.args="1 2" - 运行springboot项目
mvn spring-boot:run "-Dspring-boot.run.jvmArguments=-Djasypt.encryptor.password=xxx -Xms512m -Xmx1G -Dspring.profiles.active=dev",使用-Dspring-boot.run.jvmArguments传递 JVM 参数,-Djasypt.encryptor.password=xxx就等于在配置文件中设置jasypt.encryptor.password=xxx - 配置运行插件和主类后运行
mvn -q exec:java,-q静默模式运行,没有构建那些输出
| 插件 | 关键配置项 | 典型值示例 |
|---|---|---|
| maven-compiler-plugin | <source>,<target>,<encoding> | 1.8,UTF-8 |
| maven-surefire-plugin | <includes>,<argLine> | **/*Test.java,-Xmx512m |
| maven-jar-plugin | <mainClass>,<addClasspath> | com.example.Main,true |
| maven-assembly-plugin | <descriptorRef>,<appendAssemblyId> | jar-with-dependencies,false |
| maven-deploy-plugin | <altDeploymentRepository> | http://nexus.example.com/repo |
| exec-maven-plugin | <mainClass>,<arguments> | com.example.Run,arg1arg2 |
Maven常用插件速查表
- 一、核心构建插件
| 插件名称 | 作用描述 | 常用配置项示例 |
|---|---|---|
maven-compiler-plugin | Java源码编译 | <source>1.8</source><target>11</target><encoding>UTF-8</encoding> |
maven-surefire-plugin | 执行单元测试 | <skipTests>false</skipTests><includes>**/*Test.java</includes> |
maven-jar-plugin | 生成标准JAR包 | <mainClass>com.Main</mainClass><addClasspath>true</addClasspath> |
- 二、依赖管理插件
| 插件名称 | 作用描述 | 常用配置项示例 |
|---|---|---|
maven-dependency-plugin | 依赖管理工具 | <outputDirectory>target/lib</outputDirectory><includeScope>runtime</includeScope> |
maven-enforcer-plugin | 环境约束检查 | <requireJavaVersion>11</requireJavaVersion><banDuplicateClasses>true</banDuplicateClasses> |
- 三、打包部署插件
| 插件名称 | 作用描述 | 常用配置项示例 |
|---|---|---|
maven-assembly-plugin | 构建FatJAR | <descriptorRef>jar-with-dependencies</descriptorRef><appendAssemblyId>false</appendAssemblyId> |
maven-shade-plugin | 处理依赖冲突 | <relocations><pattern>com.google</pattern><shadedPattern>hidden.com.google</shadedPattern> |
- 四、代码质量插件
| 插件名称 | 作用描述 | 常用配置项示例 |
|---|---|---|
maven-checkstyle-plugin | 代码规范检查 | <configLocation>google_checks.xml</configLocation><failOnViolation>true</failOnViolation> |
spotbugs-maven-plugin | 静态代码分析 | <effort>Max</effort><threshold>Low</threshold><failOnError>true</failOnError> |
- 五、SpringBoot插件
| 插件名称 | 作用描述 | 常用配置项示例 |
|---|---|---|
spring-boot-maven-plugin | SpringBoot应用打包 | <mainClass>com.App</mainClass><executable>true</executable><layers>true</layers> |
- 六、实用工具插件
| 插件名称 | 作用描述 | 常用配置项示例 |
|---|---|---|
exec-maven-plugin | 直接运行Java类 | <mainClass>com.Run</mainClass><arguments>arg1arg2</arguments> |
versions-maven-plugin | 依赖版本管理 | <display-dependency-updates><display-plugin-updates> |
配置示例代码块
<!-- 典型maven-compiler-plugin配置 -->
<plugin>
  <groupId>org.apache.maven.plugins</groupId>
  <artifactId>maven-compiler-plugin</artifactId>
  <version>3.11.0</version>
  <configuration>
    <source>11</source>
    <target>11</target>
    <encoding>UTF-8</encoding>
    <showWarnings>true</showWarnings>
  </configuration>
</plugin>

<!-- 典型spring-boot-maven-plugin配置 -->
<plugin>
  <groupId>org.springframework.boot</groupId>
  <artifactId>spring-boot-maven-plugin</artifactId>
  <configuration>
    <mainClass>com.example.Application</mainClass>
    <executable>true</executable>
  </configuration>
</plugin>

<!-- 典型exec-maven-plugin配置 -->
<plugin>
    <groupId>org.codehaus.mojo</groupId>
    <artifactId>exec-maven-plugin</artifactId>
    <version>3.0.0</version>
    <configuration>
        <mainClass>com.zmy.App</mainClass>
        <arguments>
            <argument>1</argument>
            <argument>2</argument>
        </arguments>
        <!-- <arguments>zmy flm</arguments> -->
    </configuration>
</plugin>
maven 调试
对于 springboot 应用:mvn spring-boot:run "-Dspring-boot.run.jvmArguments=-Xdebug -Xrunjdwp:transport=dt_socket,server=y,suspend=y,address=5005"- 参数解释:
-Xdebug:启用调试模式-Xrunjdwp:使用 JDWP(Java Debug Wire Protocol)协议transport=dt_socket:通过 Socket 通信server=y:以服务端模式运行(等待调试器连接)suspend=y:启动时暂停,直到调试器连接(suspend=n表示不暂停)address=5005:调试端口(可自定义)
- 对于普通 java 应用,启动应用并监听调试端口:
mvn exec:exec "-Dexec.executable=java" "-Dexec.args=-Xdebug -Xrunjdwp:transport=dt_socket,server=y,suspend=y,address=5005 -classpath %classpath com.zmy.App 1 2" - 也可将调试信息配置在 pom.xml 中,
mvn exec:exec的配置:
<plugin>
  <groupId>org.codehaus.mojo</groupId>
  <artifactId>exec-maven-plugin</artifactId>
  <version>3.5.0</version> <!-- 推荐最新稳定版 -->
  <configuration>
    <executable>java</executable>
    <arguments>
      <argument>-Xdebug</argument>
      <argument>-Xrunjdwp:transport=dt_socket,server=y,suspend=y,address=5005</argument>
      <argument>-classpath</argument>
      <classpath/> <!-- 自动包含项目依赖 -->
      <argument>com.zmy.App</argument>
      <argument>1</argument> <!-- 程序参数1 -->
      <argument>2</argument> <!-- 程序参数2 -->
    </arguments>
  </configuration>
</plugin>
- 另开终端连接调试器:
jdb -connect com.sun.jdi.SocketAttach:hostname=localhost,port=5005 - 常用 jdb 命令:
stop at com.example.Main:20:在第 20 行设置断点run:继续执行locals:查看局部变量print variableName:打印变量值,执行命令print java.lang.System.currentTimeMillis()step:单步进入next:单步跳过cont:继续运行直到下一个断点eval 类名.静态方法(): 调用静态方法(如eval java.lang.System.currentTimeMillis(),需要完整类名,或者obj.setName("1"))dump 对象: 显示对象所有字段值(如dump user)set 变量名 = 值修改变量值(如set counter = 10)
回到目录
前端乱码问题
- Request乱码问题的原因:在service中使用的编码解码方式默认为:ISO-8859-1编码,但此编码并不支持中文
- 解决post提交方式的乱码:
request.setCharacterEncoding("UTF-8"); - 解决get提交方式的乱码:
parameter = new String(parameter.getbytes("iso8859-1"),"utf-8"); - 改变response的编码方式:
response.setCharacterEncoding("utf-8"); - 通知浏览器使用utf-8解码:
response.setHeader("Content-Type","text/html;charset=utf-8");
important
response.setContentType("text/html;charset=UTF-8")这个方法包含了上面的两个方法的调用,实际使用这个
warning
虽然response对象的getOutSream()和getWriter()方法都可以发送响应消息体,但是他们之间相互排斥,不可以同时使用,否则会发生异常。
回到目录
函数式接口
- 方法引用的本质是为了实现逻辑复用,当作抽象方法的方法体,返回类型和参数列表应该一致
-
Runnable:代表一个没有参数和返回值的代码块,通常用于多线程编程。(无输入,无输出)void run(); -
Supplier<T>:表示一个生产者,不接受参数,返回一个结果。(无输入,有输出)T get(); -
Consumer<T>:表示一个消费者,接受一个参数,无返回值。(有输入,无输出)void accept(T t); Consumer<T> andThen(Consumer<? super T> after){ return (T t) -> { accept(t); after.accept(t); }; } -
Function<T, R>:接受一个类型 T 的输入参数,并返回一个类型 R 的结果。(有输入,有输出)
R apply(T t):这是 Function 的唯一抽象方法,接受一个参数 t 并返回一个结果 R。Function<V, R> compose(Function<? super V, ? extends T> before) { return (V v) -> apply(before.apply(v)); }:这是一个默认方法,允许你将当前 Function 与另一个 Function 组合,使得另一个 Function 先于当前 Function 被调用。Function<T, V> andThen(Function<? super R, ? extends V> after) { return (T t) -> after.apply(apply(t)); }:这是一个默认方法,允许你将当前 Function 与另一个 Function 组合,使得当前 Function 调用后接着调用另一个 Function。Function<T, T> identity() { return t -> t; }:这是一个静态方法,返回一个恒等函数,即输入什么就返回什么。
-
Predicate<T>:接受一个参数,并返回一个布尔值结果,用于判断条件。(断言)bool = predicate.test(str) -
UnaryOperator<T> extends Function<T,T>:接受一个参数,并返回与参数类型相同的结果,相当于Function<T,T> -
BinaryOperator<T> extends BiFunction<T,T,T>:接受两个相同类型的参数,并返回一个与参数类型相同的结果。BinaryOperator<Integer> adder = Integer::sum; int result = adder.apply(10, 20); -
BiFunction<T, U, R>:接收两个参数 T 和 U,返回 R 类型,BiFunction<Integer, Integer, Integer> adder = (a, b) -> a + b; Function<Integer, Integer> multiplier = x -> x * 2; // 将 adder 的返回结果当作参数传给 multiplier,等价于 (a, b) -> (a + b) * 2 BiFunction<Integer, Integer, Integer> addAndMultiply = adder.andThen(multiplier); int result = addAndMultiply.apply(10, 20); System.out.println(result); // 输出: 60 = (10+20)*2
回到目录
方法引用
- 引用静态方法:
- 格式: 类名::静态方法
- 范例:
Integer::parseInt
- 引用成员方法
- 格式:对象::成员方法
- 其他类:其他类对象::方法名
- 本类:
this::方法名 - 父类:
super::方法名注意:引用处不能是静态方法
- 引用构造方法
- 格式:类名::new
- 范例:
student::new
- 其他调用方法
- 4.1 类名引用成员方法
- 格式:类名::成员方法
- 范例:
String::subString
- 4.2 引用数组的构造方法
- 格式:
数据类型[]::new - 范例:
int[]::new
- 格式:
回到目录
四种引用
- 强引用(NormalReference):正常使用的对象,只有有引用指向它,就不会被GC,即使内存不足报OOM,也不GC,包括类、接口、数组类型、枚举类型、泛型类型、注解类型。
- 软引用(SoftReference):当一个对象被软引用所指向的时候,只有系统内存不够的时候才会GC。软引用适合用作缓存,内存不足时可以被回收。
SoftReference<T> ref = new SoftReference<>(new T()) - 弱引用(WeakReference):当被弱引用指向的时候,只要遇到GC,就会被回收。
WeakReference<T> ref = new WeakReference<>(new T())
ThreadLocal<M> tl = new ThreadLocal<>();
tl.set(new M());
tl.remove();
- tl是强引用指向一个ThreadLocal对象,当前线程中有一个threadLocals的Map,调用set时,这个Map中的key为弱引用,指向这个ThreadLocal对象,value指向M对象。当tl释放时,key的软引用会自动GC。如果key为强引用,当前线程长期存在的话,这个Map也会长期存在,key强引用指向ThreadLocal对象,这个ThreadLocal对象始终无法回收。另外,虽然ThreadLocal对象被回收,key为null,但是value指向的M对象却无法被访问,因为Map存在,M也无法回收,所有使用ThreadLocal后要指向remove(),不然还是内存泄漏。
- 虚引用(PhantomReference):需引用是管理堆外内存的,不能被GC回收(GC只能回收堆内存)。
ThreadLocal
- 每个线程对象中有个 threadLocals 字段,类型是 Map,该 Map 内部使用 Entry 存储数据,Entry 继承了 WeakReference,即是一个弱引用,在调用 ThreadLocal 的 set(user) 时,会将这个值存入 Map,其中 key 是 ThreadLocal 对象本身,值是 user,内部会创建一个 Entry 对象,并用 ThreadLocal 对象去构造 WeakReference,所以 entry 对象是一个弱引用指向 ThreadLocal,当ThreadLocal是局部变量时,栈结束,ThreadLocal对象强引用消失,遇到GC时,Entry的弱引用也会断开,导致Map中存储的key变为null,对应的值还是user,这时已经无法再访问到user对象,但是多线程环境下,线程一直存活,threadLocals对象一直存在,这个Map依然持有这user,导致user无法被GC,造成内存泄漏。
- 如果使用静态变量的ThreadLocal,在多线程环境下,每次set都会把上一个设置的值替换掉,之前设置的值就可以被GC,但最后一次设置的值却是一直持有的,无法被GC。这也是一种泄漏(业务上不该存在,但却无法被GC)。虽然仍然可以通过get获取到最后设置的那个值,但必须在设置那个值的线程中才能获取到,否则还是无法获取的,这就是线程局部的本质,值是存在线程中的副本
// 如果不用继承,需要这样:
class Entry2 {
    WeakReference<ThreadLocal> ref;  // 包含一个弱引用
    Object value;  // 包含一个值

    Entry2(ThreadLocal k, Object v) {
        this.ref = new WeakReference<>(k);
        this.value = v;
    }
}

// 源码用的是继承,更简洁:
class Entry extends WeakReference<ThreadLocal> {
    Object value;  // 直接扩展功能

    Entry(ThreadLocal k, Object v) {
        super(k);  // 调用父类构造,我就是那个ref
        this.value = v;
    }
}
回到目录
Matcher
- Mather用于对给定字符串匹配正则表达式,每调用一次
find()就会匹配一个位置, - find方法从Matcher区域的开头开始,或者,如果上次调用该方法成功,并且Matcher尚未重置,则从上次匹配未匹配的第一个字符开始。
- replaceAll()则会匹配最后一个位置,
- appendTail(sb)用于将给定字符串中最后剩余的部分附加到sb中
\用于转义,$n用于获取组引用,appendReplacement(StringBuffer sb, String replacement)中的replacement如果含有\和$会导致异常Matcher.quoteReplacement(replacement)就能将replacement中的所有特殊字符转义,保留字面意义,一般用于传递给appendReplacement(sb,replacement)的replacement参数
回到目录
日期和时间
转换关系 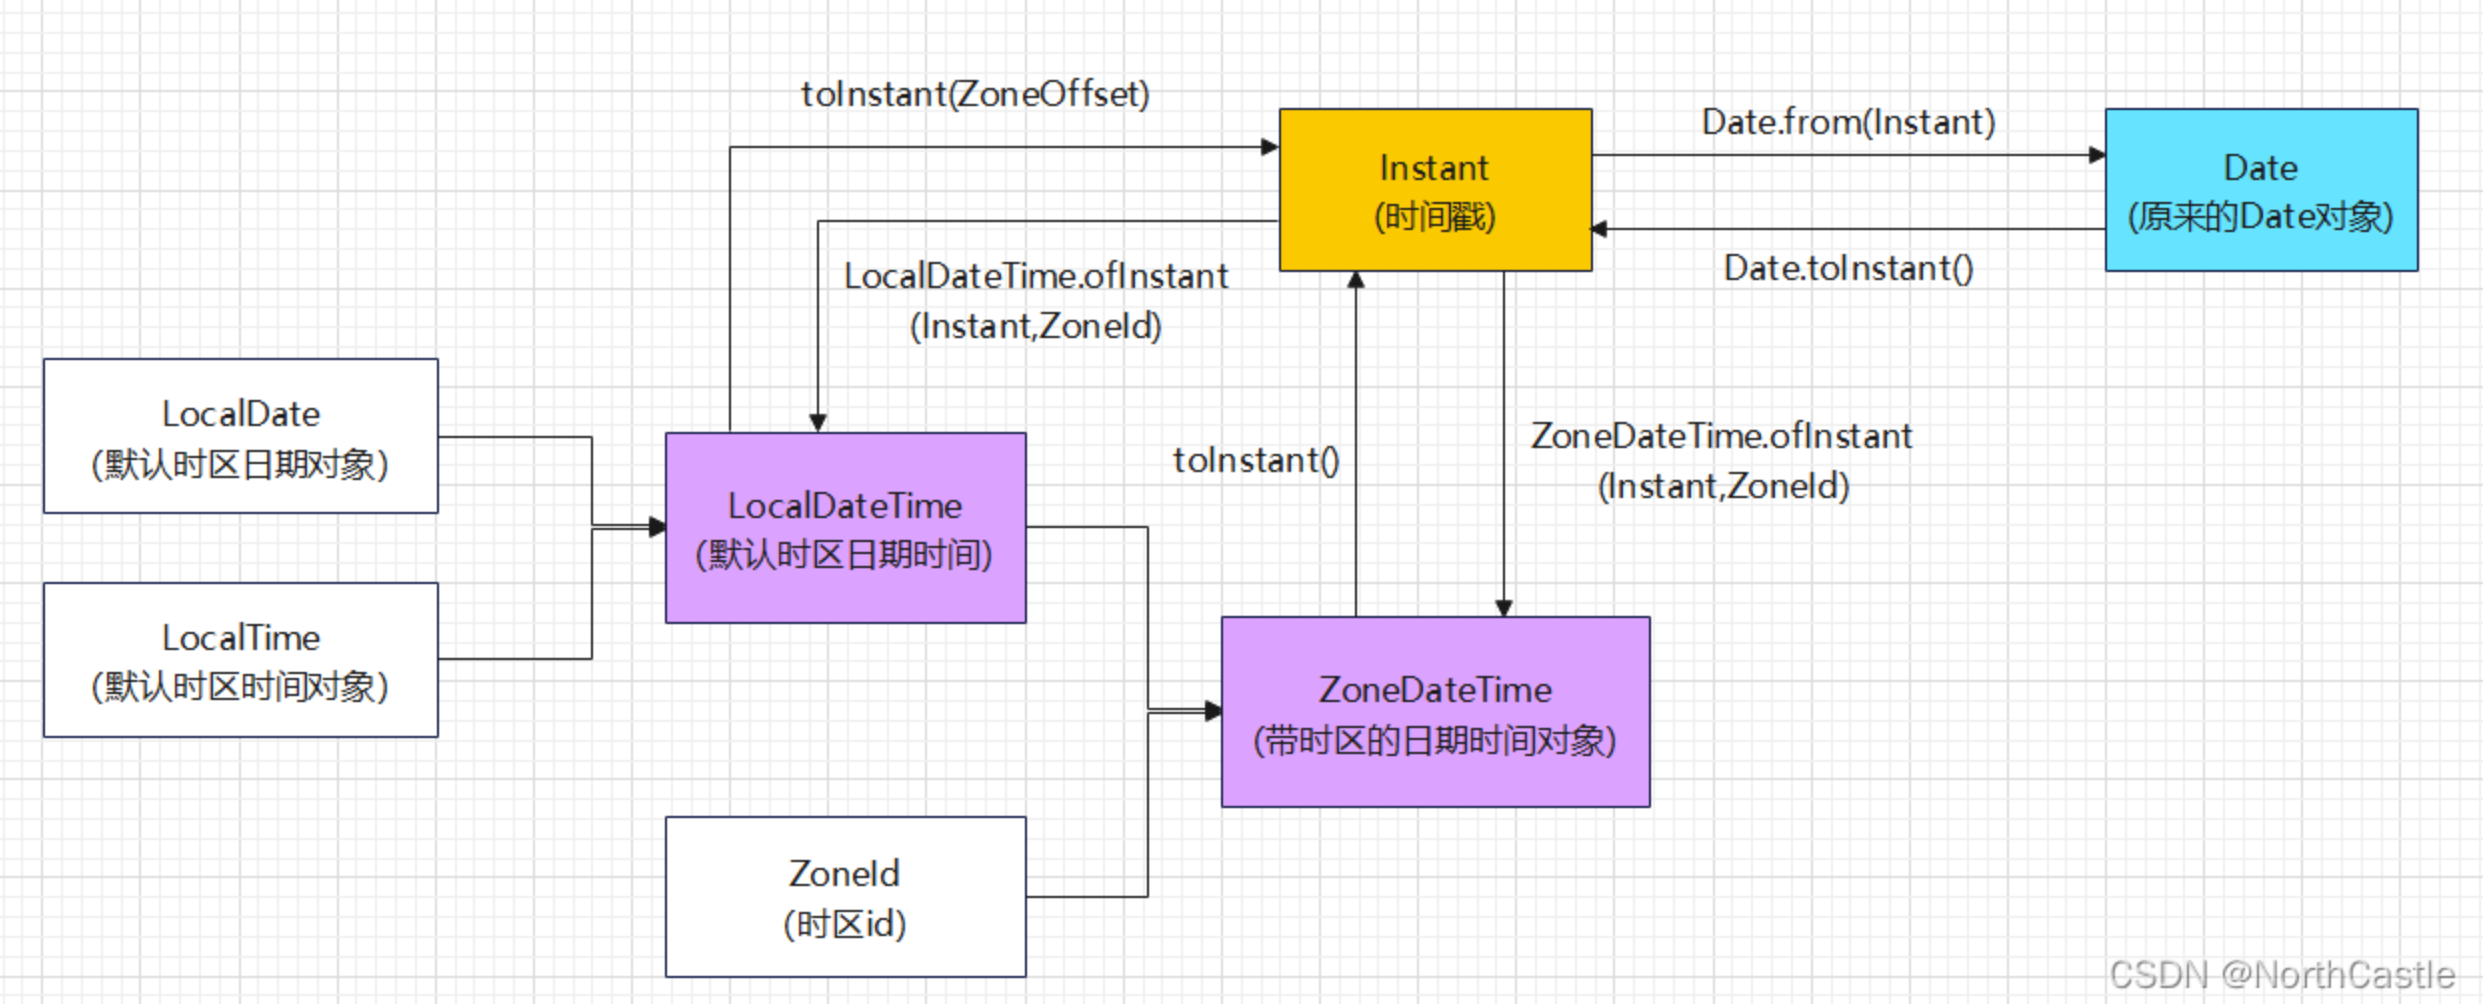
回到目录
集合
-
Collectors.toMap使用:
collect(Collectors.toMap(Person::getId, v -> v, (a,b)->a)) -
第一个参数:Person:getId表示选择Person的getId作为map的key值;
-
第二个参数:v->v表示选择将原来的对象作为Map的value值
-
第三个参数:(a,b)->a中,如果a与b的key值相同,选择a作为那个key所对应的value值。`
-
需要自定义key重复处理策略,不然key重复会报错,(k1, k2)->k1
-
value为null,会报空指针异常java.lang.NullPointerException
回到目录
泛型
-
通配符类型
<? extends T>表示?类型上界是T,参数化类型可能是T或者T的子类(?继承自T)<? super T>表示?类型下界是T,参数化类型可能是T的父类,直至Object(?是T的父类)
-
上界
<? extends T>:只能从中取数据,而不能添加数据 -
下界
<? super T>:只能向其中添加T类型或T的子类型数据,取出的数据只能放入Object中 -
PECS(Producer Extends Consumer Super)原则:
- 频繁往外读取内容的,适合用上界Extends
- 经常往里插入的,适合用下界Super
note
class B extends A; class A extends T,继承是is a的关系,B is a, A is a T- 对于
List<? extends T> list来说,编译器并不确定list中具体存放的是什么类型,只知道是 T 的子类,因此不能向 list 添加数据(理论上可以添加 T 的父类,但是编译器做了限制不让添加,会报错),例如,如果 list 中是 B,这时向 list 中添加一个 A 就会失败,因为A is not a B,但是可以从中取出数据,因为其中的数据上界是T,可以从中读取一个元素,存入一个T或T的父类中Object obj = list[0] - 通配符
<?>和类型参数 T 的区别就在于,对编译器来说所有的T都代表同一种类型。比如public <T> List<T> fill(T... t),三个T都指代同一个类型,要么都是String,要么都是Integer。但通配符<?>没有这种约束,List<?>单纯的就表示:集合里放了一个东西,是什么不知道。 - 对于
<? super T>来说,下界规定了元素的最小粒度的下限,实际上是放松了容器元素的类型控制 - ? 是任何类型,extends 和 super 都是对泛型做了一些范围限制
- extends 可用于返回类型限定,不能用于参数类型限定(
<? extends T>只能用于方法返回类型限定,jdk可以确定此类的最小继承边界是T,只要是T的父类都能接收,但是传入参数类型无法确定) - super 可用于参数类型限定,不能用于返回类型限定(
<? super T>只能用于方法传参,因为jdk能够确定传入为T的子类,返回只能用Object类接收) <?>既不能用于方法传参,也不能用于方法返回- 带有super超类型限定的通配符可以向泛型对象中写入,带有extends子类型限定的通配符可以从泛型对象中读取。
回到目录
Optional
- 创建 Optional 实例
- 使用 Optional.of(T value):当值不是 null 时使用此方法。
- 使用 Optional.ofNullable(T value):当值可能是 null 时使用此方法。
- 使用 Optional.empty():创建一个空的 Optional 实例。
String name = "Alice";
Optional<String> optionalName = Optional.ofNullable(name);  // 如果 name 为 null,则返回空的 Optional 对象
Optional<String> emptyOptional = Optional.empty();  // 创建一个空的 Optional 对象
- 检查 Optional 是否存在,使用
isPresent()方法来检查 Optional 是否包含一个值。存在返回 true,否则返回 false
boolean isPresent = optionalName.isPresent();  // 检查是否包含值
System.out.println(isPresent);  // 输出: true
- 获取 Optional 中的值,使用
get()方法来获取。但是请注意,如果 Optional 为空,调用 get() 会抛出 NoSuchElementException。
try {
    String value = optionalName.get();  // 获取值
    System.out.println(value);  // 输出: Alice
} catch (NoSuchElementException e) {
    System.out.println("No value present");
}
- 处理 Optional 的值
- 使用
ifPresent(Consumer<? super T> action):如果 Optional 包含一个值,则执行给定的动作。 - 使用
or(Supplier<? extends Optional<? extends T>> supplier):如果 Optional 包含一个值,返回该值,否则返回另一个 Optional - 使用
orElse(T other):如果 Optional 包含一个值,则返回该值;否则返回提供的默认值。 - 使用
orElseGet(Supplier<? extends T> other):如果 Optional 包含一个值,则返回该值;否则计算并返回提供的 Supplier 的结果。 - 使用
orElseThrow(Supplier<? extends X> exceptionSupplier):如果 Optional 包含一个值,则返回该值;否则抛出由 Supplier 提供的异常。
- 使用
optionalName.ifPresent(System.out::println);  // 如果存在,则打印值

String defaultValue = optionalName.orElse("Default Name");  // 如果不存在,则返回默认值
System.out.println(defaultValue);  // 输出: Alice

String computedValue = optionalName.orElseGet(() -> "Computed Value");  // 如果不存在,则计算并返回值
System.out.println(computedValue);  // 输出: Alice

try {
    String value = optionalName.orElseThrow(() -> new RuntimeException("No value present"));  // 如果不存在,则抛出异常
    System.out.println(value);  // 输出: Alice
} catch (RuntimeException e) {
    System.out.println(e.getMessage());
}
- Optional 的扁平化
- 当你有一个 Optional 的 Optional(即
Optional<Optional<T>>)时,可以使用Optional.flatMap(Function<? super T, ? extends Optional<U>> mapper)方法将其扁平化为一个Optional<U>。一个函数式接口,输入 T,返回Optional<U>
- 当你有一个 Optional 的 Optional(即
Optional<Optional<String>> nestedOptional = Optional.of(Optional.of("Alice"));
Optional<String> flatOptional = nestedOptional.flatMap(Optional::ofNullable);  // 扁平化
System.out.println(flatOptional.orElse("Default Name"));  // 输出: Alice
- Optional 的过滤
- 你可以使用
filter(Predicate<? super T> predicate)方法来过滤 Optional 中的值。
- 你可以使用
  Optional<String> filteredOptional = optionalName.filter(s -> s.length() > 5);  // 只保留长度大于5的字符串
  System.out.println(filteredOptional.orElse("Filtered Name"));  // 输出: Alice
- Optional 的转换
- 你可以使用
map(Function<? super T, ? extends U> mapper)方法将 Optional 中的值转换为另一种类型
- 你可以使用
Optional<Integer> length = optionalName.map(String::length);  // 将字符串转换为其长度
System.out.println(length.orElse(0));  // 输出: 5 (为 null 则输出0)
- Optional 的组合
- 你可以使用 Optional 的 or 方法来组合两个 Optional 对象,返回一个非空的 Optional。
Optional<String> anotherName = Optional.ofNullable(null);
Optional<String> combinedOptional = optionalName.or(() -> anotherName);
System.out.println(combinedOptional.orElse("Combined Name"));  // 输出: Alice
回到目录
并发编程
-
守护线程:依赖于JVM,JVM结束时守护线程跟着结束。通常用于后台任务,例如垃圾收集
-
非守护线程:会阻塞JVM结束,必须等待非守护线程结束后JVM才会结束。非守护线程是完成核心业务的线程。
-
守护线程的存在是为了支持非守护线程的工作。当所有非守护线程都结束时,JVM 不会等待守护线程的完成,而是会自动终止。因此,守护线程通常用于执行那些不直接影响程序核心功能的任务,如日志记录、心跳检测等。
-
并发的问题:线程干扰和内存一致性
-
每个方法都有一个内部锁(Intrinsic Lock),线程执行synchronized方法时获得该synchronized函数的锁(静态方法获得Class的锁),执行结束释放该锁。synchronized语句则需要指定获取哪个对象的内部锁,通常使用this
-
对于引用变量和大多数primitive变量(除long和double之外的所有类型),读取和写入都是原子性的。对于所有声明为volatile的变量(包括long和double变量),读取和写入都是原子性的。
-
守卫块(Guarded Block)用一个while循环包裹住wait方法调用,直到其他线程改变了循环的条件,并唤醒该线程
线程池
-
Executor:
void executor.execute(runnable)- newFixedThreadPool 创建固定数量线程池,适用数量少,耗时长的情景
- newCachedThreadPool 方法创建了一个具有可扩展线程池的执行器。此执行器适用于数量多耗时短的情景。
- newSingleThreadExecutor 方法创建了一个一次执行单个任务的执行器。
-
ExecutorService implements Executor:
Future<T> executorService.submit(runnable|callable) -
ScheduledExecutorService implements ExecutorService:
scheduleAtFixedRate scheduleWithFixedDelay -
ThreadPoolExecutor和ScheduledThreadPoolExecutor 提供更多参数选项
-
并发集合:ConcurrentMap
-
原子类:java.util.concurrent.atomic
-
ThreadLocalRandom.current().nextInt(4, 77);
-
线程池运行过程
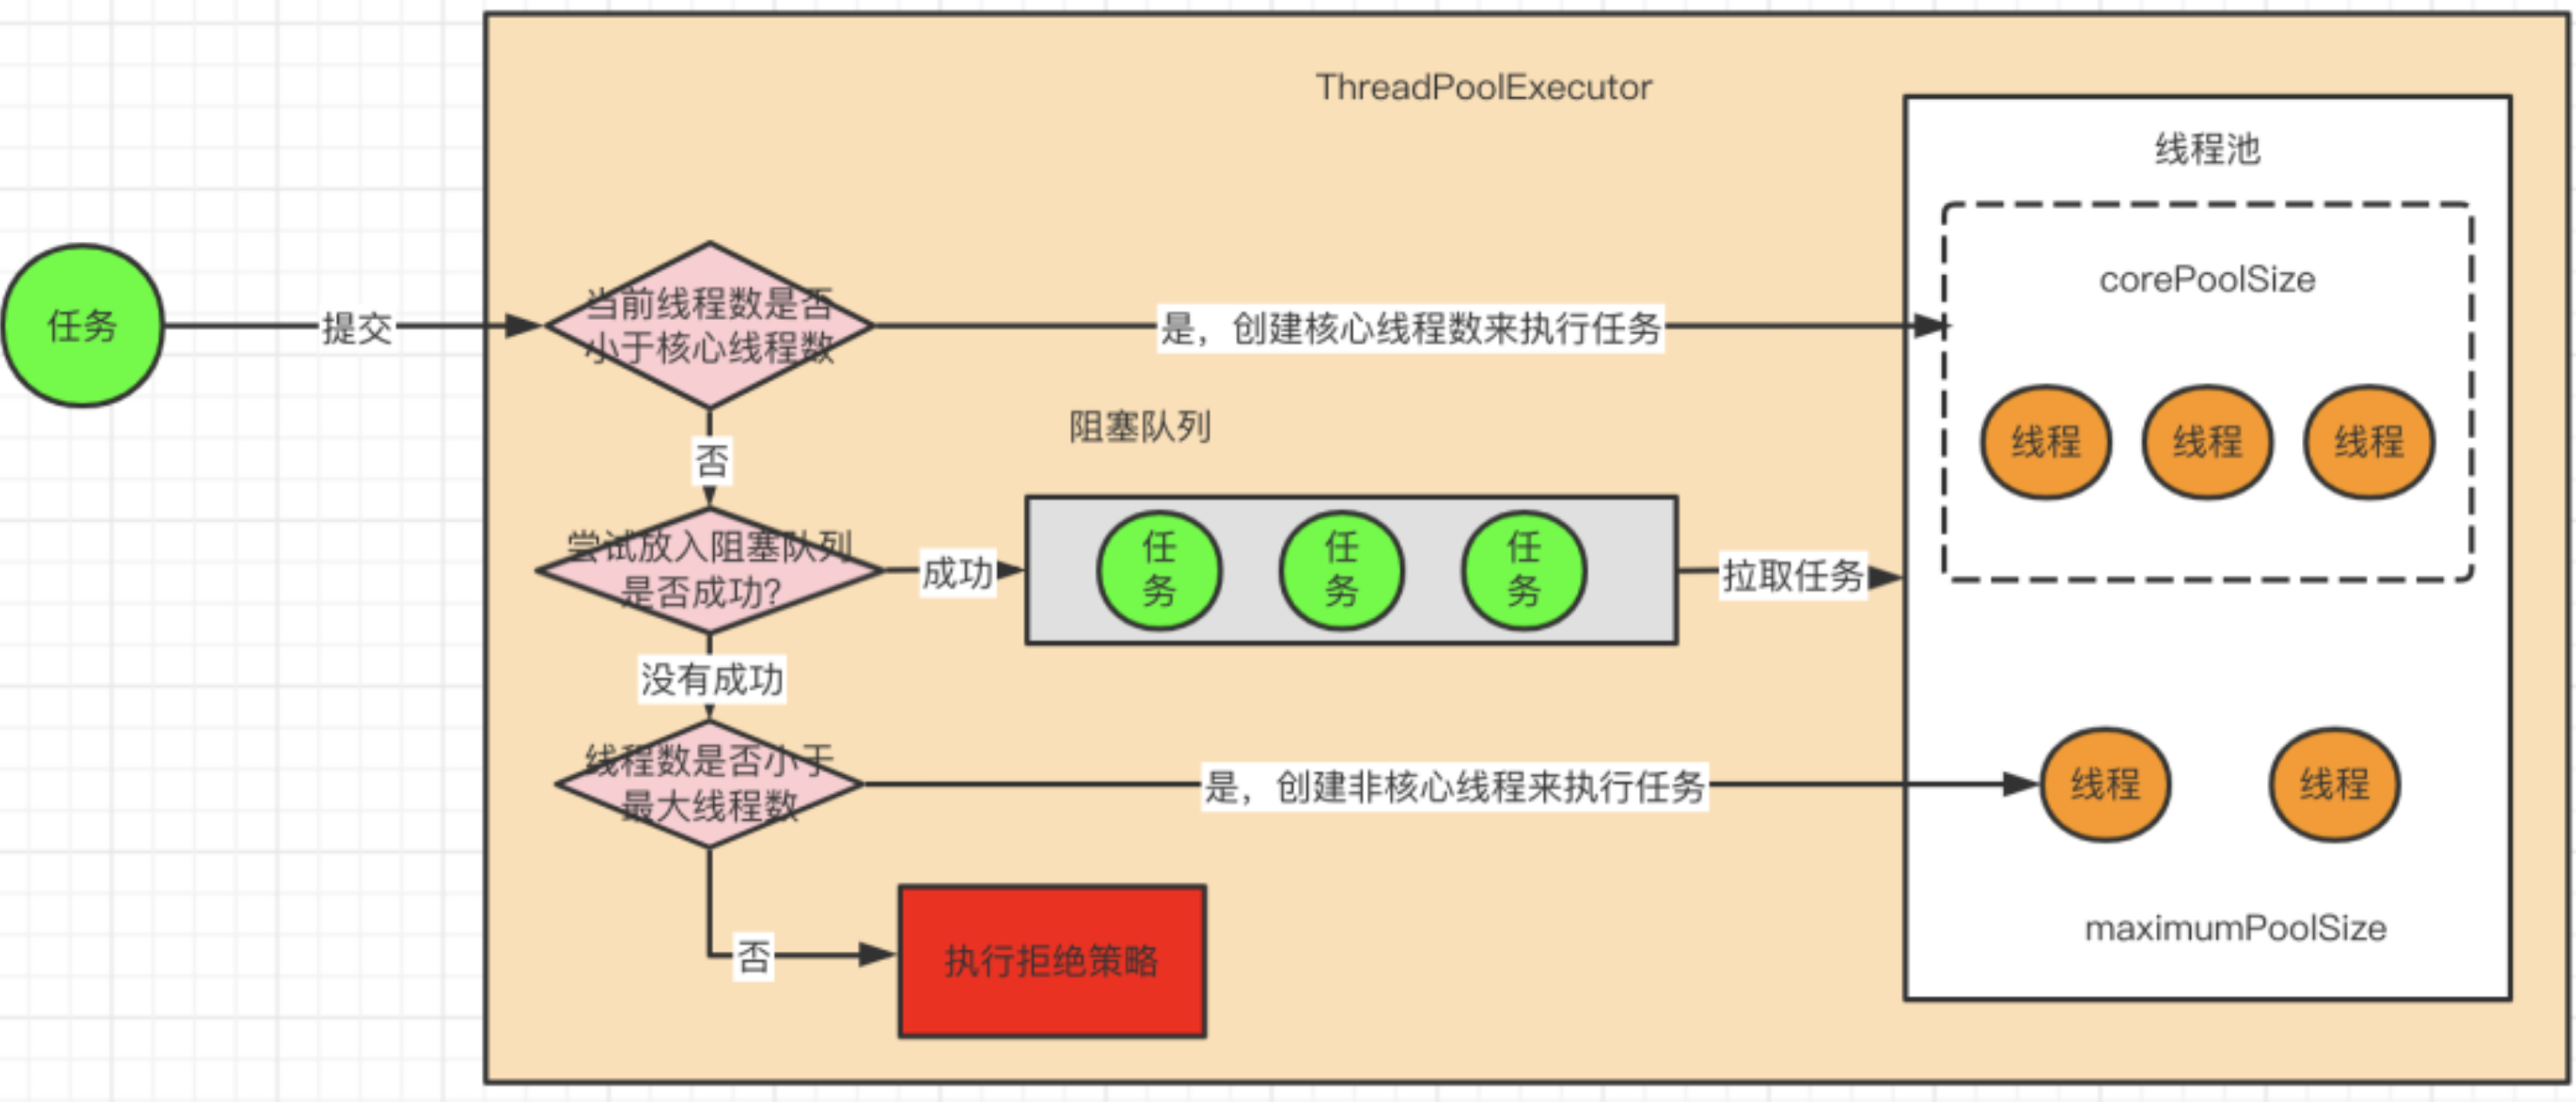
-
创建线程池
ThreadPoolExecutor(int corePoolSize,
                   int maximumPoolSize,
                   long keepAliveTime,
                   TimeUnit unit,
                   BlockingQueue<Runnable> workQueue,
                   ThreadFactory threadFactory,
                   RejectedExecutionHandler handler)
- corePoolSize:线程池中用来工作的核心的线程数量。
- maximumPoolSize:最大线程数,线程池允许创建的最大线程数。
- keepAliveTime:超出 corePoolSize 后创建的线程存活时间或者是所有线程最大存活时间,取决于配置。
- unit:keepAliveTime 的时间单位。
- workQueue:任务队列,是一个阻塞队列,当线程数已达到核心线程数,会将任务存储在阻塞队列中。比较常见的有4个,用的最多是 ArrayBlockingQueue 和 LinkedBlockingQueue
- ArrayBlockingQueue:基于数组结构的有界阻塞队列
- LinkedBlockingQueue:基于链表结构的有界阻塞队列
- DelayedWorkQueue:是一个优先级队列,它可以保证每次出队的任务都是当前队列中执行时间最靠前的
- SynchronousQueue:不存储元素的阻塞队列,每个插入操作都必须等待一个移出操作
- threadFactory :线程池内部创建线程所用的工厂。
- handler:拒绝策略;当队列已满并且线程数量达到最大线程数量时,会调用该方法处理该任务。RejectedExecutionHandler 的实现JDK自带的默认有4种
- AbortPolicy:丢弃任务,抛出运行时异常
- CallerRunsPolicy:由提交任务的线程来执行任务
- DiscardPolicy:丢弃这个任务,但是不抛异常
- DiscardOldestPolicy:从队列中剔除最先进入队列的任务,然后再次提交任务
tip
线程数的设置主要取决于业务是IO密集型还是CPU密集型。
CPU密集型指的是任务主要使用来进行大量的计算,没有什么导致线程阻塞。一般这种场景的线程数设置为CPU核心数+1。
IO密集型:当执行任务需要大量的io,比如磁盘io,网络io,可能会存在大量的阻塞,所以在IO密集型任务中使用多线程可以大大地加速任务的处理。一般线程数设置为 2×CPU核心数
java中用来获取CPU核心数的方法是:Runtime.getRuntime().availableProcessors();
ExecutorService executorService =
new ThreadPoolExecutor(1, 1, 0L, TimeUnit.SECONDS, new LinkedBlockingDeque<>(100),
r -> {
Thread thread = new Thread(r);
thread.setName("addUser-thread" + thread.getId());
thread.setDaemon(true);
return thread;
},
new ThreadPoolExecutor.DiscardPolicy());
// 创建线程工厂
ThreadFactory threadFactory = new ThreadFactory() {
public Thread newThread(Runnable r) {
Thread thread = new Thread(r);
thread.setName("addUser-thread" + thread.getId());
thread.setDaemon(true);
return thread;
}
};
// 创建线程工厂
ThreadFactory factory = new ThreadFactoryBuilder()
.setNameFormat("my-thread-%d") // 设置线程命名模式
.setPriority(Thread.NORM_PRIORITY) // 设置线程优先级
.setDaemon(false) // 设置线程为守护线程
.build();
// 创建线程工厂
BasicThreadFactory factory = new BasicThreadFactory.Builder()
.namingPattern("my-thread-%d") // 设置线程命名模式
.priority(Thread.NORM_PRIORITY) // 设置线程优先级
.daemon(false) // 设置线程为守护线程
.build();
回到目录
流式(响应式)数据
- Flux 是一种流式数据,采用延迟处理。只有调用
subscribe、block、blockFirst、blockLast、toFuture、collect、reduce等时,才会触发 Flux 发射数据进行数据处理 map、filter、merge、onError等操作符只是构建操作符链,定义数据流的处理逻辑,不会立即触发数据流的执行。- 创建 Flux:
// 从集合创建:
Flux<String> fluxFromList = Flux.fromIterable(Arrays.asList("A", "B", "C"));
// 从数组创建:
Flux<String> fluxFromArray = Flux.just("A", "B", "C");
// 从单个值创建:
Flux<String> fluxFromSingleValue = Flux.just("A");
// 从生成器创建:
Flux<Integer> fluxFromGenerator = Flux.generate(sink -> {
    sink.next(1); // 发射一个值
    sink.complete(); // 完成
});
// 从事件创建:
Flux<String> fluxFromEvent = Flux.create(sink -> {
    sink.next("A");
    sink.next("B");
    sink.complete();
});
- 订阅 Flux
fluxFromList.subscribe(System.out::println);
Flux<String> flux = Flux.just("apple", "banana", "cherry");
// 订阅并打印结果
flux.subscribe(
    System.out::println, // 消费者,处理每个数据项
    System.err::println, // 错误处理器,处理异常
    () -> System.out.println("Completed"), // 完成处理器,处理完成事件
    sub -> sub.request(1000) // 订阅并请求 1000 个元素
);
// Flux 依次发射 apple,banana,cherry,执行 out,如果期间没有异常,则最后执行 Completed
// 如果出现任何异常,则执行 err,且不再发射数据,也不执行 Completed
- 常用操作符
// 映射(Map):
Flux<String> mappedFlux = fluxFromList.map(s -> s.toUpperCase());
// 过滤(Filter):
Flux<String> filteredFlux = fluxFromList.filter(s -> s.length() > 1);
// 合并(Merge):
Flux<String> flux1 = Flux.just("A", "B");
Flux<String> flux2 = Flux.just("C", "D");
Flux<String> mergedFlux = Flux.merge(flux1, flux2);
// 错误处理(OnError):
Flux<String> errorFlux = Flux.just("A", "B", "C")
    .map(s -> {
        if (s.equals("B")) {
            throw new RuntimeException("Error occurred");
        }
        return s;
    })
    .onErrorReturn("Error");
// 转换为单个值(Reduce):
Mono<String> reducedFlux = fluxFromList.reduce((acc, s) -> acc + s);
-
Mono 是 Reactor 项目中的另一个核心类,用于表示 0 或 1 个元素的异步序列。与 Flux 不同,Mono 只能发射最多一个数据项,或者一个错误信号,或者一个完成信号。Mono 也支持异步非阻塞操作、背压处理,并提供了丰富的操作符来处理数据流。
-
创建 Mono
// 从单个值创建:
Mono<String> monoFromValue = Mono.just("Hello");
// 从 Supplier 创建:
Mono<String> monoFromSupplier = Mono.fromSupplier(() -> "Hello");
// 从 Callable 创建:
Mono<String> monoFromCallable = Mono.fromCallable(() -> "Hello");
// 从 Runnable 创建:
Mono<Void> monoFromRunnable = Mono.fromRunnable(() -> System.out.println("Hello"));
// 从 Future 创建:
Mono<String> monoFromFuture = Mono.fromFuture(new CompletableFuture<String>() {{
    complete("Hello");
}});
// 订阅 Mono
monoFromValue.subscribe(System.out::println);
- 常用操作符
// 映射(Map):
Mono<String> mappedMono = monoFromValue.map(String::toUpperCase);
// 过滤(Filter):
Mono<String> filteredMono = monoFromValue.filter(s -> s.length() > 5);
// 错误处理(OnError):
Mono<String> errorMono = Mono.just("Hello")
    .map(s -> {
        if (s.equals("Hello")) {
            throw new RuntimeException("Error occurred");
        }
        return s;
    })
    .onErrorReturn("Error");
// 转换为单个值(Reduce):
Mono<Integer> sumMono = Mono.just(1)
    .map(i -> i * 2)
    .reduce(0, Integer::sum);
// 转换为 Flux:
Flux<String> fluxFromMono = monoFromValue.flux();
- 常见的 Mono 操作
// 1. then 和 thenMany
// then:在当前 Mono 完成后,返回一个空的 Mono。
thenMany:在当前 Mono 完成后,返回一个新的 Flux。
Mono<String> mono1 = Mono.just("Hello");
Mono<String> mono2 = Mono.just("World");
mono1.then(mono2).subscribe(System.out::println); // 输出: World

// 2. zipWith:将两个 Mono 的结果合并为一个 Mono,使用提供的函数将两个结果组合在一起。
Mono<String> mono1 = Mono.just("Hello");
Mono<String> mono2 = Mono.just("World");
mono1.zipWith(mono2, (a, b) -> a + " " + b)
     .subscribe(System.out::println); // 输出: Hello World

// 3. flatMap:将当前 Mono 的结果转换为另一个 Mono,并返回新的 Mono。
Mono<String> mono = Mono.just("Hello");
mono.flatMap(s -> Mono.just(s.toUpperCase()))
    .subscribe(System.out::println); // 输出: HELLO
回到目录
Netty
各种IO模型的区别
- 阻塞I/O:(BIO):应用进程向内核发起 I/O 请求,发起调用的线程一直等待内核返回结果。一次完整的 I/O 请求称为BIO(Blocking IO,阻塞 I/O),所以 BIO 在实现异步操作时,只能使用多线程模型,一个请求对应一个线程。但是,线程的资源是有限且宝贵的,创建过多的线程会增加线程切换的开销。
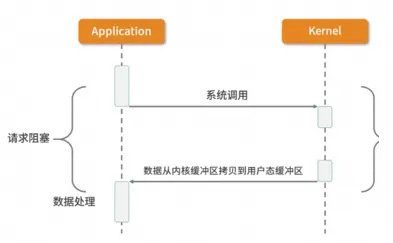
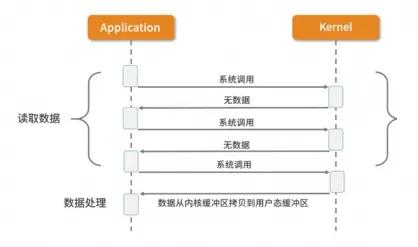
- 同步非阻塞I/O(NIO):应用进程向内核发起 I/O 请求后不再会同步等待结果,而是会立即返回,通过轮询的方式获取请求结果。NIO 相比 BIO 虽然大幅提升了性能,但是轮询过程中大量的系统调用导致上下文切换开销很大。所以,单独使用非阻塞 I/O 时效率并不高,而且随着并发量的提升,非阻塞 I/O 会存在严重的性能浪费。
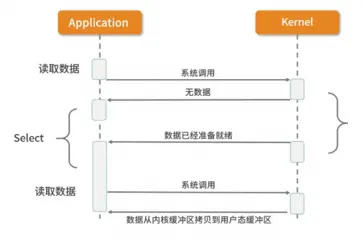
- 多路复用I/O(select和poll):多路复用实现了一个线程处理多个 I/O 句柄的操作。多路指的是多个数据通道,复用指的是使用一个或多个固定线程来处理每一个 Socket。select、poll、epoll 都是 I/O 多路复用的具体实现,线程一次 select 调用可以获取内核态中多个数据通道的数据状态。其中,select只负责等,recvfrom只负责拷贝,阻塞IO中可以对多个文件描述符进行阻塞监听,是一种非常高效的 I/O 模型。
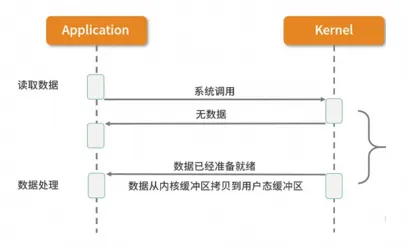
- 异步I/O(Posix.1的aio_系列函数):当应用程序调用aio_read时,内核一方面去取数据报内容返回,另一方面将程序控制权还给应用进程,应用进程继续处理其他事情,是一种非阻塞的状态。当内核中有数据报就绪时,由内核将数据报拷贝到应用程序中,返回aio_read中定义好的函数处理程序。
| 对比维度 | 同步 vs. 异步 | 阻塞 vs. 非阻塞 |
|---|---|---|
| 关注点 | 数据就绪后如何通知调用者 | 调用 I/O 函数时是否立即返回 |
| 线程行为 | 同步需主动等待,异步由内核回调 | 阻塞会挂起线程,非阻塞立即返回 |
| 典型组合 | 同步阻塞、同步非阻塞、异步非阻塞 | 非阻塞通常配合多路复用(如 epoll) |
tip
- 把 channel 理解为数据的通道
- 把 msg 理解为流动的数据,最开始输入是 ByteBuf,但经过 pipeline 的加工,会变成其它类型对象,最后输出又变成 ByteBuf
- 把 handler 理解为数据的处理工序
- 工序有多道,合在一起就是 pipeline,pipeline 负责发布事件(读、读取完成...)传播给每个 handler, handler 对自己感兴趣的事件进行处理(重写了相应事件处理方法)
- handler 分 Inbound 和 Outbound 两类
- 把 eventLoop 理解为处理数据的工人
- 工人可以管理多个 channel 的 io 操作,并且一旦工人负责了某个 channel,就要负责到底(绑定)
- 工人既可以执行 io 操作,也可以进行任务处理,每位工人有任务队列,队列里可以堆放多个 channel 的待处理任务,任务分为普通任务、定时任务
- 工人按照 pipeline 顺序,依次按照 handler 的规划(代码)处理数据,可以为每道工序指定不同的工人
-
EventLoop 对象: EventLoop 本质是一个单线程执行器(同时维护了一个 Selector),里面有 run 方法处理 Channel 上源源不断的 io 事件。
-
EventLoopGroup 是一组 EventLoop,Channel 一般会调用 EventLoopGroup 的 register 方法来绑定其中一个 EventLoop,后续这个 Channel 上的 io 事件都由此 EventLoop 来处理(保证了 io 事件处理时的线程安全)其中NioEventLoopGroup 可以处理IO事件,普通任务和定时任务;DefaultEventLoopGroup 不能处理IO事件,可以处理普通任务和定时任务;
-
管道:如果定义了如下管道,
ChannelPipeline p = ...;
p.addLast("1", new InboundHandlerA());
p.addLast("2", new InboundHandlerB());
p.addLast("3", new OutboundHandlerA());
p.addLast("4", new OutboundHandlerB());
p.addLast("5", new InboundOutboundHandlerX());
- 3 和 4 未实现 ChannelInboundHandler,因此入站事件的实际评估顺序为:1、2 和 5。
- 1 和 2 未实现 ChannelOutboundHandler,因此出站事件的实际评估顺序为:5、4 和 3。
- 如果 5 同时实现 ChannelInboundHandler 和 ChannelOutboundHandler,则入站和出站事件的评估顺序可能分别为 1、2、5 和 5、4、3。
- 通过
ChannelHandlerContext的方法触发事件在管道中的传播
// Inbound event propagation methods:
ChannelHandlerContext.fireChannelRegistered();
ChannelHandlerContext.fireChannelActive();
ChannelHandlerContext.fireChannelRead(Object);
ChannelHandlerContext.fireChannelReadComplete();
ChannelHandlerContext.fireExceptionCaught(Throwable);
ChannelHandlerContext.fireUserEventTriggered(Object);
ChannelHandlerContext.fireChannelWritabilityChanged();
ChannelHandlerContext.fireChannelInactive();
ChannelHandlerContext.fireChannelUnregistered();

// Outbound event propagation methods:
ChannelHandlerContext.bind(SocketAddress, ChannelPromise);
ChannelHandlerContext.connect(SocketAddress, SocketAddress, ChannelPromise);
ChannelHandlerContext.write(Object, ChannelPromise);
ChannelHandlerContext.flush();
ChannelHandlerContext.read();
ChannelHandlerContext.disconnect(ChannelPromise);
ChannelHandlerContext.close(ChannelPromise);
ChannelHandlerContext.deregister(ChannelPromise);
网络编程
- SelectionKeys 是事件持有对象,它持有事件类型和事件源。事件类型:SelectionKey.OP_ACCEPT、SelectionKey.OP_READ、SelectionKey.OP_WRITE、SelectionKey.OP_CONNECT。事件源:SelectableChannel。
- 依托操作系统的 select / epoll 机制,同时监听多个 Channel 的事件,把事件再封装为 SelectionKey 交给业务处理。
- 当程序获取到 SocketChannel 对象,需要向监听器注册自己的通道,监听器会返回一个 SelectionKey 对象,即事件持有对象。
- 服务端样例代码
public class NioSimpleServer {
    public static void main(String[] args) throws IOException {
        // 1.创建服务端通道:ServerSocketChannel
        ServerSocketChannel channel = ServerSocketChannel.open();
        channel.bind(new InetSocketAddress(10000));
        channel.configureBlocking(false);

        // 2.创建Selector监听器
        Selector selector = Selector.open();
        // 将服务端通道注册到监听器上,监听accept事件
        // register 的含义不是把监听器注册到通道,而是将通道订阅到监听器中,本意是交给 Selector 管理。
        channel.register(selector, SelectionKey.OP_ACCEPT);

        System.out.println("NIO 单线程服务端启动完成...");
        // 3.循环监听
        while (true){
            System.out.println("等待客户端连接...");
            // 阻塞等待事件发生
            selector.select();
            Iterator<SelectionKey> iterator = selector.selectedKeys().iterator();
            while (iterator.hasNext()){
                SelectionKey key = iterator.next();
                // 用完后移除
                iterator.remove();

                if(key.isAcceptable()){
                    ServerSocketChannel serverSocketChannel = (ServerSocketChannel) key.channel();
                    SocketChannel client = serverSocketChannel.accept();
                    client.configureBlocking(false);
                    System.out.println("客户端连接成功:" + client.getRemoteAddress());
                    // 建立通信通道后,将通道注册到监听器上,监听read事件
                    client.register(selector, SelectionKey.OP_READ);
                }

                if(key.isReadable()){
                    SocketChannel client = (SocketChannel) key.channel();
                    ByteBuffer buffer = ByteBuffer.allocate(1024);
                    int len = client.read(buffer);
                    if (len == -1) {
                        System.out.println("客户端断开连接:" + client.getRemoteAddress());
                        client.close();
                        continue;
                    }
                    buffer.flip();
                    String request = new String(buffer.array(), 0, len, StandardCharsets.UTF_8);
                    System.out.println("服务端收到客户端消息:" + request);

                    String response = "echo: " + request + "\n";
                    ByteBuffer wrap = ByteBuffer.wrap(response.getBytes(StandardCharsets.UTF_8));
                    client.write(wrap);
                    System.out.println("服务端发送响应:" + response);
                }
            }
        }
    }
}
- 客户端样例代码
public class NioSimpleClient {
    public static void main(String[] args) throws IOException {
        // 1.客户端开启连接通道
        SocketChannel client = SocketChannel.open();
        client.configureBlocking(false);
        client.connect(new InetSocketAddress("localhost", 10000));
        // 2.打开监听器,订阅连接通道事件
        Selector selector = Selector.open();
        client.register(selector, SelectionKey.OP_CONNECT);
        System.out.println("客户端启动成功");

        // 3.监听通道事件
        while (true) {
            // 阻塞监听器,监听通道事件
            selector.select();

            Iterator<SelectionKey> iterator = selector.selectedKeys().iterator();
            while (iterator.hasNext()) {
                SelectionKey key = iterator.next();
                iterator.remove();
                if (key.isConnectable()) {
                    SocketChannel channel = (SocketChannel) key.channel();
                    System.out.println("客户端连接成功:" + channel.getRemoteAddress());

                    // 4.连接成功,订阅写事件
                    if(channel.finishConnect()) {
                        channel.register(selector, SelectionKey.OP_WRITE);
                    }
                }
                if (key.isWritable()) {
                    SocketChannel channel = (SocketChannel) key.channel();
                    String message = "hello server\n";
                    ByteBuffer buffer = ByteBuffer.wrap(message.getBytes(StandardCharsets.UTF_8));
                    channel.write(buffer);
                    System.out.println("客户端发送数据:" + message);
                    // 5.发送成功,订阅读事件,读取服务端响应数据
                    channel.register(selector, SelectionKey.OP_READ);
                }

                if(key.isReadable()) {
                    SocketChannel channel = (SocketChannel) key.channel();
                    ByteBuffer buffer = ByteBuffer.allocate(1024);
                    int length = channel.read(buffer);
                    if(length > 0) {
                        buffer.flip();
                        String message = new String(buffer.array(), 0, length, StandardCharsets.UTF_8);
                        System.out.println("客户端收到服务端响应:" + message);
                        // 6.读取成功,关闭连接通道
                        channel.close();
                        return;
                    }
                }
            }
        }
    }
}
ByteBuffer
- 在网络 I/O 中,所有的读写操作都基于 ByteBuffer,这一点和文件 I/O 完全相同。ByteBuffer 的本质是一个数组,但它比普通数组多了
position、limit、capacity三个核心属性,用来精确控制数据的读写过程。重点是如下 6 个方法 flip():将缓冲区从写模式切换到读模式,只有flip之后才能从buffer中把字节数组置换出来,limit设为当前position,position设为 0,这样可以从头开始读取刚写入的数据。remaining(),返回limit - position,即还能读取(或写入)多少数据,判断当前缓冲区是否还有数据可读。mark()和reset()经常配合起来使用。mark()在当前位置做一个标记,解析数据包时,遇到不完整的数据包(半包)时,可以回退到标记位置。退到标记位置用reset()回到这里,如果没有先调用mark(),reset()会抛出异常。compact()是清理已读数据,把剩余未读的数据移到缓冲区开头,然后切换到写模式继续接收新数据。处理半包时,把未读部分保留下来,方便后续拼接新数据。getInt()可以读取 4 个字节并返回一个int值 (一个int类型有 4 个字节),经常用来读取数据包的数据头(用一个int类型表示当前数据包的长度)
回到目录
Http
- spring 中四中 http 请求方式
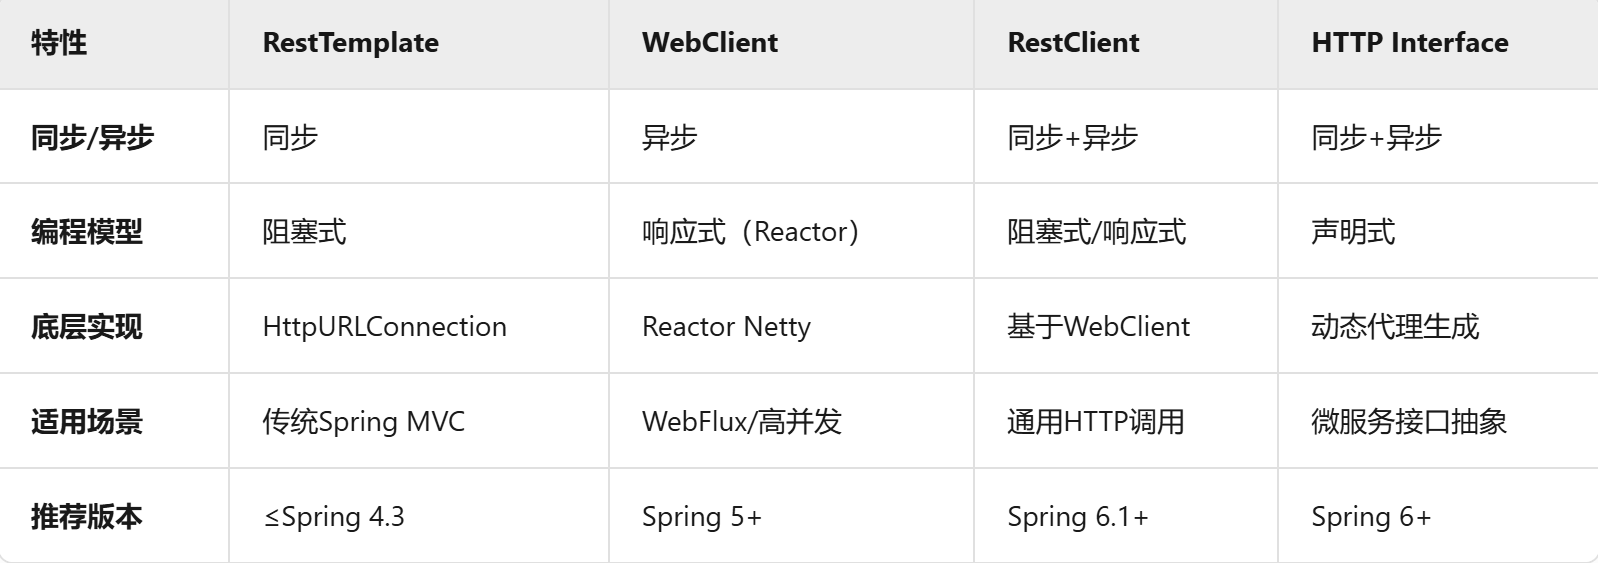
- RestTemplate(已弃用):Spring早期提供的同步阻塞式 HTTP 客户端(基于HttpURLConnection或Apache HTTP Client)。
- WebClient(推荐):Spring 5+引入的异步非阻塞 HTTP 客户端(基于Reactor和Netty)。
- RestClient(Spring 6.1+新增):Spring 6.1引入的同步/异步统一 HTTP 客户端,简化 WebClient 的同步使用。
- HTTP Interface(Spring 6+):通过声明式接口定义 HTTP 请求(类似Feign或Retrofit)。
// restTemplate
String result = restTemplate.getForObject("https://api.example.com", String.class);
// WebClient
WebClient.create()
.get()
.uri("https://api.example.com")
.retrieve()
.bodyToMono(String.class)
.subscribe(result -> System.out.println(result));
// RestClient
// 同步调用
String result = RestClient.create()
.get()
.uri("https://api.example.com")
.retrieve()
.body(String.class);
// 异步调用
RestClient.create()
.get()
.uri("https://api.example.com")
.retrieve()
.body(String.class)
.subscribe(System.out::println);
// Http 接口
(url = "/users", accept = "application/json")
public interface UserClient {
("/{id}")
User getUser( Long id);
Mono<User> createUser( User user);
}
// 使用
private UserClient userClient;
User user = userClient.getUser(1L); // 同步调用
回到目录
类加载器
- 类加载器的核心作用只有一个:定义类的“命名空间”(Namespace)。类的唯一性 = 全限定名 + 类加载器实例
- 被一个类加载器继承链加载的类,只有在“双亲委派”生效且由同一个祖先加载器定义时,才是同一个类。而在可见性上,只有“子见父”是通的,“父见子”是默认阻断的。
- 类加载器的作用:
- 隔离依赖: Tomcat 为每个 Web 应用创建独立的
WebAppClassLoader。App-A 的类由 Loader-A 加载,它看到的 Spring 是 5.0。App-B 的类由 Loader-B 加载,它看到的 Spring 是 3.0。 - 热部署 / 热替换:当你需要更新代码时,丢弃旧的 ClassLoader 实例(它加载的所有类也就变得不可达,可以被 GC 回收)。创建一个新的 ClassLoader 实例,重新加载新的 .class 文件。实现了“类级别的热更新”。
- 加载非本地类(SPI 机制):Java 核心库(Bootstrap 加载器)想要调用厂商提供的实现类(比如 MySQL 驱动),但核心库不能依赖厂商的具体包。解决方案: 线程上下文类加载器(Thread Context ClassLoader,TCCL)。这是一种破坏双亲委派模型的行为。父加载器(核心库)主动使用子加载器(应用类加载器)去加载接口实现类。这实现了解耦:核心库定义接口,应用层提供实现,通过类加载器桥接。
- 隔离依赖: Tomcat 为每个 Web 应用创建独立的
JDBC 详细说明:
-
角色分配:
- 接口(标准):java.sql.Driver 接口。这是 JDK 提供的,放在 rt.jar 里。
- 加载者:Bootstrap ClassLoader(启动类加载器)。它是最顶层的,负责加载核心库。
- 实现(具体):com.mysql.cj.jdbc.Driver 实现类。这是 MySQL 官方提供的,放在 mysql-connector.jar 里。
- 加载者:App ClassLoader(应用类加载器)。它负责加载 classpath 下的用户代码。
-
代码逻辑:
- JDK 里有一个类叫 java.sql.DriverManager(由 Bootstrap 加载)。它的任务是管理所有数据库驱动。当你要连接数据库时,DriverManager 需要去加载并实例化具体的 com.mysql.Driver。
-
死锁出现了(双亲委派模型的局限):
- DriverManager 想加载 com.mysql.Driver。
- 按照双亲委派模型,DriverManager 会用自己的类加载器(Bootstrap)去加载。
- 但是! Bootstrap 类加载器只认识核心库(rt.jar),它根本看不到 classpath 下的 mysql-connector.jar。
- 如果让 App ClassLoader 去加载呢?不行。因为 DriverManager 是 Bootstrap 加载的,它无法“向下委托”给 App ClassLoader。双亲委派是单向向上的,父加载器不能委托子加载器。
-
结论: 如果死守双亲委派模型,核心库(父)永远无法使用用户代码(子)。这就没法写扩展机制了(SPI)。
-
TCCL 它的核心思想是:“既然类加载器层级关系锁死了,那我们就通过‘线程’来传递一个可用的加载器。”
- 步骤 1(设置): 当你的 Java 应用启动时(由 App ClassLoader 加载),主线程(Main Thread)会被默认设置一个上下文类加载器,通常就是 App ClassLoader。
- 步骤 2(获取): 当 JDK 的核心代码(DriverManager,由 Bootstrap 加载)运行时,它发现自己加载不了 MySQL 驱动。
- 步骤 3(借用): 于是,DriverManager 不用自己的加载器了,而是问当前线程:“嘿,你身上带的上下文加载器是谁?”
- 步骤 4(加载): 线程回答:“是 App ClassLoader"。DriverManager 就临时借用这个 App ClassLoader 去加载 com.mysql.Driver。
-
自定义类加载器加载类文件,首先需要继承
java.lang.ClassLoader类,重写findClass方法或者loadClass方法。
note
- 如果要遵循双亲委派机制,只需重写 findClass 方法。
- 如果要打破双亲委派机制,需重写 findClass 和 loadClass 方法。
- 关键方法说明
| 方法名 | 作用 |
|---|---|
| findLoadedClass() | 检查是否已加载该类 |
| loadClass() | 根据类名加载类 |
| defineClass() | 将字节数组转换为Class对象(实现安全控制的关键) |
| findClass() | 自定义类加载器的扩展点 |
| resolveClass() | 执行类的连接阶段(验证、准备、解析) |
| getParent() | 获取父加载器 |
-
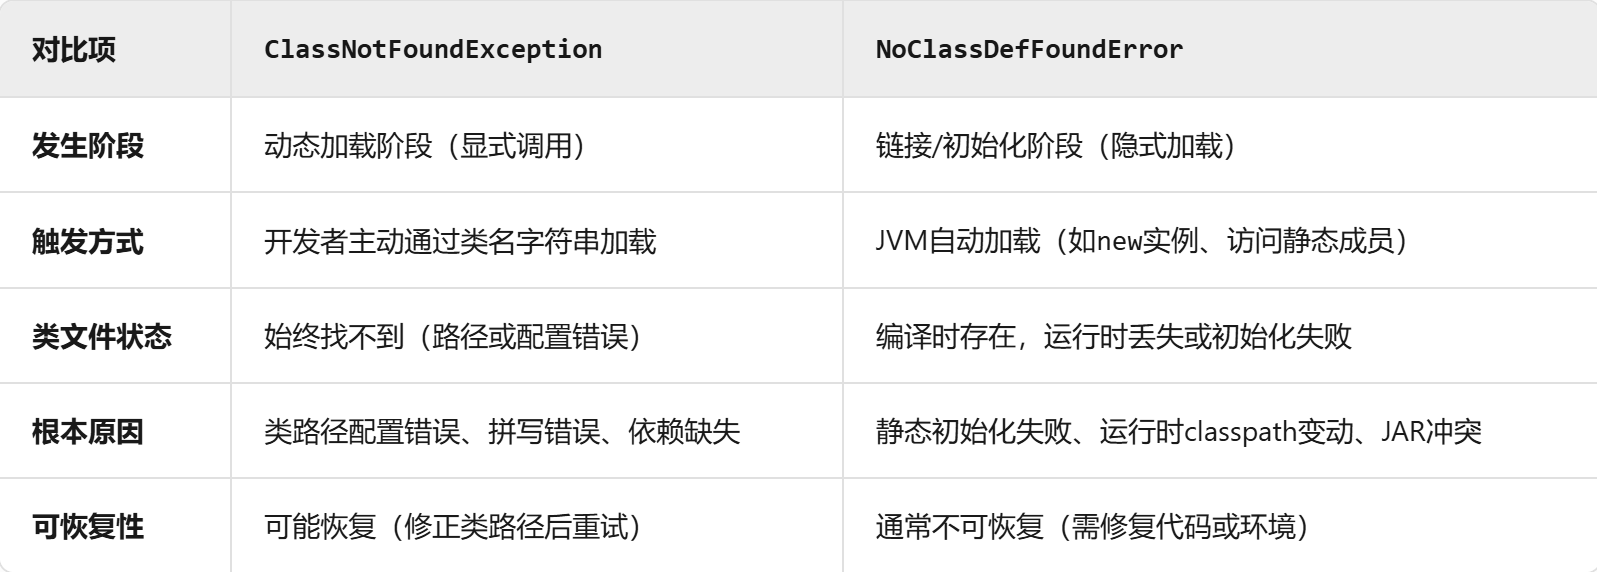
ClassNotFoundException vs NoClassDefFoundError

-
在 Java 的反射机制里,Class.forName 和 ClassLoader 是两种用于加载类的重要方式。
-
Class.forName
- 这是
java.lang.Class类中的一个静态方法。通过提供类的全限定名(即包含包名的类名),它能够在运行时将对应的类加载到 Java 虚拟机(JVM)中。 - 在加载类的过程中,该方法会触发类的静态初始化块执行(静态初始化块里的代码通常用于对类的静态变量进行初始化操作或者执行一些只需要在类加载时执行一次的代码逻辑)。若传入的类名不存在或者由于某些权限问题无法访问该类,就会抛出 ClassNotFoundException 异常。
- 这是
-
ClassLoader
- 它是一个抽象类,在 Java 里充当类加载的核心工具。每一个 Java 类都与一个 ClassLoader 对象相关联,这个对象的主要职责是把类文件加载到 JVM 中。ClassLoader 具备动态加载类的能力,并且可以从多种不同的来源加载类文件,像本地文件系统、网络资源等。
- 作为抽象类,它需要通过具体的子类(如 URLClassLoader、AppClassLoader 等)来实现类加载功能。调用 ClassLoader 的 loadClass 方法加载类时,仅仅是将类加载到 JVM 中,不会触发类的静态初始化块执行。静态初始化块会在类首次主动使用时才执行,例如创建类的实例、访问类的静态变量等。
/**
* 遵循双亲委派机制的自定义类加载器,重写findClass
*
* @author xuanwu
*/
public class FollowParentalDelegationClassLoader extends ClassLoader {
// 定义加载类的路径
private String classPath;
public FollowParentalDelegationClassLoader(String classPath) {
// 将系统类加载器设置为父加载器
super(ClassLoader.getSystemClassLoader());
this.classPath = classPath;
}
/**
* 重写findClass方法
*
* @param name
* @return
* @throws ClassNotFoundException
*/
protected Class<?> findClass(String name) throws ClassNotFoundException {
// 获取类文件的字节数组
byte[] classData = getClassData(name);
if (classData == null) {
thrownew ClassNotFoundException("Class: " + name + " not found");
}
// 将字节数组转换为Class对象
return defineClass(name, classData, 0, classData.length);
}
/**
* 读取类文件的字节数组
*
* @param className 类名
* @return 字节数组
*/
private byte[] getClassData(String className) {
String path = classPath + File.separator +
className.replace('.', File.separatorChar) + ".class";
try (InputStream ins = new FileInputStream(path);
ByteArrayOutputStream baos = new ByteArrayOutputStream()) {
int bufferSize = 4096;
byte[] buffer = newbyte[bufferSize];
int bytesNumRead;
// 读取类文件到字节数组
while ((bytesNumRead = ins.read(buffer)) != -1) {
baos.write(buffer, 0, bytesNumRead);
}
return baos.toByteArray();
} catch (IOException e) {
e.printStackTrace();
}
return null;
}
}
/**
* 打破双亲委派机制的自定义类加载器,重写findClass和loadClass
*/
public class NonDelegatingClassLoader extends ClassLoader {
// 定义加载类的路径
private String classPath;
// 定义需要由此类加载器直接加载的类的包名前缀
private Set<String> directLoadPackages;
public NonDelegatingClassLoader(String classPath, String... directLoadPackages) {
this.classPath = classPath;
this.directLoadPackages = new HashSet<>(Arrays.asList(directLoadPackages));
}
public Class<?> loadClass(String name, boolean resolve) throws ClassNotFoundException {
synchronized (getClassLoadingLock(name)) {
// First, check if the class has already been loaded
Class<?> c = findLoadedClass(name);
if (c == null) {
long t0 = System.nanoTime();
try {
boolean shouldLoadDirectly = directLoadPackages.stream().anyMatch(pkg -> name.startsWith(pkg));
// 关键的代码在这里,逻辑可以自已修改
if (!shouldLoadDirectly) {
// 其他类还是走双亲委派机制
c = this.getParent().loadClass(name);
} else {
// 自己写的类,走自己的类加载器。
c = findClass(name);
}
} catch (ClassNotFoundException e) {
// ClassNotFoundException thrown if class not found
// from the non-null parent class loader
}
if (c == null) {
// If still not found, then invoke findClass in order
// to find the class.
long t1 = System.nanoTime();
c = findClass(name);
// this is the defining class loader; record the stats
sun.misc.PerfCounter.getParentDelegationTime().addTime(t1 - t0);
sun.misc.PerfCounter.getFindClassTime().addElapsedTimeFrom(t1);
sun.misc.PerfCounter.getFindClasses().increment();
}
}
if (resolve) {
resolveClass(c);
}
return c;
}
}
protected Class<?> findClass(String name) throws ClassNotFoundException {
// 获取类文件的字节数组
byte[] classData = getClassData(name);
if (classData == null) {
thrownew ClassNotFoundException("Class " + name + " not found");
}
// 将字节数组转换为Class对象
return defineClass(name, classData, 0, classData.length);
}
/**
* 读取类文件的字节数组
*
* @param className 类名
* @return 字节数组
*/
privatebyte[] getClassData(String className) {
// 将类名转换为文件路径
String path = classPath + File.separatorChar
+ className.replace('.', File.separatorChar) + ".class";
try (InputStream ins = new FileInputStream(path);
ByteArrayOutputStream baos = new ByteArrayOutputStream()) {
int bufferSize = 4096;
byte[] buffer = newbyte[bufferSize];
int bytesNumRead;
// 读取类文件到字节数组
while ((bytesNumRead = ins.read(buffer)) != -1) {
baos.write(buffer, 0, bytesNumRead);
}
return baos.toByteArray();
} catch (IOException e) {
e.printStackTrace();
}
return null;
}
}
回到目录
日志框架
-
Loggers(记录器):日志类别和级别;进行日志记录
-
Appenders (输出源):日志要输出的地方;控制日志输出到哪
-
Layouts(布局):日志以何种形式输出;控制日志输出形式
-
Append=false:true表示消息增加到指定文件中,false则将消息覆盖指定的文件内容,默认值是true。
日志级别生效规则
-
Threshold用于指定日志信息的最低输出级别,相当于过滤
-
当 rootLogger 和 Threshold 设置了日志级别时,级别高的设置会生效
-
当指定包的级别时,rootLogger失效,包级别是Threshold中级别高的生效
-
log4j.logger.myTest1定义logger,可以通过private static Log logger1 = LogFactory.getLog("myTest1");获取
回到目录
Session
- 每次请求的request中都会有一个session对象,但是这个session对象会根据客户端传递的cookie的JSESSIONID来查找已有的session,如果找到了则设置为当前request的session对象,如果没找到说明第一次登录,就新建一个session,并把sessionID返回给客户端,客户端保存
- 每次获取Session都会刷新其中的
thisAccessedTime属性,校验过期则是根据当前时间与thisAccessedTime的时间差是否大于设定的有效期,默认是30分钟 - Cookie 在同一个浏览器是共享的,只要符合 Domain 和 Path 的请求,都会自动携带匹配的Cookie,Cookie 默认共享端口。
CORS中的Cookie
- 要实现跨域传递 Cookie,必须同时满足 前端 + 后端 + Cookie 属性 三方面的配置
- 以一个典型场景为例:
- 前端:http://localhost:3000
- 后端 API:http://api.example.com:8080
- 后端使用 JSESSIONID 维护登录状态
- 前端:设置
withCredentials = true,JavaScript 中使用 fetch 或 XMLHttpRequest 时,必须开启凭据模式
// 1.使用axios
// axios 配置
axios.defaults.withCredentials = true; // 全局开启携带 Cookie

// 或在单个请求中开启
axios.get('http://api.example.com:8080/user/profile', {
  withCredentials: true
})
.then(response => {
  console.log(response.data);
})
.catch(error => {
  console.error('请求失败:', error);
});

// 2.使用fetch
fetch('http://api.example.com:8080/user/profile', {
  method: 'GET',
  credentials: 'include'  // 关键:包含 Cookie
})
.then(res => res.json())
.then(data => console.log(data))
.catch(err => console.error(err));

// 3.使用ajax
$.ajax({
  url: 'http://api.example.com:8080/user/profile',
  type: 'GET',
  xhrFields: {
    withCredentials: true  // 关键
  },
  success: function(data) {
    console.log(data);
  },
  error: function() {
    console.error('请求失败');
  }
});
- 后端:CORS 响应头必须允许凭据,服务器必须在响应头中明确允许:必须设置的响应头:
Access-Control-Allow-Origin: http://localhost:3000
Access-Control-Allow-Credentials: true
// 1.创建一个全局配置类,统一处理所有跨域请求。
public class CorsConfig implements WebMvcConfigurer {
public void addCorsMappings(CorsRegistry registry) {
registry.addMapping("/api/**") // 拦截的路径
.allowedOriginPatterns("http://localhost:3000") // 允许的前端域名
.allowedMethods("GET", "POST", "PUT", "DELETE", "OPTIONS")
.allowedHeaders("*")
.allowCredentials(true) // ✅ 允许携带 Cookie
.maxAge(3600); // 预检请求缓存时间
}
}
// 2.使用 @CrossOrigin 注解(局部配置)适用于单个 Controller 或方法:
(
origins = "http://localhost:3000",
allowCredentials = "true", // ✅ 允许 Cookie
allowedHeaders = "*",
methods = {RequestMethod.GET, RequestMethod.POST}
)
public class UserController {
("/user/profile")
public ResponseEntity<User> getProfile(HttpSession session) {
String username = (String) session.getAttribute("username");
if (username == null) {
session.setAttribute("username", "zhangsan");
}
return ResponseEntity.ok(new User(username));
}
("/login")
public ResponseEntity<String> login(HttpSession session) {
session.setAttribute("username", "zhangsan");
return ResponseEntity.ok("登录成功");
}
}
// 3.使用 CorsConfigurationSource Bean(高级控制)适用于需要更精细控制的场景(如集成 Spring Security):
public class CorsConfig {
public CorsConfigurationSource corsConfigurationSource() {
CorsConfiguration config = new CorsConfiguration();
config.setAllowedOriginPatterns(Arrays.asList("http://localhost:3000"));
config.setAllowedMethods(Arrays.asList("*"));
config.setAllowedHeaders(Arrays.asList("*"));
config.setAllowCredentials(true); // ✅ 关键:允许 Cookie
config.setMaxAge(3600L);
UrlBasedCorsConfigurationSource source = new UrlBasedCorsConfigurationSource();
source.registerCorsConfiguration("/api/**", config); // 拦截路径
return source;
}
}
// 如果使用了 Spring Security,还需要确保它不覆盖 CORS 配置:
protected void configure(HttpSecurity http) throws Exception {
http.cors().and() // 启用 CORS
.csrf().disable()
.authorizeRequests()
.anyRequest().permitAll();
}
<!-- springmvc 全局 CORS 配置 -->
<mvc:cors>
  <!-- 拦截哪些路径 -->
  <mvc:mapping path="/api/**"
               allowed-origins="http://localhost:3000"
               allowed-methods="GET,POST,PUT,DELETE,OPTIONS"
               allowed-headers="*"
               allow-credentials="true"
               max-age="3600" />
</mvc:cors>
warning
- ⚠️ 注意:
Access-Control-Allow-Origin不能是*(通配符),必须是具体的域名,否则浏览器会拒绝带凭据的请求
- 后端:设置 Cookie 的 Domain 和 Path(可选但重要)
为了让 Cookie 能被正确存储和发送,建议设置:
Set-Cookie: JSESSIONID=abc123; Domain=example.com; Path=/; HttpOnly; Secure - 后端:处理预检请求(Preflight):对于某些复杂请求(如带 Cookie、自定义头、POST JSON),浏览器会先发一个 OPTIONS 预检请求。后端必须正确响应这个预检请求:
OPTIONS /user/profile HTTP/1.1
Origin: http://localhost:3000
Access-Control-Request-Method: GET
Access-Control-Request-Headers: content-type

HTTP/1.1 200 OK
Access-Control-Allow-Origin: http://localhost:3000
Access-Control-Allow-Credentials: true
Access-Control-Allow-Methods: GET, POST, PUT, DELETE
Access-Control-Allow-Headers: Content-Type
Access-Control-Max-Age: 86400
setAllowedOrigins(List<String> origins)只能指定完整的、精确的源,比如:https://a1.com, https://a1.com,https://a2.com,也支持特殊值*,表示所有源都允许。- ❌ 但一旦设置了
allowCredentials = true,就不能用*。Spring 会直接拒绝这种组合(抛异常或忽略)。 - 所以:当需要
allowCredentials=true时,setAllowedOrigins必须传具体域名,不能用*。 setAllowedOriginPatterns(List<String> patterns)(Spring 5.3+ 新增)支持通配符模式,比如:https://*.a1.com, https://*.a1.com:[8080,8081], https://*.a1.com:[*]- 关键优势:即使使用了通配符(如
*.a1.com),在实际响应中,Spring 会把Access-Control-Allow-Origin设置为请求中实际的Origin值(比如https://shop.a1.com),而不是*,也不是模式本身。 - ✅ 因此,它可以和
allowCredentials = true安全共存!
// 使用setAllowedOriginPatterns,灵活易扩展,但不能直接设为Arrays.asList("*"),必须是有约束的
// "*"、"http://*"、"https://*" 这类无域名限制的通配,在 allowCredentials=true 时都是不被允许的。
corsConfiguration.setAllowedOriginPatterns(Arrays.asList("https://*.a1.com"));
corsConfiguration.setAllowCredentials(true);

// setAllowedOrigins,也可用不灵活
corsConfiguration.setAllowedOrigins(Arrays.asList(
    "https://shop.a1.com",
    "https://admin.a1.com",
    "https://app.a1.com"
));
corsConfiguration.setAllowCredentials(true);
tomcat 中的 session
- org.apache.catalina.STRICT_SERVLET_COMPLIANCE是一个非常重要的系统属性,它控制着 Tomcat 在行为上是否遵循 “严格的 Servlet 规范兼容性”。设置
export JAVA_OPTS="-Dorg.apache.catalina.STRICT_SERVLET_COMPLIANCE=true"
回到目录
Zookeeper
-
打开解压的zookeeper安装目录下的
config目录,复制一份zoo_sample.cfg,然后重命名为zoo.cfg,修改里面的内容,dataLogDir是新增的,原来文件里没有
dataDir=D:\\zookeeper\\apache-zookeeper-3.8.4-bin\\data
dataLogDir=D:\\zookeeper\\apache-zookeeper-3.8.4-bin\\logs
# 默认是8080,因为8080可能被web应用使用,Springboot项目中tomcat的默认启动端口就是8080
admin.serverPort=9099
# 添加这个配置才能使用create -t ttl /node_name
extendedTypesEnabled=true
-
zoo.cfg 文件的关键配置项:
TickTime(ms): 基本上ZK配置中,使用到时间的配置的时候。都是以TickTime作为基数。initLimit:用于集群,允许从节点连接并同步到master节点的初始化连接时间,以TickTime作为时间基数。syncLimit:用于集群,master主节点与从节点发送信息,请求和应答的时间长度。dataDir:ZK数据存储目录。dataLogDir:ZK日志目录。若不配置,ZK会把数据和日志存储在同一个目录下。clientPort:ZK服务端端口。默认为2181。
-
启动zookeeper:
- windows:
- 服务端:bin目录下的
zkServer.bat - 客户端,只需要双击
zkCli.bat即可
- 服务端:bin目录下的
- Linux:
- 服务端:
./zkServer.sh start,如果指定配置文件:bin/zkServer.sh start conf/配置文件名.cfg,直接./zkServer.sh会提示后面还可以带很多个命令。 - 客户端:
./zkCli.sh,help 命令查看 zookeeper 有哪些命令
- 服务端:
- windows:
-
常用命令
bin/zkServer.sh stop # 停止zookeeper
bin/zkServer.sh start # 启动zookeeper
bin/zkServer.sh status # 查看zookeeper状态
bin/zkServer.sh restart # 重启zookeeper
bin/zkServer.sh start-foreground # 在前台启动zookeeper
集群配置
- 在
zoo.cfg配置文件最后添加如下配置:
ticketTime=2000
clientPort=2181
dataDir=/usr/local/zookeeper/data
dataLogDir=/usr/local/zookeeper/logs
initLimit=10
syncLimit=5
server.1=master:2888:3888 #主节点
server.2=node1:2888:3888  #从节点
server.3=node2:2888:3888  #从节点
- 创建myid文件:在 dataDir 指定的目录下 (即
/usr/local/zookeeper/data目录) 创建名为myid的文件, 文件内容和 zoo.cfg 中当前机器的 id 一致。例如master配置如下:touch "1" > /usr/local/zookeeper/data/myid - slave配置:
echo -e "node1\nnode2" > /usr/local/zookeeper/conf/slave - 将配置好的zookeeper发送到其他从节点。
- 在 dataDir 指定的目录下 (即
/usr/local/zookeeper/data目录) 创建名为 myid 的文件。在 node1 生成 myid 文件touch "2" >/usr/local/zookeeper/data/myid。在 node2 生成 myid 文件touch "3" >/usr/local/zookeeper/data/myid
- 常见错误:
- SASL config status: Will not attempt to authenticate using SASL (unknown error):打开防火墙放行2181端口,或关闭防火墙,获取添加启动参数
-Dzookeeper.sasl.client=false
- SASL config status: Will not attempt to authenticate using SASL (unknown error):打开防火墙放行2181端口,或关闭防火墙,获取添加启动参数
回到目录
IO 对象
两类IO
-
旧的API (Java 1.0-1.6):
File、FileInputStream/FileOutputStream、FileReader/FileWriter、URL -
新的API (Java 7+ NIO.2):
Path(接口)、Paths(工厂类)、Files(工具类)、FileSystem、URI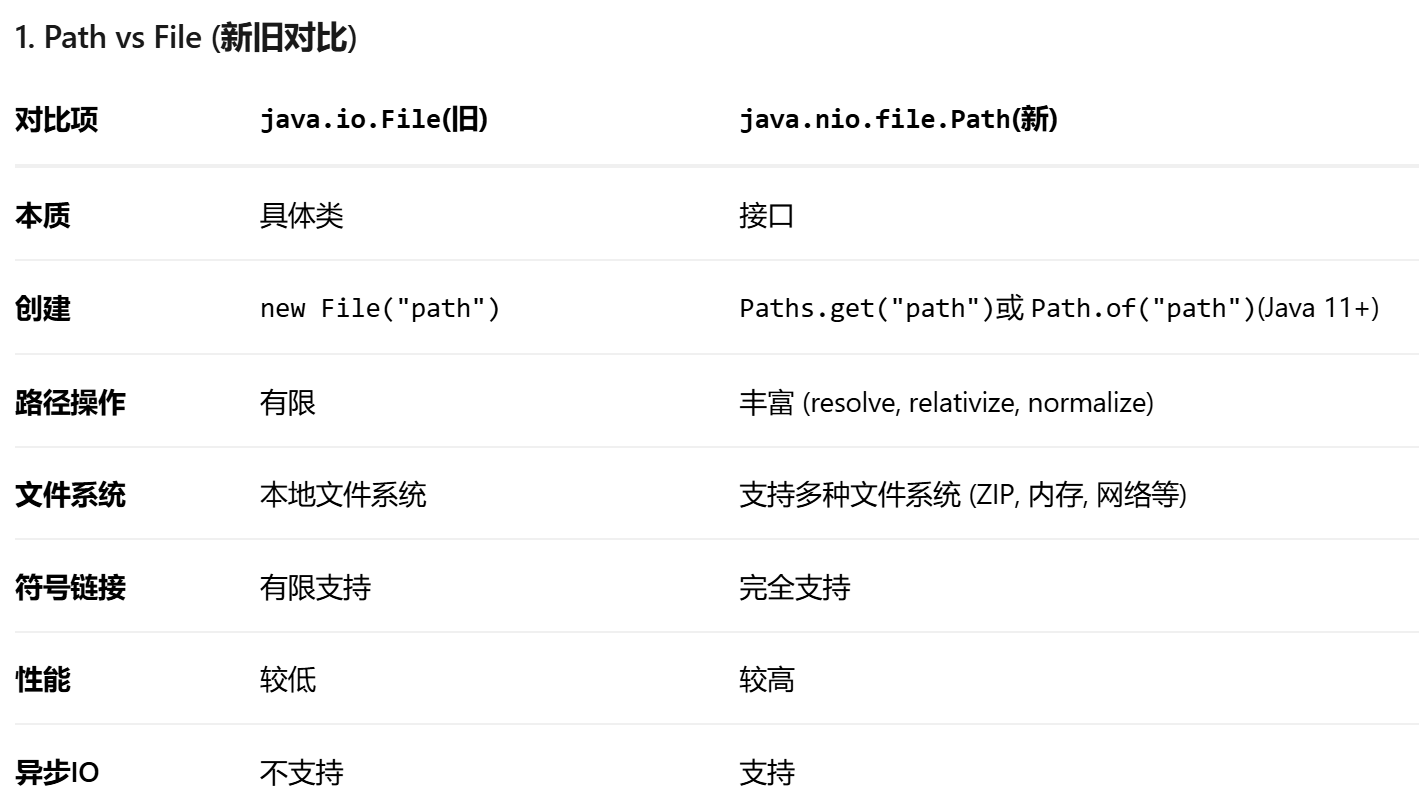
-
Paths是Path的工厂类
// 使用示例
Path path1 = Paths.get("/home/user/doc.txt");
Path path2 = Paths.get("C:", "Users", "doc.txt");  // Windows
Path path3 = Paths.get(URI.create("file:///tmp/test.txt"));
// Java 11 可以直接用 Path.of()
Path path1 = Path.of("/tmp/test.txt");
Path path2 = Path.of("C:", "Users", "test.txt");
Files- 强大的文件操作工具
// 旧方式
File file = new File("test.txt");
if (file.exists()) {
    long size = file.length();
    // 读取需要 FileInputStream + BufferedReader
}

// 新方式
Path path = Paths.get("test.txt");
if (Files.exists(path)) {
    long size = Files.size(path);
    List<String> lines = Files.readAllLines(path);  // 一行搞定
    // 或者流式处理
    Files.lines(path)
         .filter(line -> !line.isEmpty())
         .forEach(System.out::println);
}
URI一般格式是:scheme:[//authority]path[?query][#fragment]- 对于 file 协议:
- 它通常没有
authority(主机)部分,因为文件是在本地系统上的。 - 但为了保持
URI格式的一致性,仍然保留//来表示authority部分的开始。 - 当
authority为空时(即本地文件),就变成file:// + 路径。 - 而
Unix/Linux系统中的绝对路径是以/开头的(如/tmp/test.txt)。
- 它通常没有
- 对于 file 协议:
// URI - 统一资源标识符(抽象概念)
URI uri = URI.create("https://user:pass@example.com:8080/path/file?query=1#frag");
System.out.println(uri.getScheme());    // https
System.out.println(uri.getHost());      // example.com
System.out.println(uri.getPath());      // /path/file
System.out.println(uri.getQuery());     // query=1
System.out.println(uri.getFragment());  // frag

// URL - 统一资源定位符(具体地址)
URL url = new URL("https://example.com/file.txt");
try (InputStream is = url.openStream()) {  // URL 可以打开连接获取内容
    byte[] data = is.readAllBytes();
}

// 相互转换
URI uri2 = url.toURI();    // URL → URI
URL url2 = uri.toURL();    // URI → URL (可能抛异常,如果scheme不支持)
- Spring Resource 体系
// 主要实现类:
// 1. ClassPathResource - 类路径资源
Resource res1 = new ClassPathResource("config/application.yml");
// 对应 classpath:config/application.yml
// 2. FileSystemResource - 文件系统资源
Resource res2 = new FileSystemResource("/tmp/config.yml");
// 对应 file:/tmp/config.yml
// 3. UrlResource - URL资源
Resource res3 = new UrlResource("https://example.com/config.yml");
// 对应 https://example.com/config.yml
// 4. ByteArrayResource - 字节数组资源
Resource res4 = new ByteArrayResource("content".getBytes());
// 5. InputStreamResource - 输入流资源
// 使用 ResourceLoader 自动选择
private ResourceLoader resourceLoader;
public void loadResource(String location) throws IOException {
Resource resource = resourceLoader.getResource(location);
// location 可以是:
// "classpath:config.yml"
// "file:/tmp/config.yml"
// "https://example.com/config.yml"
if (resource.exists()) {
try (InputStream is = resource.getInputStream()) {
// 处理资源
}
}
}
使用场景
- 场景1:读取配置文件
// 方式1: 旧API
File configFile = new File("config.properties");
Properties props = new Properties();
try (FileInputStream fis = new FileInputStream(configFile)) {
props.load(fis);
}
// 方式2: 新NIO API
Path configPath = Paths.get("config.properties");
Properties props2 = new Properties();
try (InputStream is = Files.newInputStream(configPath)) {
props2.load(is);
}
// 方式3: Spring方式
("classpath:config.properties")
private Resource configResource;
public Properties loadWithSpring() throws IOException {
Properties props = new Properties();
try (InputStream is = configResource.getInputStream()) {
props.load(is);
}
return props;
}
- 场景2:遍历目录
// 旧方式
File dir = new File("/tmp");
File[] files = dir.listFiles();
if (files != null) {
    for (File f : files) {
        System.out.println(f.getName());
    }
}

// 新方式
Path dirPath = Paths.get("/tmp");
try (Stream<Path> stream = Files.list(dirPath)) {
    stream.filter(Files::isRegularFile)
          .map(Path::getFileName)
          .forEach(System.out::println);
}

// 递归遍历
try (Stream<Path> stream = Files.walk(dirPath, 3)) {  // 深度3层
    stream.filter(Files::isRegularFile)
          .forEach(System.out::println);
}
- 场景3:文件复制
// 旧方式
try (FileInputStream fis = new FileInputStream("source.txt");
     FileOutputStream fos = new FileOutputStream("target.txt")) {
    byte[] buffer = new byte[8192];
    int length;
    while ((length = fis.read(buffer)) != -1) {
        fos.write(buffer, 0, length);
    }
}

// 新方式(一行搞定!)
Files.copy(Paths.get("source.txt"), Paths.get("target.txt"),
          StandardCopyOption.REPLACE_EXISTING,
          StandardCopyOption.COPY_ATTRIBUTES);

// 还有更多选项
// StandardOpenOption: READ, WRITE, APPEND, CREATE, CREATE_NEW...
// StandardCopyOption: REPLACE_EXISTING, COPY_ATTRIBUTES, ATOMIC_MOVE...
// LinkOption: NOFOLLOW_LINKS...
文件系统抽象
// 1. 默认文件系统
FileSystem defaultFs = FileSystems.getDefault();
Path defaultPath = defaultFs.getPath("/tmp/test.txt");

// 2. 内存文件系统
try (FileSystem memFs = FileSystems.newFileSystem(
        URI.create("memory:///"),
        Map.of("create", "true"))) {

    Path memPath = memFs.getPath("/data.txt");
    Files.writeString(memPath, "Hello Memory FS!");

    // 读取
    String content = Files.readString(memPath);
    System.out.println(content);
}

// 3. ZIP/JAR 文件系统
Path zipPath = Paths.get("archive.zip");
try (FileSystem zipFs = FileSystems.newFileSystem(zipPath, (ClassLoader) null)) {
    Path entry = zipFs.getPath("/doc.txt");

    if (Files.exists(entry)) {
        List<String> lines = Files.readAllLines(entry);
    }
}
性能对比
// 大文件复制性能对比
public class PerformanceTest {

    public static void main(String[] args) throws IOException {
        Path source = Paths.get("debian-13.1.0-amd64-DVD-1.iso");  // 3.7GB文件
        Path target1 = Paths.get("copy1.iso");
        Path target2 = Paths.get("copy2.iso");

        // 测试1: 传统IO
        long start1 = System.nanoTime();
        copyTraditional(source, target1);
        long time1 = System.nanoTime() - start1;

        // 测试2: NIO.2 Files.copy
        long start2 = System.nanoTime();
        Files.copy(source, target2, StandardCopyOption.REPLACE_EXISTING);
        long time2 = System.nanoTime() - start2;

        // 测试3: NIO 通道传输
        long start3 = System.nanoTime();
        copyWithChannels(source, Paths.get("copy3.iso"));
        long time3 = System.nanoTime() - start3;

        System.out.printf("传统IO: %.2f 秒%n", time1 / 1_000_000_000.0);        // 传统IO: 8.37 秒
        System.out.printf("Files.copy: %.2f 秒%n", time2 / 1_000_000_000.0);    // Files.copy: 1.60 秒
        System.out.printf("NIO通道: %.2f 秒%n", time3 / 1_000_000_000.0);       // NIO通道: 2.76 秒
    }

    static void copyTraditional(Path source, Path target) throws IOException {
        try (InputStream is = Files.newInputStream(source);
             OutputStream os = Files.newOutputStream(target)) {
            byte[] buffer = new byte[8192];
            int length;
            while ((length = is.read(buffer)) != -1) {
                os.write(buffer, 0, length);
            }
        }
    }

    static void copyWithChannels(Path source, Path target) throws IOException {
        try (FileChannel inChannel = FileChannel.open(source, StandardOpenOption.READ);
             FileChannel outChannel = FileChannel.open(target,
                 StandardOpenOption.WRITE, StandardOpenOption.CREATE)) {

            long size = inChannel.size();
            long transferred = 0;

            while (transferred < size) {
                transferred += inChannel.transferTo(transferred,
                    size - transferred, outChannel);
            }
        }
    }
}
回到目录
排序
Comparable 接口
- 让对象自己知道自己怎么排序(自然排序)
// Comparable<T> 接口定义
public interface Comparable<T> {
    int compareTo(T other);  // 比较自己和另一个对象
}
- 返回值的含义:
- 负数:我(this) 比 other 小 → 我应该排在前面
- 零: 我(this) 和 other 相等
- 正数:我(this) 比 other 大 → 我应该排在后面
Comparator 接口
- 含义:提供一个独立的比较器,定义排序规则
// Comparator<T> 接口定义
public interface Comparator<T> {
    int compare(T o1, T o2);  // 比较两个对象
}
- 返回值的含义:
- 负数:o1 应该排在 o2 前面
- 零: o1 和 o2 相等
- 正数:o1 应该排在 o2 后面
// 1. 按分数升序
Comparator<Student> byScore = Comparator.comparingInt(Student::getScore);
students.sort(byScore);

// 2. 按分数降序
Comparator<Student> byScoreDesc = Comparator.comparingInt(Student::getScore).reversed();
-
Comparator.comparingInt(Student::getScore)返回一个Comparator用于在sort(byScore)中使用其compare(s1, s2)方法,内部是(o1, o2) -> keyExtractor.apply(o1).compareTo(keyExtractor.apply(o2));,这里keyExtractor就是Student::getScore -
对于排序容器,其中的元素要么实现
Comparable接口,要么构造容器时传入Comparator对象:
// 1. 实现 Comparable
class ComparableStudent extends Student implements Comparable<ComparableStudent> {
public ComparableStudent(String name, int score) {
super(name, score);
}
public int compareTo(ComparableStudent other) {
return Integer.compare(this.score, other.score);
}
}
Set<ComparableStudent> set = new TreeSet<>();
set.add(new ComparableStudent("Alice", 85));
set.add(new ComparableStudent("Bob", 92));
// 1. TreeSet 传入 Comparator
Comparator<Student> byScore = Comparator.comparingInt(Student::getScore);
Set<Student> treeSet = new TreeSet<>(byScore);
treeSet.add(new Student("Alice", 85, 20));
treeSet.add(new Student("Bob", 92, 22));
treeSet.add(new Student("Charlie", 85, 21)); // 分数相同,视为相等,不会添加
hashCode 和 equals
- equals 契约
- 自反性:对象必须等于自身
x.equals(x)必须返回true - 对称性:如果
x.equals(y)为true,则y.equals(x)也必须为true - 传递性:如果
x.equals(y)且y.equals(z),则x.equals(z) - 一致性:多次调用
equals必须返回相同结果,前提是对象没有被修改 - 非空性:
x.equals(null)必须返回false
- 自反性:对象必须等于自身
- equals 实现模式
// 使用 Java 7+ 的 Objects.equals
public boolean equals(Object obj) {
if (this == obj) return true;
if (obj == null || getClass() != obj.getClass()) return false;
Person person = (Person) obj;
return Objects.equals(id, person.id) &&
Objects.equals(name, person.name) &&
age == person.age; // 基本类型直接比较
}
// 使用 IDE 自动生成
// 在 IntelliJ 或 Eclipse 中,可以自动生成 equals 和 hashCode
- hashCode 契约
- 一致性:在对象没有被修改的情况下,多次调用返回相同值
- equals 相等性:如果两个对象
equals为true,则hashCode必须相同,这是最重要的规则! - 不相等性:如果两个对象
equals为false,hashCode不一定不同,但不同时可以提高哈希表性能
- hashCode 实现模式
// 使用 Objects.hash (Java 7+)
public int hashCode() {
return Objects.hash(id, name, age);
}
必须遵守的原则
equals 和 hashCode 的黄金法则
- 规则1:必须同时重写
equals和 hashCode - 规则2:
equals和hashCode必须基于相同的字段 - 规则3:用于计算
hashCode的字段在对象生命周期中不能改变
- compareTo 的原则
- 自反性:
x.compareTo(x) = 0 - 对称性:
x.compareTo(y)和y.compareTo(x)符号相反 - 传递性
- 与
equals一致(强烈建议)
- 自反性:
note
equals定义逻辑相等hashCode提供快速查找compareTo定义排序顺序。- 三者必须协同工作,特别是在作为集合键时,一致性至关重要。
回到目录
JSON
Jackson
Jackson 常用注解
@JsonIgnore: 忽略敏感字段,@JsonIgnore private String password;@JsonIgnoreProperties批量忽略字段:有很多字段需要忽略,不想在每个字段上都加@JsonIgnore
// 情况1:忽略特定字段
({"password", "salt", "secretKey"}) // 类级别,忽略多个字段
public class User {
private Long id;
private String username;
private String password; // 会被忽略
private String salt; // 会被忽略
private String secretKey; // 会被忽略
private String email;
private String phone;
}
// 情况2:忽略未知字段(防止前端传额外字段报错)
(ignoreUnknown = true) // 忽略JSON中不存在的字段
public class UserUpdateDTO {
private String username;
private String email;
// 如果前端传了 {"username": "zhang", "xxx": "haha"}
// xxx字段会被忽略,不会报错
}
@JsonProperty: 修改JSON字段名,READ_ONLY表示该属性只能从 Java 对象序列化到 JSON(读操作,JSON的视角),但不能从 JSON 反序列化到 Java 对象(写操作)
public class User {
private Long id;
("user_name") // JSON中显示为 user_name
private String username;
("email") // JSON中显示为 email
private String emailAddress;
// 还可以控制字段的访问权限
(access = JsonProperty.Access.READ_ONLY) // 只能读,不能通过JSON修改
private Date createdAt; // 创建时间应该由系统生成
(access = JsonProperty.Access.WRITE_ONLY) // 只能写,不会在JSON响应中显示
private String password; // 接收密码但不返回
// 只读
(access = JsonProperty.Access.READ_ONLY)
// 只写(如密码字段)
(access = JsonProperty.Access.WRITE_ONLY)
// 读写(默认行为)
(access = JsonProperty.Access.READ_WRITE)
// 自动(根据getter/setter存在性决定)
(access = JsonProperty.Access.AUTO)
}
@JsonFormat: 格式化日期
public class Order {
private Long id;
private String orderNo;
(
pattern = "yyyy-MM-dd HH:mm:ss", // 指定格式
timezone = "GMT+8" // 指定时区(北京时间)
)
private Date createTime;
(
pattern = "yyyy-MM-dd", // 只要年月日
timezone = "GMT+8"
)
private Date userBirthday;
(
pattern = "¥#,##0.00", // 格式化金额
locale = "zh_CN" // 中文环境
)
private BigDecimal amount;
}
@JsonInclude: 过滤空值:对象中有null值,但不想在JSON中显示
(JsonInclude.Include.NON_NULL) // 类级别:忽略所有null值
public class Product {
private Long id;
private String name;
(JsonInclude.Include.NON_EMPTY) // 字段级别:非空(对字符串是null或"",对集合是null或空)
private String description;
(JsonInclude.Include.NON_EMPTY)
private List<String> tags;
(JsonInclude.Include.NON_DEFAULT) // 如果是默认值就不显示(int的默认值是0)
private Integer stock = 0;
private Double price;
}
@JsonView: 不同场景返回不同字段
// 1. 先定义视图(可以理解为"视角")
public class Views {
public static class Public {} // 公开视图
public static class Internal extends Public {} // 内部视图(继承公开视图)
public static class Admin extends Internal {} // 管理员视图
}
// 2. 在实体类上标注
public class User {
(Views.Public.class) // 所有人都能看到
private Long id;
(Views.Public.class)
private String username;
(Views.Internal.class) // 只有内部系统能看到
private String email;
(Views.Internal.class)
private String phone;
(Views.Admin.class) // 只有管理员能看到
private Double salary;
(Views.Admin.class)
private String idCardNumber;
// getters/setters...
}
// 3. 在Controller中使用
("/users")
public class UserController {
// 公开接口 - 只返回公开信息
("/public/{id}")
(Views.Public.class)
public User getPublicUser( Long id) {
return userService.getUser(id);
}
// 返回:{"id": 1, "username": "zhangsan"}
// 内部接口 - 返回内部信息
("/internal/{id}")
(Views.Internal.class)
public User getInternalUser( Long id) {
return userService.getUser(id);
}
// 返回:{"id": 1, "username": "zhangsan", "email": "zhang@qq.com", "phone": "13800138000"}
// 注意:Internal继承了Public,所以Public的字段也会显示
// 管理员接口 - 返回所有信息
("/admin/{id}")
(Views.Admin.class)
public User getAdminUser( Long id) {
return userService.getUser(id);
}
// 返回所有字段
}
创建和操作 JSON 对象
import com.fasterxml.jackson.databind.JsonNode;
import com.fasterxml.jackson.databind.ObjectMapper;
import com.fasterxml.jackson.databind.node.ObjectNode;
import com.fasterxml.jackson.databind.node.ArrayNode;
import com.fasterxml.jackson.databind.node.JsonNodeFactory;

public class JacksonJsonNodeExample {
    public static void main(String[] args) throws Exception {
        ObjectMapper mapper = new ObjectMapper();

        // ========== 1. 创建 JSON 对象(类似 Fastjson 的 JSONObject)==========
        System.out.println("=== 1. 创建 JSON 对象 ===");

        // 方法1:使用 ObjectNode(推荐)
        ObjectNode user = mapper.createObjectNode();
        user.put("id", 1);
        user.put("name", "张三");
        user.put("age", 25);
        user.put("isStudent", false);

        System.out.println("ObjectNode: " + user);
        // 输出: {"id":1,"name":"张三","age":25,"isStudent":false}

        // 方法2:使用 JsonNodeFactory
        ObjectNode product = JsonNodeFactory.instance.objectNode();
        product.put("productId", 1001);
        product.put("productName", "iPhone");
        product.put("price", 6999.99);

        // 方法3:从字符串解析
        String jsonStr = "{\"username\":\"李四\",\"email\":\"li@example.com\"}";
        JsonNode parsedNode = mapper.readTree(jsonStr);
        System.out.println("从字符串解析: " + parsedNode);

        // ========== 2. 创建 JSON 数组(类似 Fastjson 的 JSONArray)==========
        System.out.println("\n=== 2. 创建 JSON 数组 ===");

        ArrayNode hobbies = mapper.createArrayNode();
        hobbies.add("篮球");
        hobbies.add("游泳");
        hobbies.add("读书");

        System.out.println("ArrayNode: " + hobbies);
        // 输出: ["篮球","游泳","读书"]

        // 添加到对象中
        user.set("hobbies", hobbies);

        // ========== 3. 嵌套对象 ==========
        System.out.println("\n=== 3. 嵌套对象 ===");

        ObjectNode address = mapper.createObjectNode();
        address.put("province", "北京");
        address.put("city", "北京市");
        address.put("district", "海淀区");

        user.set("address", address);

        // 嵌套数组
        ArrayNode phoneNumbers = mapper.createArrayNode();

        ObjectNode phone1 = mapper.createObjectNode();
        phone1.put("type", "home");
        phone1.put("number", "010-12345678");

        ObjectNode phone2 = mapper.createObjectNode();
        phone2.put("type", "mobile");
        phone2.put("number", "13800138000");

        phoneNumbers.add(phone1);
        phoneNumbers.add(phone2);

        user.set("phones", phoneNumbers);

        System.out.println("完整对象: " + user.toPrettyString());
        // 输出格式化的 JSON

        // ========== 4. 读取值 ==========
        System.out.println("\n=== 4. 读取值 ===");

        // 读取基本类型
        String name = user.get("name").asText();  // "张三"
        int id = user.get("id").asInt();  // 1
        double price = product.get("price").asDouble();  // 6999.99
        boolean isStudent = user.get("isStudent").asBoolean();  // false

        System.out.println("name: " + name);
        System.out.println("id: " + id);

        // 读取嵌套对象
        String city = user.get("address").get("city").asText();
        System.out.println("city: " + city);

        // 读取数组
        JsonNode firstHobby = user.get("hobbies").get(0);
        System.out.println("first hobby: " + firstHobby.asText());

        // 安全读取(避免 NullPointerException)
        String country = user.path("address")
                            .path("country")
                            .asText("中国");  // 默认值
        System.out.println("country (默认值): " + country);

        // ========== 5. 遍历对象 ==========
        System.out.println("\n=== 5. 遍历对象 ===");

        // 遍历所有字段
        user.fields().forEachRemaining(entry -> {
            System.out.println("Key: " + entry.getKey() +
                             ", Value: " + entry.getValue());
        });

        // 遍历数组
        System.out.println("\n遍历爱好:");
        user.get("hobbies").forEach(hobby -> {
            System.out.println("hobby: " + hobby.asText());
        });

        // ========== 6. 修改和删除 ==========
        System.out.println("\n=== 6. 修改和删除 ===");

        // 修改值
        user.put("age", 26);
        user.put("name", "张三丰");

        // 添加新字段
        user.put("gender", "男");

        // 删除字段
        user.remove("isStudent");

        // 修改嵌套对象
        if (user.has("address")) {
            ((ObjectNode) user.get("address")).put("street", "中关村大街");
        }

        // 数组操作
        ArrayNode hobbiesNode = (ArrayNode) user.get("hobbies");
        hobbiesNode.add("编程");  // 添加
        hobbiesNode.remove(0);   // 删除第一个

        System.out.println("修改后: " + user);

        // ========== 7. 类型判断 ==========
        System.out.println("\n=== 7. 类型判断 ===");

        JsonNode testNode = user.get("name");
        System.out.println("isTextual: " + testNode.isTextual());  // true
        System.out.println("isNumber: " + testNode.isNumber());    // false
        System.out.println("isObject: " + testNode.isObject());     // false
        System.out.println("isArray: " + testNode.isArray());       // false

        JsonNode hobbiesNode2 = user.get("hobbies");
        System.out.println("hobbies isArray: " + hobbiesNode2.isArray());  // true

        // ========== 8. 序列化和反序列化 ==========
        System.out.println("\n=== 8. 序列化和反序列化 ===");

        // 转为 JSON 字符串
        String jsonString = mapper.writeValueAsString(user);
        System.out.println("JSON 字符串: " + jsonString);

        // 格式化输出
        String prettyJson = mapper.writerWithDefaultPrettyPrinter()
                                 .writeValueAsString(user);
        System.out.println("格式化 JSON:\n" + prettyJson);

        // 从字符串解析
        JsonNode parsedUser = mapper.readTree(jsonString);
        System.out.println("解析后的 name: " + parsedUser.get("name").asText());

        // ========== 9. 转为 Java 对象 ==========
        System.out.println("\n=== 9. 转为 Java 对象 ===");

        // 如果已有对应的 Java 类
        UserPojo userPojo = mapper.treeToValue(user, UserPojo.class);
        System.out.println("转为 UserPojo: " + userPojo);

        // Java 对象转为 JsonNode
        JsonNode nodeFromPojo = mapper.valueToTree(userPojo);
        System.out.println("从Pojo转为JsonNode: " + nodeFromPojo);
    }
}

// 对应的 POJO 类
class UserPojo {
    private int id;
    private String name;
    private int age;
    private String gender;
    private List<String> hobbies;
    private Address address;

    // 嵌套类
    static class Address {
        private String province;
        private String city;
        private String district;
        private String street;

        // getters 和 setters...
    }

    // getters 和 setters...
}
LocalDateTime 序列化配置
- 需要相关依赖
<!-- Maven -->
<dependency>
    <groupId>com.fasterxml.jackson.datatype</groupId>
    <artifactId>jackson-datatype-jsr310</artifactId>
    <version>2.13.0</version>
</dependency>

<!-- 或使用 Spring Boot Starter 中的版本 -->
<dependency>
    <groupId>com.fasterxml.jackson.datatype</groupId>
    <artifactId>jackson-datatype-jsr310</artifactId>
</dependency>
- 使用注解
public class Order {
private Long id;
private String orderNo;
// 方式1:最简单的格式化
(pattern = "yyyy-MM-dd HH:mm:ss")
private LocalDateTime createTime;
// 方式2:自定义序列化/反序列化器
(using = LocalDateTimeSerializer.class)
(using = LocalDateTimeDeserializer.class)
(pattern = "yyyy-MM-dd HH:mm:ss")
private LocalDateTime updateTime;
// 方式3:全局格式 + 特定格式
(pattern = "yyyy-MM-dd")
private LocalDateTime deliveryDate; // 只要日期部分
// 方式4:带时区(推荐用于跨时区系统)
(
pattern = "yyyy-MM-dd'T'HH:mm:ss.SSS'Z'", // ISO8601格式
timezone = "UTC" // 统一使用UTC
)
private LocalDateTime paymentTime;
// 方式5:使用预设格式
(
shape = JsonFormat.Shape.STRING,
pattern = "yyyy-MM-dd'T'HH:mm:ss.SSSZ", // 带时区
timezone = "Asia/Shanghai"
)
private LocalDateTime cancelTime;
// 方式6:处理可能为null的情况
(
pattern = "yyyy-MM-dd HH:mm:ss",
timezone = "GMT+8"
)
private LocalDateTime expireTime;
// getters 和 setters...
}
- 全局配置(推荐)
public class JacksonConfig {
// 定义全局日期时间格式
public static final String DATE_FORMAT = "yyyy-MM-dd";
public static final String TIME_FORMAT = "HH:mm:ss";
public static final String DATE_TIME_FORMAT = "yyyy-MM-dd HH:mm:ss";
public static final String ISO_FORMAT = "yyyy-MM-dd'T'HH:mm:ss.SSS'Z'";
public ObjectMapper objectMapper() {
ObjectMapper objectMapper = new ObjectMapper();
// 1. 注册 JavaTimeModule
JavaTimeModule javaTimeModule = new JavaTimeModule();
// 2. 配置 LocalDateTime 序列化/反序列化
// LocalDateTime
DateTimeFormatter dateTimeFormatter = DateTimeFormatter.ofPattern(DATE_TIME_FORMAT);
javaTimeModule.addSerializer(LocalDateTime.class,
new LocalDateTimeSerializer(dateTimeFormatter));
javaTimeModule.addDeserializer(LocalDateTime.class,
new LocalDateTimeDeserializer(dateTimeFormatter));
// LocalDate
DateTimeFormatter dateFormatter = DateTimeFormatter.ofPattern(DATE_FORMAT);
javaTimeModule.addSerializer(LocalDate.class,
new LocalDateSerializer(dateFormatter));
javaTimeModule.addDeserializer(LocalDate.class,
new LocalDateDeserializer(dateFormatter));
// LocalTime
DateTimeFormatter timeFormatter = DateTimeFormatter.ofPattern(TIME_FORMAT);
javaTimeModule.addSerializer(LocalTime.class,
new LocalTimeSerializer(timeFormatter));
javaTimeModule.addDeserializer(LocalTime.class,
new LocalTimeDeserializer(timeFormatter));
// 3. 配置 Instant(时间戳)
javaTimeModule.addSerializer(Instant.class, InstantSerializer.INSTANCE);
javaTimeModule.addDeserializer(Instant.class, InstantDeserializer.INSTANT);
// 4. 注册模块
objectMapper.registerModule(javaTimeModule);
// 5. 其他配置
objectMapper.disable(SerializationFeature.WRITE_DATES_AS_TIMESTAMPS); // 不使用时间戳
objectMapper.disable(DeserializationFeature.ADJUST_DATES_TO_CONTEXT_TIME_ZONE);
objectMapper.setTimeZone(TimeZone.getTimeZone("Asia/Shanghai")); // 设置时区
return objectMapper;
}
}
- Spring Boot 自动配置
# application.yml
spring:
  jackson:
    # 日期格式化
    date-format: yyyy-MM-dd HH:mm:ss
    time-zone: Asia/Shanghai

    # LocalDateTime 相关配置
    serialization:
      write-dates-as-timestamps: false  # 不使用时间戳
      write-date-timestamps-as-nanoseconds: false

    deserialization:
      adjust-dates-to-context-time-zone: false
      fail-on-unknown-properties: false

    # 空值处理
    default-property-inclusion: non_null

    # 美化输出
    pretty-print: true
Fastjson
Fastjson 常用注解
- @JSONField 全能注解(最常用!)
public class User {
// 1. 修改JSON字段名
(name = "user_id")
private Long id;
(name = "user_name")
private String username;
// 2. 忽略字段(不序列化)
(serialize = false)
private String password;
// 3. 控制反序列化(接收但不返回)
(deserialize = false) // 只能反序列化,不序列化
private String secretKey; // 接收但不能返回
// 4. 日期格式化
(format = "yyyy-MM-dd HH:mm:ss")
private Date createTime;
(format = "yyyy-MM-dd")
private Date birthday;
// 5. 控制字段顺序
(ordinal = 1) // 数字越小越靠前
private String name;
(ordinal = 2)
private Integer age;
(ordinal = 3)
private String email;
// 6. 处理空值
(serialzeFeatures = SerializerFeature.WriteMapNullValue)
private String nickname; // 即使为null也序列化
// 7. 默认值
(defaultValue = "unknown")
private String status; // 如果为null,使用"unknown"
// 8. 别名(接收多种字段名)
(alternateNames = {"mobile", "phone", "phoneNumber"})
private String mobilePhone;
// 构造方法
public User() {}
// getters 和 setters...
}
@JSONType类级别注解
// 控制整个类的序列化行为
(
// 指定字段顺序
orders = {"id", "name", "age", "email"},
// 忽略某些字段
ignores = {"password", "salt"},
// 只包含某些字段
includes = {"id", "name", "age"},
// 序列化特性
serialzeFeatures = {
SerializerFeature.WriteMapNullValue, // 输出空值字段
SerializerFeature.WriteDateUseDateFormat, // 使用日期格式
SerializerFeature.PrettyFormat // 美化输出
},
// 反序列化特性
parseFeatures = {
Feature.AllowUnQuotedFieldNames, // 允许不引号的字段名
Feature.IgnoreNotMatch // 忽略不匹配的字段
}
)
public class Person {
private Long id;
private String name;
private Integer age;
private String email;
private String password; // 会被忽略
private String salt; // 会被忽略
private String address; // 不在includes中,也会被忽略
// getters 和 setters...
}
@JSONCreator自定义构造方法:JSON字段名和构造方法参数名不匹配
public class Product {
private Long productId;
private String productName;
private BigDecimal price;
// 默认构造方法
public Product() {}
// 自定义构造方法(用于反序列化)
public Product(
(name = "id") Long productId,
(name = "name") String productName,
(name = "price") BigDecimal price
) {
this.productId = productId;
this.productName = productName;
this.price = price;
}
// getters 和 setters...
}
// 使用
String json = "{\"id\": 1001, \"name\": \"iPhone\", \"price\": 6999}";
Product product = JSON.parseObject(json, Product.class);
// productId = 1001, productName = "iPhone", price = 6999
- 序列化特性(SerializerFeature)详解
public class SerializerFeatureExample {
    public static void main(String[] args) {
        User user = new User();
        user.setId(1L);
        user.setName("张三");
        user.setAge(null);  // age为null
        user.setEmail(null);  // email为null

        // 1. 基本序列化
        String json1 = JSON.toJSONString(user);
        // {"user_id":1,"user_name":"张三"}
        // age和email为null,默认不序列化

        // 2. 输出null值
        String json2 = JSON.toJSONString(user,
            SerializerFeature.WriteMapNullValue);
        // {"user_id":1,"user_name":"张三","age":null,"email":null}

        // 3. 美化格式
        String json3 = JSON.toJSONString(user,
            SerializerFeature.PrettyFormat,
            SerializerFeature.WriteMapNullValue);
        // {
        //   "user_id": 1,
        //   "user_name": "张三",
        //   "age": null,
        //   "email": null
        // }

        // 4. 空值写为空字符串
        String json4 = JSON.toJSONString(user,
            SerializerFeature.WriteNullStringAsEmpty);
        // {"user_id":1,"user_name":"张三","age":null,"email":""}

        // 5. 日期使用时间戳
        user.setCreateTime(new Date());
        String json5 = JSON.toJSONString(user,
            SerializerFeature.WriteDateUseDateFormat);
        // 使用日期格式

        String json6 = JSON.toJSONString(user,
            SerializerFeature.WriteDateUseTimestamp);
        // {"createTime":1672531199000}  // 时间戳格式

        // 6. 组合使用多个特性
        String json7 = JSON.toJSONString(user,
            SerializerFeature.WriteMapNullValue,
            SerializerFeature.PrettyFormat,
            SerializerFeature.WriteDateUseDateFormat,
            SerializerFeature.UseISO8601DateFormat);
    }
}
- 反序列化特性(Feature)详解
public class FeatureExample {
    public static void main(String[] args) {
        String json = "{id:1, name:'张三', AGE:25}";
        // 注意:字段名没有引号,大小写不匹配

        try {
            // 1. 严格模式(默认)
            User user1 = JSON.parseObject(json, User.class);
            // 会报错:字段名没有引号

            // 2. 宽松模式
            User user2 = JSON.parseObject(json, User.class,
                Feature.AllowUnQuotedFieldNames,  // 允许字段名不用引号
                Feature.IgnoreNotMatch,  // 忽略不匹配字段
                Feature.SupportArrayToBean,  // 支持数组转对象
                Feature.AllowSingleQuotes,  // 允许单引号
                Feature.AllowISO8601DateFormat  // 允许ISO8601日期格式
            );
            // 成功解析

            // 3. 自动转为下划线命名
            String json2 = "{\"user_id\":2,\"user_name\":\"李四\"}";
            User user3 = JSON.parseObject(json2, User.class,
                Feature.SupportAutoType  // 支持自动类型
            );

        } catch (Exception e) {
            e.printStackTrace();
        }
    }
}
- 配置全局Fastjson
public class FastjsonConfig {
public HttpMessageConverters fastJsonHttpMessageConverters() {
// 1. 创建Fastjson消息转换器
FastJsonHttpMessageConverter converter = new FastJsonHttpMessageConverter();
// 2. 创建Fastjson配置
FastJsonConfig config = new FastJsonConfig();
// 3. 配置序列化规则
config.setSerializerFeatures(
SerializerFeature.WriteMapNullValue, // 输出空字段
SerializerFeature.WriteNullStringAsEmpty, // 字符串null转""
SerializerFeature.WriteNullListAsEmpty, // List null转[]
SerializerFeature.WriteNullNumberAsZero, // 数字null转0
SerializerFeature.WriteNullBooleanAsFalse, // Boolean null转false
SerializerFeature.PrettyFormat, // 美化输出
SerializerFeature.WriteDateUseDateFormat, // 日期格式化
SerializerFeature.DisableCircularReferenceDetect // 禁用循环引用
);
// 4. 配置日期格式
config.setDateFormat("yyyy-MM-dd HH:mm:ss");
// 5. 配置反序列化规则
config.setParserFeatures(
Feature.AllowUnQuotedFieldNames,
Feature.AllowSingleQuotes,
Feature.IgnoreNotMatch,
Feature.AllowISO8601DateFormat
);
// 6. 配置序列化过滤器
config.setSerializeFilters(
new ValueFilter() {
public Object process(Object object, String name, Object value) {
// 自定义序列化逻辑
if (value == null) {
return "";
}
if (value instanceof Date) {
return ((Date) value).getTime(); // 日期转时间戳
}
return value;
}
}
);
// 7. 应用配置
converter.setFastJsonConfig(config);
// 8. 支持的MediaType
converter.setSupportedMediaTypes(Arrays.asList(
MediaType.APPLICATION_JSON,
MediaType.APPLICATION_JSON_UTF8
));
return new HttpMessageConverters(converter);
}
}
- Fastjson 安全提醒
// 危险!不要这样用!
String json = "{\"@type\":\"com.xxx.HackerClass\", ...}";
Object obj = JSON.parse(json);  // 可能被攻击!

// 安全的用法:
// 1. 指定具体类型
User user = JSON.parseObject(json, User.class);

// 2. 关闭自动类型推导
ParserConfig config = ParserConfig.getGlobalInstance();
config.setAutoTypeSupport(false);  // 关闭AutoType

// 3. 添加白名单
config.addAccept("com.yourcompany.");
config.addAccept("com.safe.");

// 4. 或者使用安全的API
String safeJson = JSON.toJSONString(user);
User safeUser = JSON.parseObject(safeJson, User.class);
HTTP-流式响应
http请求方式
- 原生 java 方式
public String httpURLConnectionGet(String url) throws IOException {
    HttpURLConnection conn = (HttpURLConnection) new URL(url).openConnection();
    conn.setRequestMethod("POST");
    // 设置请求头
    conn.setRequestProperty("Accept", "application/json");
    // 启用输出流,允许发送请求体
    conn.setDoOutput(true);
    // 发送请求体
    try (DataOutputStream wr = new DataOutputStream(conn.getOutputStream(), StandardCharsets.UTF_8)) {
        wr.write(jsonStr.getBytes(StandardCharsets.UTF_8));
        wr.flush();
    }

    // 读取响应
    int responseCode = conn.getResponseCode();
    try (BufferedReader reader = new BufferedReader(
            new InputStreamReader(conn.getInputStream(), StandardCharsets.UTF_8))) {
        StringBuilder response = new StringBuilder();
        String line;
        while ((line = reader.readLine()) != null) {
            response.append(line);
        }
        return response.toString();
    }


    // post请求
    String url = "http://localhost:8080/user/updateUser";
    HttpHeaders headers = new HttpHeaders();
    headers.setContentType(MediaType.APPLICATION_JSON); // 明确设置 Content-Type
    JSONObject paramMap = new JSONObject();
    paramMap.set("id", "1");
    paramMap.set("name", "zmy");
    paramMap.set("age", 18);
    paramMap.set("birthday", "2025-05-21 00:00:00");
    HttpEntity<String> request = new HttpEntity<>(paramMap.toString(), headers);
    String result = restTemplate.postForObject(url, request, String.class);
    JSONObject jsonObject = JSONUtil.parseObj(result);
    System.out.println(jsonObject.toJSONString(2));
}
- RestTemplate
// 同步请求
public String getWithRestTemplate(String url) {
    ResponseEntity<String> response = restTemplate.getForEntity(url, String.class);
    return response.getBody();
}

// 流式读取
public void streamWithRestTemplate(String url) {
    restTemplate.execute(url, HttpMethod.GET, null, clientHttpResponse -> {
        try (BufferedReader reader = new BufferedReader(
                new InputStreamReader(clientHttpResponse.getBody()))) {
            String line;
            while ((line = reader.readLine()) != null) {
                // 处理每一行数据
                processLine(line);
            }
        }
        return null;
    });
}
- 不同方法区别
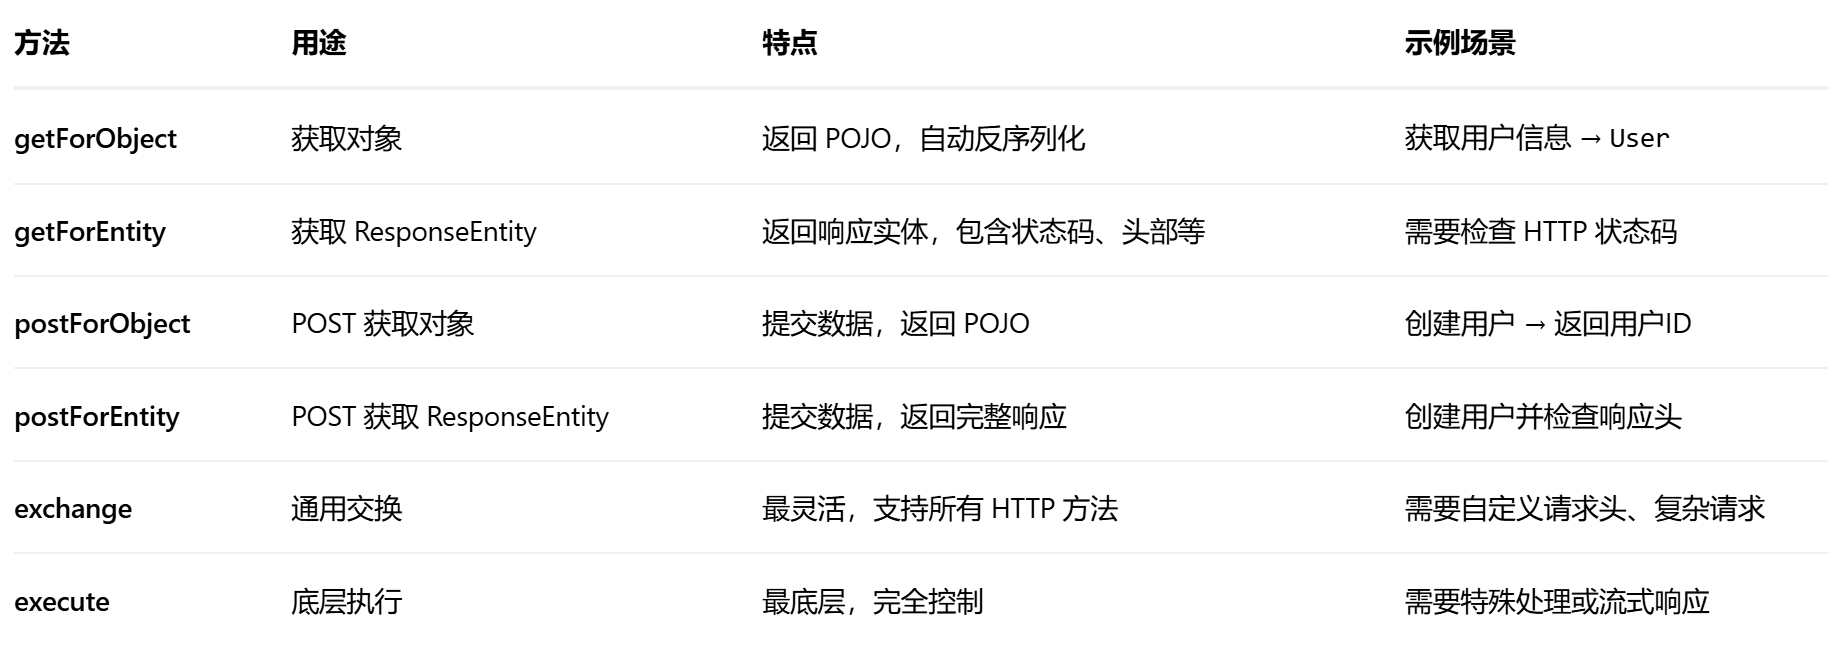
// 1. getForObject - 返回对象
public User getUserSimple(Long userId) {
    // 自动将 JSON 转换为 User 对象
    return restTemplate.getForObject(
        "http://api.example.com/users/{id}",
        User.class,  // 返回类型
        userId       // 路径变量
    );
}

public List<User> getUserList() {
    // 使用 ParameterizedTypeReference 处理泛型
    return restTemplate.getForObject(
        "http://api.example.com/users",
        List.class  // 注意:这里会丢失泛型信息
    );
}
// 更好的方式处理泛型
public List<User> getUsersWithType() {
    // 使用 exchange 或 包装类
    ResponseEntity<List<User>> response = restTemplate.exchange(
        "http://api.example.com/users",
        HttpMethod.GET,
        null,
        new ParameterizedTypeReference<List<User>>() {}
    );
    return response.getBody();
}

// getForEntity获取完整响应体
public ResponseEntity<User> getUserWithDetails(Long userId) {
    // 返回 ResponseEntity,包含状态码、头部、body
    ResponseEntity<User> response = restTemplate.getForEntity(
        "http://api.example.com/users/{id}",
        User.class,
        userId
    );

    // 获取响应信息
    HttpStatus statusCode = response.getStatusCode();  // 状态码
    HttpHeaders headers = response.getHeaders();       // 响应头
    User user = response.getBody();                    // 响应体

    // 检查状态码
    if (statusCode.is2xxSuccessful()) {
        System.out.println("请求成功");
    }

    // 获取特定头部
    String contentType = headers.getContentType().toString();
    String cacheControl = headers.getCacheControl();

    return response;
}

public void getWithQueryParams() {
    // 使用 URI 构建查询参数
    UriComponentsBuilder builder = UriComponentsBuilder
        .fromUriString("http://api.example.com/users")
        .queryParam("page", 1)
        .queryParam("size", 10)
        .queryParam("sort", "name,desc");

    ResponseEntity<List<User>> response = restTemplate.getForEntity(
        builder.build().toUri(),
        new ParameterizedTypeReference<List<User>>() {}
    );
}

// exchange方法
public User getUserWithCustomHeaders(Long userId) {
    // 1. 创建请求头
    HttpHeaders headers = new HttpHeaders();
    headers.set("Authorization", "Bearer " + getToken());
    headers.setContentType(MediaType.APPLICATION_JSON);
    headers.setAccept(Collections.singletonList(MediaType.APPLICATION_JSON));

    // 2. 创建 HttpEntity(包含请求体和头部)
    User user = new User();
    HttpEntity<String> entity = new HttpEntity<>(user, headers);

    // 3. 发送请求
    ResponseEntity<User> response = restTemplate.exchange(
        "http://api.example.com/users/{id}",
        HttpMethod.POST,
        entity,      // 包含头部的请求实体
        User.class,
        userId
    );

    return response.getBody();
}
// 使用ParameterizedTypeReference返回复杂对象
public Map<String, Object> getComplexResponse() {
    ResponseEntity<Map<String, Object>> response = restTemplate.exchange(
        "http://api.example.com/stats",
        HttpMethod.GET,
        null,
        new ParameterizedTypeReference<Map<String, Object>>() {}
    );

    return response.getBody();
}

// execute方法,最低层
public String executeWithCallback(String url) {
    return restTemplate.execute(
        url,
        HttpMethod.GET,
        request -> {
            // 自定义请求回调
            request.getHeaders().set("X-Custom-Header", "value");
            request.getHeaders().setAccept(Collections.singletonList(MediaType.APPLICATION_JSON));
        },
        response -> {
            // 自定义响应提取
            if (response.getStatusCode().is2xxSuccessful()) {
                return new BufferedReader(new InputStreamReader(response.getBody()))
                    .lines().collect(Collectors.joining("\n"));
            } else {
                throw new RuntimeException("请求失败: " + response.getStatusCode());
            }
        }
    );
}

public void downloadFile(String fileUrl, String savePath) throws IOException {
    restTemplate.execute(
        fileUrl,
        HttpMethod.GET,
        null,
        clientHttpResponse -> {
            // 处理流式响应
            try (InputStream inputStream = clientHttpResponse.getBody();
                 FileOutputStream outputStream = new FileOutputStream(savePath)) {

                byte[] buffer = new byte[8192];
                int bytesRead;
                while ((bytesRead = inputStream.read(buffer)) != -1) {
                    outputStream.write(buffer, 0, bytesRead);
                }
            }
            return null;
        }
    );
}
- HTTP client
// 同步请求
public String apacheHttpClientGet(String url) throws IOException {
    try (CloseableHttpClient client = HttpClients.createDefault()) {
        HttpGet request = new HttpGet(url);
        try (CloseableHttpResponse response = client.execute(request)) {
            return EntityUtils.toString(response.getEntity());
        }
    }
}

// 流式处理
public void apacheHttpClientStream(String url) throws IOException {
    try (CloseableHttpClient client = HttpClients.createDefault()) {
        HttpGet request = new HttpGet(url);
        try (CloseableHttpResponse response = client.execute(request)) {
            HttpEntity entity = response.getEntity();
            try (InputStream inputStream = entity.getContent();
                 BufferedReader reader = new BufferedReader(
                     new InputStreamReader(inputStream))) {
                String line;
                while ((line = reader.readLine()) != null) {
                    processLine(line);
                }
            }
        }
    }
}
http header设置
- Java HTTP请求基础Headers设置
public HttpHeaders getBasicRequestHeaders() {
    HttpHeaders headers = new HttpHeaders();

    // ============ 强烈推荐 ============
    // 1. User-Agent (必需,服务器识别客户端)
    headers.set("User-Agent",
        "Mozilla/5.0 (Windows NT 10.0; Win64; x64) " +
        "AppleWebKit/537.36 (KHTML, like Gecko) " +
        "Chrome/120.0.0.0 Safari/537.36");

    // 2. Accept (告诉服务器能接受的数据类型)
    headers.setAccept(Arrays.asList(
        MediaType.APPLICATION_JSON,       // 优先JSON
        MediaType.APPLICATION_XML,        // 其次XML
        MediaType.TEXT_PLAIN              // 最后文本
    ));

    // 3. Accept-Encoding (压缩支持,节省带宽)
    headers.set("Accept-Encoding", "gzip, deflate, br");

    // 4. Accept-Language (语言偏好)
    headers.set("Accept-Language", "zh-CN,zh;q=0.9,en;q=0.8");

    // 5. Connection (连接管理)
    headers.set("Connection", "keep-alive");  // 保持连接

    // 6. Cache-Control (缓存控制)
    headers.set("Cache-Control", "no-cache");  // 不要缓存

    // API特定Headers
    headers.setContentType(MediaType.APPLICATION_JSON);

    return headers;
}
- 文件上传
public HttpHeaders getUploadHeaders(String fileName, long fileSize) {
    HttpHeaders headers = new HttpHeaders();

    // 必须设置Content-Type
    headers.setContentType(MediaType.MULTIPART_FORM_DATA);

    // 边界字符串,用于multipart
    String boundary = "----WebKitFormBoundary" + UUID.randomUUID().toString();
    headers.setContentType(MediaType.parseMediaType(
        "multipart/form-data; boundary=" + boundary));

    // 文件信息
    headers.set("Content-Disposition",
        "form-data; name=\"file\"; filename=\"" + fileName + "\"");

    // 文件类型
    String mimeType = Files.probeContentType(Paths.get(fileName));
    if (mimeType != null) {
        headers.set("Content-Type", mimeType);
    }

    // 文件大小
    headers.set("Content-Length", String.valueOf(fileSize));

    return headers;
}
- 文件下载Headers配置
("/download")
public ResponseEntity<Resource> downloadFile(
String fileName,
HttpServletRequest request) throws IOException {
Path filePath = Paths.get("/files", fileName);
Resource resource = new FileSystemResource(filePath);
// 1. 基础响应Headers
HttpHeaders headers = new HttpHeaders();
// ============ 核心Headers ============
// Content-Type (必须)
String contentType = determineContentType(fileName);
headers.setContentType(MediaType.parseMediaType(contentType));
// 使用自定义头传递文件名
headers.add("X-File-Name", fileName);
// Content-Disposition (控制下载行为)
String contentDisposition = String.format(
"attachment; filename=\"%s\"",
URLEncoder.encode(fileName, StandardCharsets.UTF_8));
headers.add("Content-Disposition", contentDisposition);
// Content-Length (重要,帮助浏览器显示进度)
headers.setContentLength(Files.size(filePath));
// ============ 可选但推荐的Headers ============
// 缓存控制
headers.setCacheControl(CacheControl.noCache()
.mustRevalidate()
.cachePrivate());
// 最后修改时间
FileTime lastModified = Files.getLastModifiedTime(filePath);
headers.setLastModified(lastModified.toMillis());
// ETag (实体标签,用于缓存验证)
String etag = "\"" + Files.size(filePath) + "-" +
lastModified.toMillis() + "\"";
headers.setETag(etag);
// 范围请求支持 (大文件分片下载)
headers.set("Accept-Ranges", "bytes");
// ============ 安全相关Headers ============
// 防止MIME类型嗅探
headers.set("X-Content-Type-Options", "nosniff");
// 防止点击劫持
headers.set("X-Frame-Options", "DENY");
// 内容安全策略
headers.set("Content-Security-Policy", "default-src 'self'");
return ResponseEntity.ok()
.headers(headers)
.body(resource);
}
- 通用API请求头
public HttpHeaders apiRequestTemplate() {
    return HttpHeaders.of(Map.of(
        "Accept", "application/json",
        "Content-Type", "application/json",
        "User-Agent", "MyApp/1.0.0",
        "Authorization", "Bearer {token}",
        "X-Request-ID", UUID.randomUUID().toString(),
        "Accept-Encoding", "gzip, deflate",
        "Cache-Control", "no-cache"
    ));
}
- 文件上传
public HttpHeaders fileUploadTemplate(String fileName) {
    String boundary = "----" + UUID.randomUUID();
    return HttpHeaders.of(Map.of(
        "Content-Type", "multipart/form-data; boundary=" + boundary,
        "Content-Disposition",
            "form-data; name=\"file\"; filename=\"" + fileName + "\"",
        "Cache-Control", "no-cache"
    ));
}
- 文件下载响应
public HttpHeaders fileDownloadTemplate(String fileName, long fileSize) {
    return HttpHeaders.of(Map.of(
        "Content-Type", getMimeType(fileName),
        "Content-Disposition", "attachment; filename=\"" + fileName + "\"",
        "Content-Length", String.valueOf(fileSize),
        "Accept-Ranges", "bytes",
        "Cache-Control", "no-cache, no-store, must-revalidate",
        "Pragma", "no-cache",
        "Expires", "0",
        "X-Content-Type-Options", "nosniff"
    ));
}
- 流式输出,关键在于设置响应头为
text/event-stream,并逐个向响应中写入数据
HttpHeaders headers = new HttpHeaders();
// 一次性设置内容类型和编码,不要分开设置:response.setContentType("text/event-stream");response.setCharacterEncoding("UTF-8");
headers.set("Content-Type", "text/event-stream; charset=utf-8");
headers.set("Transfer-Encoding", "chunked");
headers.set("Cache-Control", "no-cache");
headers.set("Connection", "keep-alive");
headers.set("X-Accel-Buffering", "no");  // 如果使用Nginx代理
流式响应
- 流式响应结构:SSE 的基本传输格式是纯文本,以 event:、data:、id: 等字段开头,每个字段占一行,事件之间用 两个换行符 \n\n 分隔,符合这种格式的,浏览器network中才会流式输出
- 流式响应的关键在于设置
text/event-stream;charset=utf-8响应头,标准SSE格式的会被EventSource识别,没有标准格式的可以使用fetch自己解析
// SSE响应头
response.setContentType("text/event-stream; charset=utf-8");
response.setHeader("Cache-Control", "no-cache");
response.setHeader("Connection", "keep-alive");
// 分块传输
response.setHeader("Transfer-Encoding", "chunked");
// 流式JSON
response.setContentType("application/x-ndjson"); // Newline Delimited JSON
- 后端接口
(origins = "*")
("/bodyEmitter")
public ResponseBodyEmitter handle(HttpServletResponse response) {
response.setContentType("text/event-stream; charset=utf-8");
ResponseBodyEmitter emitter = new ResponseBodyEmitter(0L);
CompletableFuture.runAsync(() -> {
try {
for (int i = 0; i < 5; i++) {
Sse sse = new Sse(i, "eventType", "消息:" + i + ",时间:" + new Date());
String message = sse.toJson();
System.out.println(message);
emitter.send(message, MediaType.APPLICATION_JSON);
Thread.sleep(1000);
}
emitter.complete();
} catch (Exception e) {
emitter.completeWithError(e);
}
}, sseExecutor); // 使用线程池
return emitter;
}
(originPatterns = "http://127.0.0.1:[*], http://localhost:[*]")
("/sse")
public SseEmitter sse(HttpServletResponse response){
// SseEmitter不设置text/event-stream也能流式输出,SseEmitter重载了extendResponse方法,在其中设置了响应头text/event-stream
SseEmitter emitter = new SseEmitter(0L);
CompletableFuture.runAsync(()->{
try {
for (int i = 0; i < 5; i++){
System.out.println("发送消息" + i);
emitter.send(SseEmitter.event()
.id(String.valueOf(i))
// .name("eventType")
.data("消息" + i + new Date(), MediaType.TEXT_PLAIN));
TimeUnit.SECONDS.sleep(1);
}
emitter.complete();
} catch (Exception e) {
emitter.completeWithError(e);
}
}, sseExecutor); // 使用线程池
return emitter;
}
(origins = "*")
("/streaming")
public ResponseEntity<StreamingResponseBody> streamingResponse(HttpServletResponse response) throws IOException {
StreamingResponseBody streamingResponseBody = out -> {
Writer writer = new OutputStreamWriter(out, StandardCharsets.UTF_8);
for (int i = 0; i < 5; i++) {
try {
String message = "data: 消息:" + i + ",时间:" + new Date() + "\n\n";
System.out.println(message);
writer.write(message);
writer.flush();// 主动刷新
TimeUnit.SECONDS.sleep(1);
} catch (Exception e) {
e.printStackTrace();
}
}
};
return ResponseEntity.ok()
.contentType(MediaType.TEXT_EVENT_STREAM) // 显示设置流式输出
.body(streamingResponseBody);
}
- 这些流式输出,内部是使用的sringmvc的异步请求,会一直等待请求响应结束,但不会占用tomcat线程,而是使用内置的线程池,需要配置mvc异步请求
public class WebConfig implements WebMvcConfigurer {
("taskExecutor")
private ThreadPoolTaskExecutor taskExecutor;
public void configureAsyncSupport(AsyncSupportConfigurer configurer) {
configurer.setTaskExecutor(taskExecutor);
configurer.setDefaultTimeout(30000);
}
}
SseEmitter是ResponseBodyEmitter子类,专门用户SSE输出。用于向客户端持续推送文本事件(如实时通知、进度更新)。自动设置Content-Type: text/event-stream。支持多条消息发送,直到调用complete()或超时。⚠️ 注意:每个SseEmitter会占用一个Tomcat线程(除非配合异步处理),高并发需谨慎。ResponseBodyEmitter通用的单向流式输出,比SseEmitter更通用ResponseEntity<StreamingResponseBody>同步块写入流,不依赖异步线程池,直接在Controller方法中逐块写入OutputStream。适合大文件下载、后端等场景。不会阻塞额外线程(但会占用 Servlet 容器线程直到完成)。
important
- SseEmitter 和 ResponseBodyEmitter 应该使用线程池运行,用虚拟线程或固定池;注意超时和异常处理
- StreamingResponseBody 适用大文件下载、简单流输出等,不需要使用线程池,但会占 Tomcat 线程;避免长时间运行
- 前端处理流式响应
- eventsource是根据SSE的标准格式进行解析的,event.data就能直接获取到data部分
- EventSource处理SSE流,仅支持GET请求,会自动进行重连
- eventSource.readyState 属性:
- EventSource.CONNECTING (0): 表示连接正在建立中。
- EventSource.OPEN(1): 表示连接已经建立并处于打开状态。
- EventSource.CLOSED(2): 表示连接已经关闭。
- eventSource.readyState 属性:
- 可以在后端控制最后一个消息的类型是done,然后注册监听done事件,主动关闭eventsource
- 或者在onclose事件中主动关闭eventsource
function setupSSEStream(url) {
    const eventSource = new EventSource(url);
    // onmessage只能处理默认的event:事件,
    eventSource.onmessage = (event) => {
        const data = event.data;
        console.log('Received:', data);
        updateUI(data);
    };

    eventSource.onopen = () => {
        console.log('Connection opened');
    };

    eventSource.onerror = (error) => {
        console.error('Error:', error);
        eventSource.close();
    };

    eventSource.onclose = (close) => {
        console.error('Close:', close);
        eventSource.close();
    };

    // 处理自定义结束事件
    eventSource.addEventListener('done', (event) => {
        console.log('Custom event:', event.data);
        eventsource.close();
    });

    return eventSource;
}

// 使用Fetch API处理流式响应,支持POST请求
// 处理文本流
async function handleTextStream(url) {
    const response = await fetch(url);
    const reader = response.body
        .pipeThrough(new TextDecoderStream())
        .getReader();

    while (true) {
        const { done, value } = await reader.read();
        if (done) break;
        // 这里获取的value是后端的原始内容,需要手动获取各个部分,后端可返回json字符串,前端自己取
        console.log('Chunk:', value);
        processChunk(value);
    }
}

// 处理JSON流(NDJSON)
async function handleJSONStream(url) {
    const response = await fetch(url);
    const reader = response.body
        .pipeThrough(new TextDecoderStream())
        .getReader();

    let buffer = '';

    while (true) {
        const { done, value } = await reader.read();
        if (done) break;

        buffer += value;
        const lines = buffer.split('\n');
        buffer = lines.pop() || ''; // 保存不完整的行

        for (const line of lines) {
            if (line.trim()) {
                try {
                    const data = JSON.parse(line);
                    processJSON(data);
                } catch (e) {
                    console.error('Parse error:', e);
                }
            }
        }
    }
}

// axios
// Axios处理流式响应
async function axiosStream(url) {
    try {
        const response = await axios({
            method: 'GET',
            url: url,
            responseType: 'stream', // Node.js环境
            onDownloadProgress: (progressEvent) => {
                // 处理进度
                const chunk = progressEvent.currentTarget.response;
                processPartialData(chunk);
            }
        });
    } catch (error) {
        console.error('Error:', error);
    }
}

// 浏览器环境使用ReadableStream
async function axiosBrowserStream(url) {
    const response = await axios.get(url, {
        responseType: 'blob',
        onDownloadProgress: (progressEvent) => {
            const percentCompleted = Math.round(
                (progressEvent.loaded * 100) / progressEvent.total
            );
            updateProgress(percentCompleted);
        }
    });

    const reader = response.data.stream().getReader();
    while (true) {
        const { done, value } = await reader.read();
        if (done) break;
        processChunk(value);
    }
}

// WebSocket处理
function setupWebSocket(url) {
    const ws = new WebSocket(url);

    ws.onopen = () => {
        console.log('WebSocket connected');
        ws.send('start_stream');
    };

    ws.onmessage = (event) => {
        const data = event.data;
        processStreamData(data);
    };

    ws.onerror = (error) => {
        console.error('WebSocket error:', error);
    };

    ws.onclose = () => {
        console.log('WebSocket disconnected');
    };

    return ws;
}
Resource类
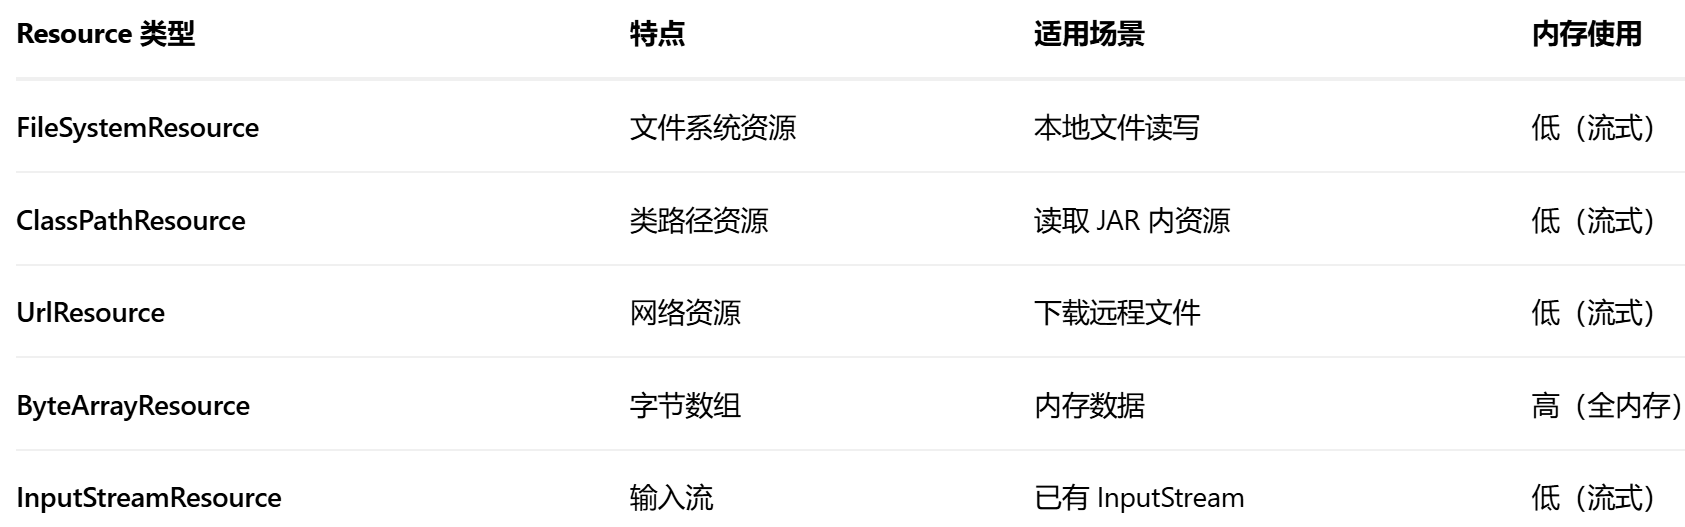
- 创建Resource各种方式
public void createResources() throws IOException {
// 1. 通过 ResourceLoader(Spring 自动注入)
private ResourceLoader resourceLoader;
Resource fileResource1 = resourceLoader.getResource("file:/path/to/file.txt");
Resource classpathResource1 = resourceLoader.getResource("classpath:config/app.properties");
Resource urlResource1 = resourceLoader.getResource("https://example.com/file.txt");
// 2. 直接创建
// FileSystemResource
Resource fileResource2 = new FileSystemResource("/path/to/file.txt");
Resource fileResource3 = new FileSystemResource(new File("/path/to/file.txt"));
Resource fileResource4 = new FileSystemResource(Paths.get("/path/to/file.txt"));
// ClassPathResource
Resource classpathResource2 = new ClassPathResource("config/app.properties");
Resource classpathResource3 = new ClassPathResource("config/app.properties", getClass());
Resource classpathResource4 = new ClassPathResource("config/app.properties", getClass().getClassLoader());
// UrlResource
Resource urlResource2 = new UrlResource("https://example.com/file.txt");
Resource urlResource3 = new UrlResource(new URL("https://example.com/file.txt"));
// ByteArrayResource
byte[] data = "Hello World".getBytes();
Resource byteArrayResource = new ByteArrayResource(data);
// InputStreamResource
InputStream inputStream = new FileInputStream("/path/to/file.txt");
Resource inputStreamResource = new InputStreamResource(inputStream);
}
回到目录
ByteBuddy
- 链接
- 示例
DynamicType.Unloaded<?> dynamicType = new ByteBuddy()//ByteBuddy 是不可变的,Unloaded表示未加载的类
.with(new NamingStrategy.AbstractBase() {
protected String name(TypeDescription superClass) {
return "i.love.ByteBuddy." + superClass.getSimpleName();//自定义类名
}
})
.subclass(Object.class)//继承Object
.make();
new ByteBuddy().subclass(Foo.class);//生成子类
new ByteBuddy().redefine(Foo.class);//重定义类,丢失原始信息
new ByteBuddy().rebase(Foo.class);//重基类,保留所有方法,生成增加方法
// 方法选择,类似于选择重载方法的逻辑,后添加的那个方法选择器位于栈顶,最先被应用,更具体的选择器应该放在最后调用
class Foo {
public String bar() { return null; }
public String foo() { return null; }
public String foo(Object o) { return null; }
}
Foo dynamicFoo = new ByteBuddy()
.subclass(Foo.class)
.method(isDeclaredBy(Foo.class)).intercept(FixedValue.value("One!"))
.method(named("foo")).intercept(FixedValue.value("Two!"))
.method(named("foo").and(takesArguments(1))).intercept(FixedValue.value("Three!"))
.make()
.load(getClass().getClassLoader())
.getLoaded()
.newInstance();
// 委托方法调用
public class Bar {
public List<String> load(String info) {
return Arrays.asList(info + ": foo", info + ": bar");
}
}
public static class Interceptor {
public static List<String> log(
Callable<List<String>> zuper,// 调用目标方法,必不可少
Object obj, // 动态生成的目标对象generateBar
Object[] allArguments, // 注入目标方法的全部参数
Method method, // 目标方法
Bar bar // 动态生成的父类实例,可以调用原始的方法,使用不同的参数,其中的字段和generateBar的字段是不同的
)throws Exception {
System.out.println("Calling Interceptor");
try {
System.out.println(bar.load(allArguments[0] + "123"));
return zuper.call();
} finally {
System.out.println("Returned from database");
}
}
}
public void annotateDelegateTest() throws IllegalAccessException, InstantiationException {
Bar generateBar = new ByteBuddy()
.subclass(Bar.class)
.method(named("load")).intercept(MethodDelegation.to(Interceptor.class))
.make()
.load(ByteBuddyTest.class.getClassLoader())
.getLoaded()
.newInstance();
System.out.println(generateBar.load("ssss"));
}
// 转发方法调用
public class Bar {
public List<String> log(String info) {
return Arrays.asList(info + ": foo", info + ": bar");
}
}
public class ForwardingLoggerInterceptor {
private final Bar bar;
public ForwardingLoggerInterceptor(Bar bar) {
this.bar = bar;
}
public List<String> log( Function<Bar, List<String>> pipe) {
System.out.println("Calling log");
try {
return pipe.apply(bar);
} finally {
System.out.println("Returned from log");
}
}
public static void main(String[] args) throws ReflectiveOperationException {
Bar generateBar = new ByteBuddy()
.subclass(Bar.class)
.method(named("log"))
.intercept(MethodDelegation.withDefaultConfiguration()
.withBinders(Pipe.Binder.install(Function.class))
.to(new ForwardingLoggerInterceptor(new Bar())))//转发到ForwardingLoggerInterceptor对象上的log方法
.make()
.load(ForwardingLoggerInterceptor.class.getClassLoader())
.getLoaded()
.getDeclaredConstructor().newInstance();
System.out.println(generateBar.load("Hello"));;
}
}
// 访问字段
class UserService {
public String doSomething() { return null; }
}
interface Strategy {
String doSomethingElse();
}
interface StrategyAccessor {
Strategy getStrategy();
void setStrategy(Strategy strategy);
}
interface InstanceCreator {
Object makeInstance();
}
Class<? extends UserService> dynamicUserServiceClass = new ByteBuddy()
.subclass(UserService.class)
.method(not(isDeclaredBy(Object.class)))
.intercept(MethodDelegation.toField("strategy"))// doSomething方法委托给strategy字段
.defineField("strategy", Strategy.class, Visibility.PRIVATE)// 为子类定义字段
.implement(StrategyAccessor.class)
.intercept(FieldAccessor.ofBeanProperty())// 实现字段访问器,生成getter/setter
.make()
.load(getClass().getClassLoader())
.getLoaded();
InstanceCreator factory = new ByteBuddy()
.subclass(InstanceCreator.class)
.method(not(isDeclaredBy(Object.class)))
.intercept(MethodDelegation.toConstructor(dynamicUserServiceClass))// makeInstance委托给dynamicUserServiceClass的构造函数
.make()
.load(dynamicUserServiceClass.getClassLoader())// 必须使用dynamicUserServiceClass的类加载器
.getLoaded().newInstance();
class HelloWorldStrategy implements Strategy {
public String doSomethingElse() {
return "Hello World!";
}
}
UserService userService = (UserService) factory.makeInstance();
((StrategyAccessor) userType).setStrategy(new HelloWorldStrategy());
// 类型注释
(RetentionPolicy.RUNTIME)
@interface RuntimeDefinition {
}
class RuntimeDefinitionImpl implements RuntimeDefinition {
public Class<? extends Annotation> annotationType() {
return RuntimeDefinition.class;
}
}
new ByteBuddy()
.subclass(Object.class)
.annotateType(new RuntimeDefinitionImpl())
.make();
回到目录
Jackson
-
"对象映射(Object Mapping)" 是 Jackson 最核心的概念,分成
jackson-core和jackson-databind两层。 -
对象映射 = Java 对象 ↔ JSON 的自动转换。
-
一、没有对象映射时(jackson-core)假设有一段 JSON,如果只有
jackson-core,拿到的是一个 Token 流。 -
Jackson Core 根本不知道:什么叫 User,什么叫 Person,age 是 int,name 是 String。它只知道 JSON 是由 Token 组成的。
-
二、有对象映射时(jackson-databind)把 JSON 映射成 Java 对象,把 Java 对象转换为 JSON。,Jackson 自己读取字段,读取getter,读取注解,写JSON,不用手动
generator.writeStartObject() -
所以 Mapping 其实映射的是:Java对象属性(Property)到 JSON 字段(Field)
-
五、为什么叫 Databind?因为它不仅仅是把 JSON 转为对象,而是把 JSON 数据绑定(Data Bind)到 Java 对象。所以整个模块叫:jackson-databind
-
六、ObjectReadContext 为什么需要 Mapper?parser.readValueAsTree() 时Parser 本身不会把JSON转为JsonNode,它只会把JSON转为Token。Core看到的是:START_OBJECT、FIELD_NAME、VALUE_STRING、END_OBJECT
-
要变成
ObjectNode node;node.put("name","Tom");是 JsonNodeDeserializer 的工作,它属于 jackson-databind。Parser -> ObjectReadContext -> JsonNodeDeserializer -> JsonNode -
七、writePOJO() 为什么也需要 Context?Generator 根本不知道:User 是什么。于是:ObjectWriteContext 会去找:SerializerProvider,BeanSerializer,反射User,getter,@JsonProperty,@JsonFormat,@JsonInclude,Module,最后写JSON。这整个过程,就是:对象映射。
-
八、举一个更复杂的例子,例如:
class User {
("user_name")
String name;
(pattern="yyyy-MM-dd")
LocalDate birthday;
String password;
}
Mapper 做的事情其实很多:反射,发现字段,读取@JsonProperty,读取@JsonFormat,读取@JsonIgnore,找到LocalDateSerializer,调用Serializer,输出JSON,password 根本不会输出。这些都是 Object Mapping。
{
    "user_name":"Tom",
    "birthday":"2025-01-01"
}
- 九、为什么 Jackson3 要把 Mapping 和 Core 分开?因为它们其实是两套完全不同的能力。
- jackson-core 是把 JSON 文本转为 Token,它不知道 Java。而:jackson-databind 是把 Token 转为 Java对象,序列化,反序列化,它知道 Java。
- 所以 Jackson3 把:ObjectReadContext,ObjectWriteContext 放到了解析器和序列化器两层之间。是给 Core "插上" 对象映射的能力。
- 可以用一个现实中的比喻来理解,假设 JSON 是一份英文说明书:
{
    "name":"Tom",
    "age":18
}
-
jackson-core就像一个识字的人,他能告诉你:"这里有一个对象、一个字段名name、一个字符串Tom、一个字段名age、一个数字18。" 但他不知道这些信息应该放到哪个 Java 类里。 -
jackson-databind则像一位装配工。他不仅能读懂说明书,还知道:"name要放到User.name,age要放到User.age,如果有@JsonProperty、@JsonFormat、自定义模块,也要按这些规则处理。" -
所以,对象映射的本质就是:根据一系列映射规则(反射、注解、模块、自定义序列化器等),自动完成 Java 对象和 JSON 之间的双向转换。 这也是为什么
JsonMapper比JsonFactory多了一整套ObjectReadContext、ObjectWriteContext——因为这些上下文保存的正是完成"对象映射"所需要的全部知识。 -
以后遇到一个需求,只要问自己一句:"我是在处理 JSON 文本,还是在处理 Java 对象?"
- 如果答案是 Java 对象(POJO、JsonNode、Map、List 等) → 用 JsonMapper。
- 如果答案是 JSON Token 流(自己调用 nextToken()、writeStartObject() 等)→ 可以直接用 JsonFactory。
回到目录
国产Web中间件
宝兰德中间件
- 控制台:
http://localhost:1900/console默认用户名密码:admin/B#2008_2108#es - 管理bes实例:
systemctl status|stop|start|restart bes-standard.service
命令行工具
- 命令行工具依赖
/opt/bes/bin/iastool工具,可以加入系统路径$PATH - 宝兰德部署只支持 war 包,不支持目录部署
- 停止宝蓝德实例命令:
iastool --user admin --password B#2008_2108#es --passport B#2008_2108#es stop --server - 启动宝蓝德实例命令:
iastool --user admin --password B#2008_2108#es --passport B#2008_2108#es start --server - 列出应用信息:
iastool --passport B#2008_2108#es list --application --verbose=true MyApp - 部署应用:
iastool --passport B#2008_2108#es deploy --name MyApp /path/to/MyApp.war - 解部署应用:
iastool --passport B#2008_2108#es undeploy MyApp - 停止应用:
iastool --passport B#2008_2108#es stop --application MyApp - 启动应用:
iastool --passport B#2008_2108#es start --application MyApp - 重启应用:
iastool --passport B#2008_2108#es stop --application MyApp && iastool --passport B#2008_2108#es start --application MyApp - 查看帮助信息:
iastool --help
中创中间件
- web控制台:
https://localhost:8060 - 启动中间件:
cd /opt/InforSuiteAS/as/bin && sh asadmin start-domain domain1 - 使用
sh asadmin start-domain domain1 -v可以查看详细启动错误信息
命令行部署
- 中创支持目录部署,命令行依赖于
/opt/InforSuiteAS/as/bin/asadmin脚本,可以在~/.bashrc设置别名
function asadmin(){
  if [[ -z /opt/InforSuiteAS/as/bin/asadmin ]]; then
    sh /opt/InforSuiteAS/as/bin/asadmin "$@"
  else
    echo "/opt/InforSuiteAS/as/bin/asadmin not exists!"
    exit 1
  fi
}
- 部署顺序
--deploymentorder越小越优先启动,默认 200 - 卸载应用:
asadmin --port 8060 undeploy --target server MyApp - 部署应用:
asadmin --port 8060 deploy --deploymentorder 200 --contextroot /MyApp /path/to/MyApp/ - 重部署:
asadmin --port 8060 redeploy --name MyApp --deploymentorder 200 --contextroot /MyApp /path/to/MyApp/ - 查看部署的应用:
asadmin list-applications - 查看帮助:
asadmin --port 8060 --help
相关配置
- 首次启动会创建一个 domain,类似于虚拟主机,在当前 domain 下部署的应用,其配置信息在
/opt/InforSuiteAS/as/domains/domain1/conf,核心是domain.xml - 重启实例本身会自动部署应用,如果需要重新部署可以清理缓存文件
rm -rf /opt/InforSuiteAS/as/domains/domain1/logs
rm -rf /opt/InforSuiteAS/as/domains/domain1/generated
rm -rf /opt/InforSuiteAS/as/domains/domain1/osgi-cache
- 修改
config/domain.xml,删除<applications>的内容,删除<application-ref ref="MyApp....
sed -i.bak -e '/<applications>/,/<\/applications>/d' -e '/<application-ref ref="[a-zA-Z]/d' /opt/InforSuiteAS/as/domains/domain1/config/domain.xml
sed -i '/<clusters><\/clusters>/a <applications><\/applications>' /opt/InforSuiteAS/as/domains/domain1/config/domain.xml
- 配置指定的 jdk 的几种方式
- 在
/opt/InforSuiteAS/as/config/asenv.conf配置AS_JAVA="/usr/java/jdk1.8.0_341-amd64" - 在
/opt/InforSuiteAS/as/domain/domain1/config/domain.xml中<java-config/>配置java-home:<java-config classpath-suffix="" debug-options="-agentlib:jdwp=transport=dt_socket,server=y,suspend=n,address=9009" java-home="/usr/java/jdk1.8.0_341-amd64" system-classpath=""> domain.xml优先级高于AS_JAVA
东方通中间件
- web控制台:
http://localhost:9060 - 东方通支持目录部署,其命令行工具依赖
/opt/TongWeb/bin/commandstool.sh,可以交互式运行,推荐将用户口令写在配置文件~/.asadminprefs:(用户名口令似乎是固定的cli/cli123.com)
cat > ~/.asadminprefs <<EOF
AS_ADMIN_user=cli
AS_ADMIN_password=cli123.com
EOF
# 设置别名,指定环境变量 TONGWEB_HOME,如果单独运行 ./commandstool.sh,必须在 /opt/TongWeb/bin 目录下
echo alias twtool=\'env TONGWEB_HOME=/opt/TongWeb /opt/TongWeb/bin/commandstool.sh'\' >> ~/.bashrc
- 部署应用:
twtool deploy --contextroot=/MyApp --applocation=/path/to/MyApp MyApp - 重部署:
twtool redeploy MyApp - 解部署:
twtool undeploy MyApp - 查看已部署应用:
twtool list-apps - 查看帮助信息:
twtool --help,在web控制台右上角也有用户手册 附录9 命令行使用说明