目录
- es 查询:
- terms:不分析,直接检索词项,用于类别,标签,布尔值等
- match:全文检索,不要求分词后的词项顺序
- match_phrase:全文检索,但要求词项的顺序
入门
-
双击 bin 下的
elasticsearch.bat启动 ES,9300 是 ES 集群间组件的通信端口,9200 是客户端访问端口,使用http://localhost:9200访问 -
RESTFul:REST 指的是一组架构约束条件和原则。满足这些约束条件和原则的应用程序或设计就是 RESTful。在服务端所有东西都表示为资源,使用不同的 HTTP 方法表示对资源的操作,增删改查对应的方法是
POST DELETE PUT GET,其他的方法还有HEAD OPTIONS。简单的理解就是,如果想要访问互联网上的资源,就必须向资源所在的服务器发出请求,请求体中必须包含资源的网络路径, 以及对资源进行的操作(增删改查)。 -
ES 是面向文档的数据库,里面的一个文档就是一条数据(虽然逻辑上称为文档,但实际还是由不同字段组合而成的,并不是直接存储一整个文档内容),与 Mysql 类比如下:
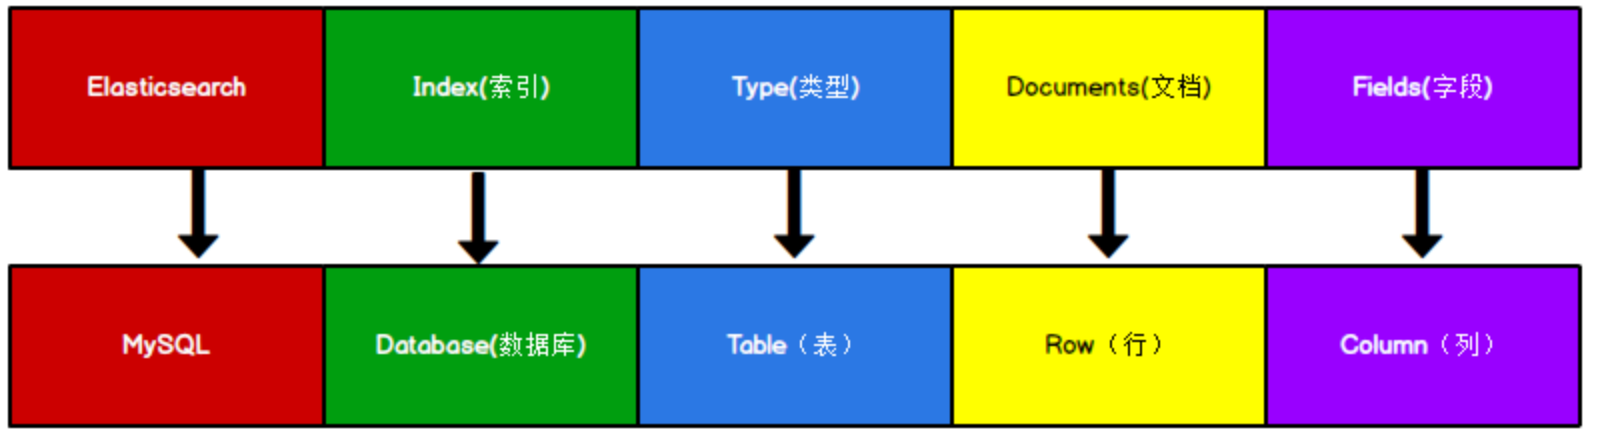
基础增删改查
- 创建索引:
PUT http://localhost:9200/shopping,查看日志在logs/elasticsearch.log,发送重复的请求会报错
{
    "acknowledged": true,//响应结果
    "shards_acknowledged": true,//分片结果
    "index": "shopping"//索引名称
}
- 查看所有索引:
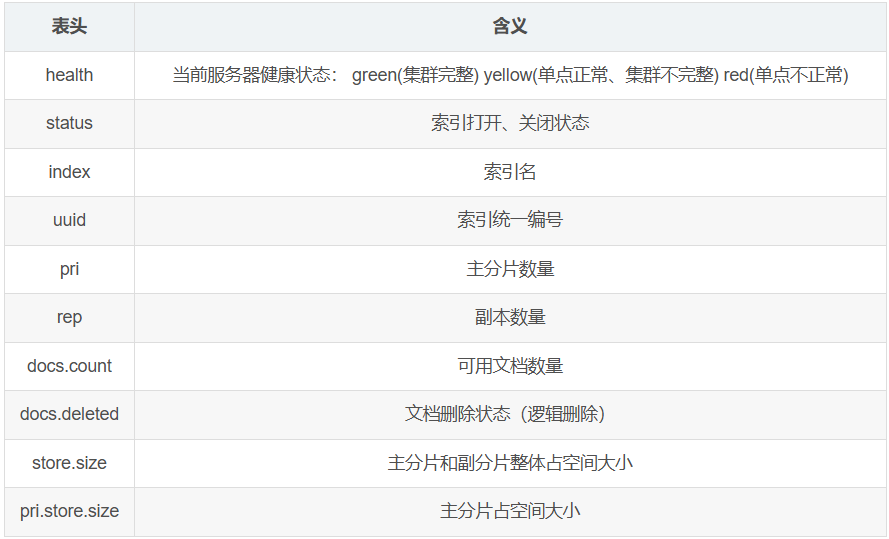
GET http://localhost:9200/_cat/indices?v,请求路径中的_cat表示查看的意思,indices表示索引,v表示输出各字段含义,所以整体含义就是查看当前 ES服务器中的所有索引
health status index    uuid                   pri rep docs.count docs.deleted store.size pri.store.size
yellow open   shopping IGEq6KTKR8-Zrk4tGM3PEw   1   1          0            0       208b           208b
- 查看单个索引:
GET http:localhost:9200/shopping,直接获取索引
{
    "shopping": { // 索引名
        "aliases": {},  // 别名
        "mappings": {},  // 映射:相当于表结构
        "settings": {  // 设置
            "index": {  // 设置-索引
                "creation_date": "1727847341912",  // 设置-索引-创建时间
                "number_of_shards": "1",  // 设置-索引-主分片数量
                "number_of_replicas": "1",  // 设置-索引-复制的文档数量
                "uuid": "IGEq6KTKR8-Zrk4tGM3PEw",  // 设置-索引-uuid
                "version": {  // 设置-索引-版本
                    "created": "7080099"
                },
                "provided_name": "shopping"  // 设置-索引-提供的名字
            }
        }
    }
}
- 删除索引:
DELETE http:localhost:9200/shopping
{
    "acknowledged": true
}
- 创建文档:
POST http:localhost:9200/shopping/_doc,JSON 内容:
{
    "title":"小米手机",
    "category":"小米",
    "images":"http://www.gulixueyuan.com/xm.jpg",
    "price":3999.00
}
- 输出如下,由于没有指定数据唯一性标识(ID),默认情况下, ES 服务器会随机生成一个。如果指定:
POST http:localhost:9200/shopping/_doc/1,返回结果中"_id": "1"
{
    "_index": "shopping",//索引
    "_type": "_doc",//类型-文档
    "_id": "ANQqsHgBaKNfVnMbhZYU",//唯一标识,可以类比为 MySQL 中的主键,随机生成
    "_version": 1,//版本
    "result": "created",//结果,这里的 create 表示创建成功
    "_shards": {//
        "total": 2,//分片 - 总数
        "successful": 1,//分片 - 成功
        "failed": 0//分片 - 失败
    },
    "_seq_no": 0,
    "_primary_term": 1
}
- 批量创建文档:
POST http://localhost:9200/_bulk,json 数据如下:
{  "index": {"_index": "shopping", "_id":"1"}}
{  "title": "小米手机",  "category": "小米",  "images": "http://www.gulixueyuan.com/xm.jpg",  "price": 1999}

{  "index": {"_index": "shopping", "_id":"2"}}
{  "title": "小米手机",  "category": "小米",  "images": "http://www.gulixueyuan.com/xm.jpg",  "price": 1999}
warning
- 添加文档时不指定主键,发送请求的方式必须为 POST,不能是 PUT,否则会发生错误
- 如果增加数据时明确数据主键,那么请求方式也可以为 PUT。
- 通过
_doc和_create两种 API 方式来创建文档,主要区别在于_doc可以不需要强制指定_id参数,_create必须指定_id参数;_doc在创建文档的时候,如果文档已存在,会先进行删除再创建。而_create则会直接报错,提示创建失败。 - 批量创建时,如果 url 中指定索引
http://localhost:9200/shopping/_bulk,则 json 中可以不指定索引{ "index": {} },(文档 id 是可选的) - 需要注意的是,每个 json 数据只能写在一行,且每个文档都必须换行,最后一个也是
- 主键查询:
GET http://localhost:9200/shopping/_doc/1,_source是返回的字段
{
    "_index": "shopping",
    "_type": "_doc",
    "_id": "1",
    "_version": 1,
    "_seq_no": 1,
    "_primary_term": 1,
    "found": true,
    "_source": {
        "title": "小米手机",
        "category": "小米",
        "images": "http://www.gulixueyuan.com/xm.jpg",
        "price": 3999.00
    }
}
- 查找不存在的内容,
GET http://localhost:9200/shopping/_doc/1001,返回结果如下:
{
    "_index": "shopping",
    "_type": "_doc",
    "_id": "1001",
    "found": false
}
- 全查询:查看索引下所有数据:
GET http://localhost:9200/shopping/_search
{
    "took": 32,
    "timed_out": false,
    "_shards": {
        "total": 1,
        "successful": 1,
        "skipped": 0,
        "failed": 0
    },
    "hits": {
        "total": {
            "value": 2,
            "relation": "eq"
        },
        "max_score": 1.0,
        "hits": [
            {
                "_index": "shopping",
                "_type": "_doc",
                "_id": "og3LS5IB1orlWxw6XjOX",
                "_score": 1.0,
                "_source": {
                    "title": "小米手机",
                    "category": "小米",
                    "images": "http://www.gulixueyuan.com/xm.jpg",
                    "price": 3999.00
                }
            },
            {
                "_index": "shopping",
                "_type": "_doc",
                "_id": "1",
                "_score": 1.0,
                "_source": {
                    "title": "小米手机",
                    "category": "小米",
                    "images": "http://www.gulixueyuan.com/xm.jpg",
                    "price": 3999.00
                }
            }
        ]
    }
}
- 全量修改:和新增文档一样,输入相同的 URL 地址请求,如果请求体变化,会将原有的数据内容覆盖,
POST http:localhost:9200/shopping/_doc/1,json 数据为:
{
    "title":"华为手机",
    "category":"华为",
    "images":"http://www.gulixueyuan.com/hw.jpg",
    "price":1999.00
}
- 输出如下:
{
    "_index": "shopping",
    "_type": "_doc",
    "_id": "1",
    "_version": 2, // 版本改变
    "result": "updated",//<-----------updated 表示数据被更新
    "_shards": {
        "total": 2,
        "successful": 1,
        "failed": 0
    },
    "_seq_no": 2,
    "_primary_term": 1
}
- 局部修改:只修改某一数据的局部信息,
POST http:localhost:9200/shopping/_update/1,json 数据为:
{
    "doc": {
        "title":"小米手机",
        "category":"小米"
    }
}
- 输出如下:
{
    "_index": "shopping",
    "_type": "_doc",
    "_id": "1",
    "_version": 3,  // 版本也跟着变
    "result": "updated",//<-----------updated 表示数据被更新
    "_shards": {
        "total": 2,
        "successful": 1,
        "failed": 0
    },
    "_seq_no": 3,
    "_primary_term": 1
}
- 删除文档:删除文档时不会立即从磁盘删除,而是标记为已删除(逻辑删除)
DELETE http://localhost:9200/shopping/_doc/1,返回结果
{
    "_index": "shopping",
    "_type": "_doc",
    "_id": "1",
    "_version": 4,
    "result": "deleted",//<---删除成功
    "_shards": {
        "total": 2,
        "successful": 1,
        "failed": 0
    },
    "_seq_no": 4,
    "_primary_term": 1
}
- 此时再次查询:
GET http://localhost:9200/shopping/_doc/1,查看是否删除成功
{
    "_index": "shopping",
    "_type": "_doc",
    "_id": "1",
    "found": false
}
查询
-
条件查询-URL 带参:查找 category 为小米的文档:
GET http://localhost:9200/shopping/_search?q=category:小米 -
条件查询-请求体带参:
GET http://localhost:9200/shopping/_search,json 数据如下:如果要查找所有文档内容,json 数据如下:
{
    "query":{
        "match":{ // 匹配
            "category":"小米"
        }
    }
}

// 查找所有文档
{
    "query":{
        "match_all":{}
    }
}
- 查询指定字段:
GET http://localhost:9200/shopping/_search,json 数据如下:
{
    "query":{
        "match_all":{}
    },
    "_source":["title"] // 返回 title 字段
}
- 分页查询:
GET http://localhost:9200/shopping/_search
{
    "query":{
        "match_all":{}
    },
    "from":0,
    "size":2
}
- 排序查询:
GET http://localhost:9200/shopping/_search
{
    "query":{
        "match_all":{}
    },
    "sort":{
        "price":{
            "order":"desc" // 或者 asc
        }
    }
}
- 多条件查询:查找价格为3999的小米手机,
GET http://localhost:9200/shopping/_search,must相当于数据库的and
{
    "query":{
        "bool":{
            "must":[ // 相当于 and
                {
                    "match":{
                        "category":"小米"
                    }
                },
                {
                    "match":{
                        "price":3999
                    }
                }
            ]
        }
    }
}
- 查询小米和华为的手机:
GET http://localhost:9200/shopping/_search,should相当于数据库中的or
{
    "query": {
        "bool": {
            "should": [ // 相当于 or
                {
                    "match": { // 相当于 =
                        "category": "小米"
                    }
                },
                {
                    "match": {
                        "category": "华为"
                    }
                }
            ]
        }
    }
}
- 范围查询:查找大于2000的小米和华为
{
    "query": {
        "bool": {
            "should": [ // 相当于 or
                {
                    "match": { // 相当于 =
                        "category": "小米"
                    }
                },
                {
                    "match": {
                        "category": "华为"
                    }
                }
            ],
            "filter": { // 过滤相当于 > < >= <=
                "range": {
                    "price": {
                        "gt": 1000
                    }
                }
            }
        }
    }
}
- 全文检索:能像搜索引擎那样,如品牌输入“小华”,返回结果带回品牌有“小米”和华为的,
GET http://localhost:9200/shopping/_search
{
    "query":{
        "match":{ // 匹配
            "category":"小华"
        }
    }
}
- 完全匹配:
{
    "query":{
        "match_phrase":{ // 匹配
            "category":"为"
        }
    }
}
- 高亮查询:
{
    "query":{
        "match_phrase":{ // 匹配
            "category":"为"
        }
    },
    "highlight":{
        "fields":{
            "category":{} // 高亮这个字段
        }
    }
}
- 输出结果:
"hits": [
            {
                "_index": "shopping",
                "_type": "_doc",
                "_id": "qA3-S5IB1orlWxw6JzOf",
                "_score": 0.6931471,
                "_source": {
                    "title": "华为手机",
                    "category": "华为",
                    "images": "http://www.gulixueyuan.com/xm.jpg",
                    "price": 1999
                },
                "highlight": {
                    "category": [
                        "华<em>为</em>" // 高亮一个 为 字
                    ]
                }
            },
- 聚合查询:
{
    "aggs":{ // 聚合操作
        "price_group":{ // 聚合的名称,聚合后的字段名
            "terms":{ // 分组计数,还有 avg, max, min, sum
                "field":"price" // 分组字段
            }
        }
    },
    "size":0 // 默认返回结果带原始数据,不想附带原始数据,设置 size 为 0
}
- 结果如下:
{
    "took": 7,
    "timed_out": false,
    "_shards": {
        "total": 1,
        "successful": 1,
        "skipped": 0,
        "failed": 0
    },
    "hits": {
        "total": {
            "value": 6,
            "relation": "eq"
        },
        "max_score": null,
        "hits": []
    },
    "aggregations": {
        "price_group": {
            "doc_count_error_upper_bound": 0,
            "sum_other_doc_count": 0,
            "buckets": [
                {
                    "key": 1999.0,
                    "doc_count": 5
                },
                {
                    "key": 3999.0,
                    "doc_count": 1
                }
            ]
        }
    }
}
映射
- 索引相当于数据库,索引库的映射相当于数据库的表结构,定义了 type (相当于一张表)下有哪些字段,字段的类型,约束等信息
- 创建索引:
PUT http://localhost:9200/user - 创建映射:
PUT http://localhost:9200/user/_mapping,json 数据:
{
    "properties":{
        "name":{
            "type":"text", // 字段类型
            "index": true
        },
        "sex":{
            "type":"keyword",
            "index":true
        },
        "tel":{
            "type":"keyword",
            "index":false // false 表示该字段不会建立倒排索引,无法用于全文检索,但仍可返回该字段
        }
    }
}
-
常见的字段类型
- 文本类型
text- 用于需要全文搜索的字段。Elasticsearch会对这些字段进行分析,即分词和规范化处理。keyword- 用于不需要分析的字段,适合精确匹配和排序。关键字字段不会被分词,而是作为一个整体存储。
- 数值类型
integer- 整数类型。long- 长整型。double- 双精度浮点型。float- 单精度浮点型。scaled_float- 可缩放的浮点类型,用于需要更高精度的数值存储。
- 日期类型
date- 日期类型,支持多种日期格式。
- 二进制类型
binary- 二进制数据类型,通常用于存储非文本数据(如图片、音频等)。
- 布尔类型
boolean- 布尔类型。
- 对象类型·
object- 用于嵌套的复杂数据结构。可以进一步定义子字段及其类型。
- 嵌套类型
nested- 用于存储嵌套的对象,这些对象可以独立索引并进行查询。
- 地理类型
geo_point- 用于地理坐标点的位置数据。geo_shape- 用于存储复杂的地理形状。
- 关键字类型
constant_keyword- 常量关键字,常用于标记字段,不进行分词处理,且值是固定的。
- 令牌计数类型
token_count- 用于统计字符串中的token数量。
- 直方图类型
histogram- 用于存储直方图数据。
- IP 类型
ip- 用于存储IP地址。
- 完成类型
completion- 用于自动补全功能的字段类型。
- 形状类型
shape- 用于存储几何形状数据,如多边形、线段等。
- 联合类型
join- 用于表示文档间的父子关系,通常用于聚合查询。
- 别名类型
alias- 字段别名,不占用存储空间,只是指向另一个字段。
- 扁平化类型
flattened- 用于存储嵌套的JSON数据,这些数据会被扁平化处理。
- 密集向量类型
dense_vector- 用于存储密集向量数据,适用于机器学习场景。
- 稀疏向量类型
sparse_vector- 用于存储稀疏向量数据。
- 文本类型
-
添加数据:
POST http://localhost:9200/user/_create/1001
{
    "name":"小米",
    "sex":"男的",
    "tel":"110"
}
- 查找含有“男”的数据:
GET http://localhost:9200/user/_search,查不到结果,因为sex是keword类型,存储的时候不会被分词,只有查询“男的”才能得到数据
{
    "query":{
        "match":{
            "sex":"男"
        }
    }
}
// 查询结果
{
    "took": 1,
    "timed_out": false,
    "_shards": {
        "total": 1,
        "successful": 1,
        "skipped": 0,
        "failed": 0
    },
    "hits": {
        "total": {
            "value": 0,
            "relation": "eq"
        },
        "max_score": null,
        "hits": []
    }
}
ES 环境
- 集群就是在多个服务器(节点)上部署相同的服务,共同持有整个数据,在逻辑上组成一个整体对外提供服务。一个 ES 集群有一个唯一的名字标识,默认是 elasticsearch,某个节点只能通过指定集群的名字来加入这个集群
- 节点也有唯一的标识名,默认是随机的漫威角色名,默认情况下,每个节点都会加入 elasticsearch 集群,即使只有一个节点
- 主节点:主节点负责创建索引、删除索引、分配分片、追踪集群中的节点状态等工作, 主节点负荷相对较轻, 客户端请求可以直接发往任何节点, 由对应节点负责分发和返回处理结果。
- 数据节点:数据节点负责数据的存储和CRUD等具体操作,数据节点对机器配置要求比较高、,首先需要有足够的磁盘空间来存储数据,其次数据操作对系统CPU、Memory和IO的性能消耗都很大。通常随着集群的扩大,需要增加更多的数据节点来提高可用性。
- 配置集群:设置
./config/elasticsearch.yml,详细的配置信息含义
#节点 1 的配置信息:
#集群名称,节点之间要保持一致
cluster.namemy-elasticsearch
#节点名称,集群内要唯一
node.namenode-1001
#该节点是否为候选主节点
node.mastertrue
#该节点是否为候选数据节点
node.datatrue
#节点绑定的 ip 地址或主机名
network.hostlocalhost
#设置存储数据的目录,使用全路径
path.data/path/to/data
#设置节点的日志目录
path.logs/path/to/logs
#http 端口,客户端使用的端口,如果在同一个服务器部署多个 es,则需要设置不同的值,多个服务器使用默认 9200 就可以,设置为 -1 表示禁用 http api
http.port1001
#tcp 监听端口,节点之间通信的端口
transport.tcp.port9301
#其他的节点地址,如何节点默认使用 9300 端口,则可以不写端口
discovery.seed_hosts"localhost:9301" "localhost:9302""localhost:9303"
discovery.zen.fd.ping_timeout1m
discovery.zen.fd.ping_retries5
#该设置的作用是在执行破坏性操作(例如删除索引)时需要提供名称,用于防止以外操作
action.destructive_requires_nametrue
#集群内的可以被选为主节点的节点列表
cluster.initial_master_nodes"node-1" "node-2""node-3"
#跨域配置
http.cors.enabledtrue
http.cors.allow-origin"*"
- 查看集群状态:
GET htpp://localhost:1001/_cluster/health,返回结果
{
    "cluster_name": "my-application",
    "status": "green",
    "timed_out": false,
    "number_of_nodes": 3,
    "number_of_data_nodes": 3,
    "active_primary_shards": 0,
    "active_shards": 0,
    "relocating_shards": 0,
    "initializing_shards": 0,
    "unassigned_shards": 0,
    "delayed_unassigned_shards": 0,
    "number_of_pending_tasks": 0,
    "number_of_in_flight_fetch": 0,
    "task_max_waiting_in_queue_millis": 0,
    "active_shards_percent_as_number": 100.0
}
-
status 字段指示着当前集群在总体上是否工作正常。它的三种颜色含义如下:
- green:所有的主分片和副本分片都正常运行。
- yellow:所有的主分片都正常运行,但不是所有的副本分片都正常运行。
- red:有主分片没能正常运行。
-
Linux 单节点部署 ES
# 解压缩
tar -zxvf elasticsearch-7.8.0-linux-x86_64.tar.gz -C /opt/module
# 改名
mv elasticsearch-7.8.0 es
- 创建用户:因为安全问题, Elasticsearch 不允许 root 用户直接运行,所以要创建新用户,在 root 用户中创建新用户。
useradd es #新增 es 用户
passwd es #为 es 用户设置密码
userdel -r es #如果错了,可以删除再加
chown -R es:es /opt/module/es #文件夹所有者
- 修改配置文件
1、修改 /opt/module/es/config/elasticsearch.yml 文件。
# 加入如下配置
cluster.name: elasticsearch
node.name: node-1
network.host: 0.0.0.0
http.port: 9200
cluster.initial_master_nodes: ["node-1"]

2、修改/etc/security/limits.conf
# 在文件末尾中增加下面内容
# 每个进程可以打开的文件数的限制
es soft nofile 65536
es hard nofile 65536

3、修改/etc/security/limits.d/20-nproc.conf
# 在文件末尾中增加下面内容
# 每个进程可以打开的文件数的限制
es soft nofile 65536
es hard nofile 65536
# 操作系统级别对每个用户创建的进程数的限制
* hard nproc 4096
# 注: * 带表 Linux 所有用户名称

4、修改/etc/sysctl.conf
# 在文件中增加下面内容
# 一个进程可以拥有的 VMA(虚拟内存区域)的数量,默认值为 65536
vm.max_map_count=655360

5、重新加载
sysctl -p
- 启动软件,使用 ES 用户启动
cd /opt/module/es/
#启动
bin/elasticsearch
#后台启动
bin/elasticsearch -d
- 关闭防火墙
#暂时关闭防火墙
systemctl stop firewalld
#永久关闭防火墙
systemctl enable firewalld.service #打开防火墙永久性生效,重启后不会复原
systemctl disable firewalld.service #关闭防火墙,永久性生效,重启后不会复原
- Linux 集群部署 ES,修改配置文件
# 加入如下配置
#集群名称
cluster.name: cluster-es
#节点名称, 每个节点的名称不能重复
node.name: node-1
#ip 地址, 每个节点的地址不能重复
network.host: linux1
#是不是有资格主节点
node.master: true
node.data: true
http.port: 9200
# head 插件需要这打开这两个配置
http.cors.allow-origin: "*"
http.cors.enabled: true
http.max_content_length: 200mb
#es7.x 之后新增的配置,初始化一个新的集群时需要此配置来选举 master
cluster.initial_master_nodes: ["node-1"]
#es7.x 之后新增的配置,节点发现
discovery.seed_hosts: ["linux1:9300","linux2:9300","linux3:9300"]
gateway.recover_after_nodes: 2
network.tcp.keep_alive: true
network.tcp.no_delay: true
transport.tcp.compress: true
#集群内同时启动的数据任务个数,默认是 2 个
cluster.routing.allocation.cluster_concurrent_rebalance: 16
#添加或删除节点及负载均衡时并发恢复的线程个数,默认 4 个
cluster.routing.allocation.node_concurrent_recoveries: 16
#初始化数据恢复时,并发恢复线程的个数,默认 4 个
cluster.routing.allocation.node_initial_primaries_recoveries: 16
进阶概念
- 索引 Index:一个索引就是一个拥有几分相似特征的文档的集合。类似数据库
- 类型 Type:一个类型是你的索引的一个逻辑上的分类/分区,通常,会为具有一组共同字段的文档定义一个类型。类似表。不同版本类型有变化:
5.x支持多中type;6.x只能有一种type;7.x默认不再支持索引类型,默认类型是_doc - 文档 Document:一个文档是一个可被索引的基础信息单元,也就是一条数据。
- 字段 Field:相当于是数据表的字段,对文档数据根据不同属性进行的分类标识。
- 映射 Mapping:mapping 是处理数据的方式和规则方面做一些限制,如:某个字段的数据类型、默认值、分析器、是否被索引等等。按着最优规则处理数据对性能提高很大,因此才需要建立映射
- 分片 Shards:一个索引可以存储超出单个节点硬件限制的大量数据。ES 提供了将索引划分成多份的能力,每一份就称之为分片。当你创建一个索引的时候,你可以指定你想要的分片的数量。每个分片本身也是一个功能完善并且独立的“索引”,这个“索引”可以被放置到集群中的任何节点上。分片很重要,主要有两方面的原因:
- 允许你水平分割 / 扩展你的内容容量。
- 允许你在分片之上进行分布式的、并行的操作,进而提高性能/吞吐量。
- 至于一个分片怎样分布,它的文档怎样聚合和搜索请求,是完全由 Elasticsearch 管理的,对于作为用户的你来说,这些都是透明的,无需过分关心。
tip
容易被混淆的概念是:Lucene 索引,我们在 Elasticsearch 称作 分片 。 一个Elasticsearch 索引是分片的集合。 当 Elasticsearch 在索引中搜索的时候, 他发送查询到每一个属于索引的分片(Lucene 索引),然后合并每个分片的结果到一个全局的结果集。
- 副本 Replicas:在一个网络 / 云的环境里,失败随时都可能发生,在某个分片/节点不知怎么的就处于离线状态,或者由于任何原因消失了,这种情况下,有一个故障转移机制是非常有用并且是强烈推荐的。为此目的, Elasticsearch 允许你创建分片的一份或多份拷贝,这些拷贝叫做复制分片(副本)。复制分片之所以重要,有两个主要原因:
- 在分片/节点失败的情况下,提供了高可用性。因为这个原因,注意到复制分片从不与原/主要(original/primary)分片置于同一节点上是非常重要的。
- 扩展你的搜索量/吞吐量,因为搜索可以在所有的副本上并行运行。
- 分配 Allocation:将分片分配给某个节点的过程,包括分配主分片或者副本。如果是副本,还包含从主分片复制数据的过程。这个过程是由 master 节点完成的。
文档分析
-
分析包含下面的过程:
- 将一块文本分成适合于倒排索引的独立的词条。
- 将这些词条统一化为标准格式以提高它们的“可搜索性”,或者recall。
-
分析器执行上面的工作。分析器实际上是将三个功能封装到了一个包里:
- 字符过滤器:首先,字符串按顺序通过每个字符过滤器 。他们的任务是在分词前整理字符串。一个字符过滤器可以用来去掉 HTML,或者将 & 转化成 and。
- 分词器:其次,字符串被分词器分为单个的词条。一个简单的分词器遇到空格和标点的时候,可能会将文本拆分成词条。
- Token 过滤器:最后,词条按顺序通过每个 token 过滤器 。这个过程可能会改变词条(例如,小写化Quick ),删除词条(例如, 像 a, and, the 等无用词),或者增加词条(例如,像 jump 和 leap 这种同义词)
-
测试分词器:
GET http://localhost:9200/_analyze
{
    "analyzer": "standard",// 标准分词器
    "text": "Text to analyze"
}
- 下载中文分词器 IK (https://github.com/medcl/elasticsearch-analysis-ik/releases/tag/v7.8.0),将解压后的后的文件夹放入 ES 根目录下的 plugins 目录下,重启 ES 即可使用。
- 测试:
GET http://localhost:9200/_analyze
{
    "text":"测试单词",
    "analyzer":"ik_max_word" // 会将文本做最细粒度的拆分。
  // 或者 "analyzer":"ik_smart" 会将文本做最粗粒度的拆分。
}
- 扩展词汇:将某个词“弗雷尔卓德”指定不进行分词,在 ES 目录下的 plugins 目录下的 ik 文件夹,创建
custom.dic文件,写入“弗雷尔卓德”。同时打开IKAnalyzer.cfg.xml文件,将新建的custom.dic配置其中。然后重启 ES。
<properties>
<comment>IK Analyzer 扩展配置</comment>
<!--用户可以在这里配置自己的扩展字典 -->
<entry key="ext_dict">custom.dic</entry>
<!--用户可以在这里配置自己的扩展停止词字典-->
<entry key="ext_stopwords"></entry>
<!--用户可以在这里配置远程扩展字典 -->
<!-- <entry key="remote_ext_dict">words_location</entry> -->
<!--用户可以在这里配置远程扩展停止词字典-->
<!-- <entry key="remote_ext_stopwords">words_location</entry> -->
</properties>
- 再次查询
GET http://localhost:9200/_analyze
{
    "text":"测试单词",
    "analyzer":"ik_max_word"
}
- 结果如下
{
    "tokens": [
        {
            "token": "弗雷尔卓德", // token 是实际存储到索引中的词条
            "start_offset": 0, // start_ offset 和 end_ offset 指明字符在原始字符串中的位置。
            "end_offset": 5,
            "type": "CN_WORD", // type 指明词条的类型
            "position": 0 // position 指明词条在原始文本中出现的位置。
        }
    ]
}
- 使用脚本对文档进行更新
POST demand/_update_by_query?conflicts=proceed
{
  "query": {
    "bool": {
      "must": [
        {
          "term": {
            "username": "flm"
          }
        }
      ]
    }
  },
  "script": {
    "source": "ctx._source.nickname = params.new_nickname",
    "lang": "painless",
    "params": {
      "new_nickname": "小奇迹"
    }
  }
}
source定义了一个简单的 Painless 脚本,它将文档中的nickname字段设置为params.new_nickname的值。params是一个键值对的对象,用于向脚本传递外部参数。本例中提供了一个名为new_nickname的参数,其值为 "张三"。lang指定了使用的脚本语言为 painless。ctx是 Painless 脚本中的上下文对象,它提供了对当前文档的访问和控制。ctx包含以下几个重要的属性和方法:ctx._source:这是文档的_source字段,表示文档的实际内容。你可以直接修改ctx._source中的字段来更新文档。例如,ctx._source.nickname = "张三"会将nickname字段的值更改为 "张三"。ctx._index:表示当前文档所属的索引名称。ctx._id:表示当前文档的 ID。ctx.op:控制文档的操作类型。它可以设置为以下值:noop:不做任何操作,保留原始文档。delete:删除当前文档。index:更新或创建文档(默认行为)。
note
painless 脚本只对查询出来的文档逐个运行脚本